使用追踪器Using the Tracker
29 steps
简介Overview
我们要在上一个练习的镜头里把人物面部单独抠出来。沿用前面学过的方法,可以先把面部隔离出来,再用 power window 限制作用范围。但有个小问题:人脸会移动,power window 也得跟着一起动才行。We want to isolate the subject’s face in the shot we just worked on. Using the techniques we explored in the previous section, we can isolate the face and limit the effect of the isolation with a power window. The slight issue you will have, though, is that the face moves and therefore we would need the power window to move with it as well.
- 添加第二个节点:在 node 02 上右键选择 Add Serial,或按 Option-S(macOS)/ Alt-S(Windows)。Add a second node by right-clicking node 02 and choosing Add Serial, or pressing Option-S (macOS) or Alt-S (Windows) on the keyboard.
- 再次选择 Qualifier 工具,并切换到 3D Qualifier。Select the Qualifier tool again and select the 3D Qualifier.
- 在 Sean 右眼正下方点击,然后向下拖到脖子一半的位置,再向上拖到脖子另一侧,把面部圈出来。画出来的路径应该像字母 J。Click just below Sean’s right eye and click and drag down on the face to halfway down the neck and drag up toward the other side of the neck to isolate the face. The path should look like a letter J.
- 点击视图左上角的
Highlight按钮,或按 Shift-H。Click the Highlight button at the top left corner of the view or press Shift-H on the keyboard. - 进入 Window 菜单,选择圆形窗口(circular window)。Go into the Window menu and select a circular window.
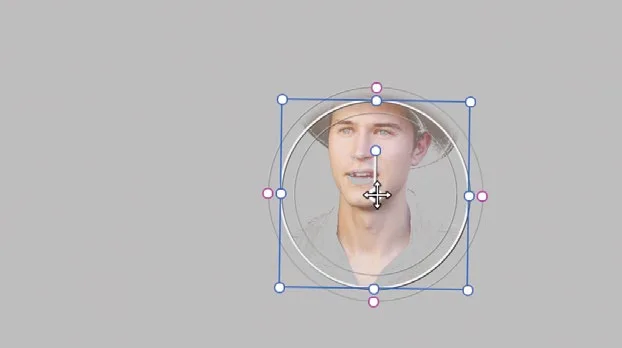
- 按住窗口中心的控制点拖动,让窗口与人物下巴齐平。Click and drag the center of the window until it sits level with the subject’s chin.
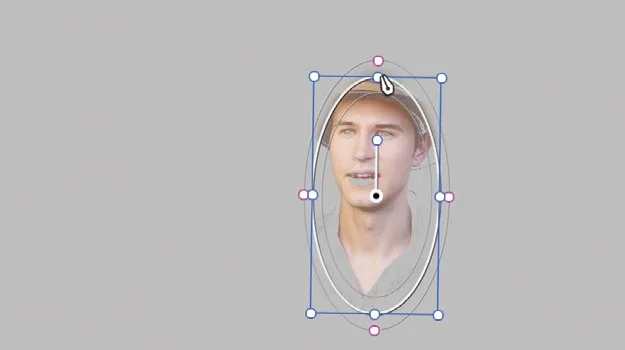
- 拖动左侧或右侧的控制点,把窗口收窄,让范围更集中在面部。Click and drag either the left or right side control point to narrow the window to focus more on the subject’s face.
- 拖动顶部的控制点,确保把耳朵也包进来。Click and drag the top control point just to ensure that you get the subject’s ear in.
- 点击屏幕上的
Overlay按钮将其关闭,把窗口隐藏。Turn off the window by clicking the onscreenOverlaybutton to off.
TIP · 提示按 Shift-`(反引号)可以隐藏所有屏幕 overlay…
按 Shift-`(反引号)可以隐藏所有屏幕 overlay。You can press Shift-` (grave accent) to hide the onscreen overlays.
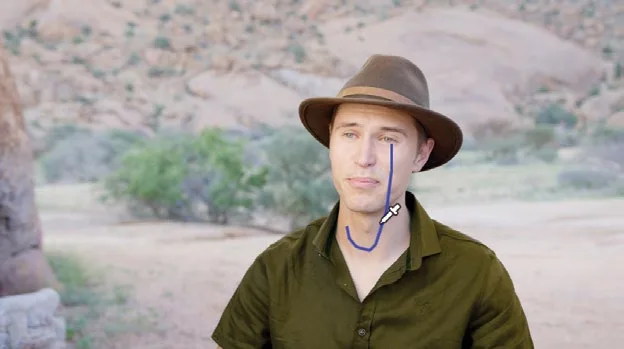
现在选区已经很不错了,但 qualifier 还需要再清理一下。You now have a pretty good selection; however, the qualifier needs tidying up again.
- 选中 qualifier(限定器),将 Clean Black(清除黑场)参数向右拖到约 5,直到衬衫上的噪点消失。Select the qualifier and click and drag the Clean Black parameter to the right to around 5 or until the additional noise that we had in the shirt disappears.
- 重新打开
Qualifier窗口,点击 Picker Add(吸管添加)按钮,在嘴唇上拖动,确保嘴唇被纳入选区。Go back into the Qualifier window and click thePicker Addbutton. Drag over the lips to ensure they are part of the selection.
我们想让主体的皮肤看起来更暖,但更好的做法是把背景调冷。We want to make the subject’s skin appear warmer, but a good way to do this is to cool the background.
Sean 转头时,窗口并没有跟着移动,所以需要让窗口追踪他的动作。As Sean now moves his head, the window does not move with him, so we need the window to track his movement.
- 在工具栏的中央面板中,选择 Tracker(追踪器)工具。In the toolbar center palettes, select the Tracker tool.
- 确保播放头停在第一帧,然后点击 Track Forward(向前追踪)按钮。Ensure that the playhead is over the first frame and then click the
Track Forwardbutton.
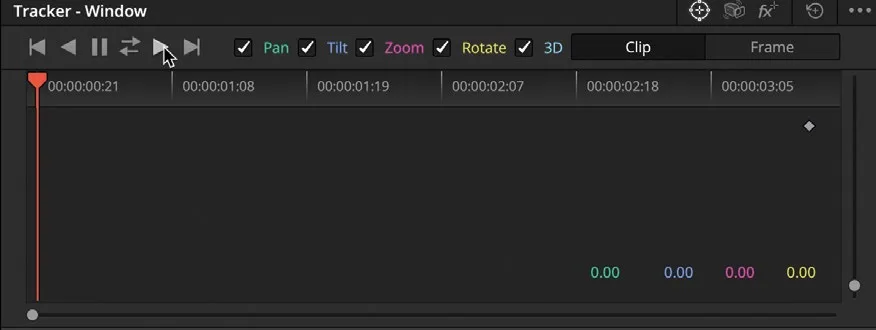
窗口会跟随 Sean 的面部一起移动,继续只框选你限定过的肤色区域。The window will move along with Sean’s face, ensuring the window still isolates the skin tone you qualified.
- 在 Node Editor 中选中 03 号节点,右键点击,选择
Add Node > Add Outside,或按 Option-O(macOS)/ Alt-O(Windows)。With node 03 selected in the Node Editor, right-click it and choose Add Node > Add Outside or press Option-O (macOS) or Alt-O (Windows). - 把 Gamma 调色控制点向蓝色方向拖动,让背景看起来更冷一些。Drag the Gamma color control point toward blue to make the background look a little colder.
- 将 Saturation(饱和度)控制向左拖动,把背景饱和度略微降到约 40,避免蓝得过头。Drag the saturation control to the left and drop the saturation of the background slightly to around 40 to ensure that it is not too blue.
现在可以看到,Sean 的皮肤显得更暖了——其实你并没有改动限定区域,而是把背景调冷,骗过眼睛,让人以为肤色发生了变化。As you can now see, Sean’s skin looks warmer because you changed the background to look cooler, tricking the eye into thinking there has been a change to our qualified area when there actually hasn’t.
TIP · 提示如果想让肤色显得更暖,回到上一个节点,用 Gamma 控制往画面里再加一点橙色。DaVinci Resolve 中还有一…
如果想让肤色显得更暖,回到上一个节点,用 Gamma 控制往画面里再加一点橙色。DaVinci Resolve 中还有一种叫 Vectorscope(矢量示波器)的视频示波器,能在调肤色时帮上忙。更多内容可参考 Daria Fissoun 所著《The Colorist's Guide to DaVinci Resolve 20》。If you want the skin tone to look still warmer, go back to the previous node and, using the Gamma control, add more orange to the shot. There is also a video scope called the Vectorscope that can help you when grading skin tones. For more information, refer to the book The Colorist’s Guide to DaVinci Resolve 20, by Daria Fissoun.
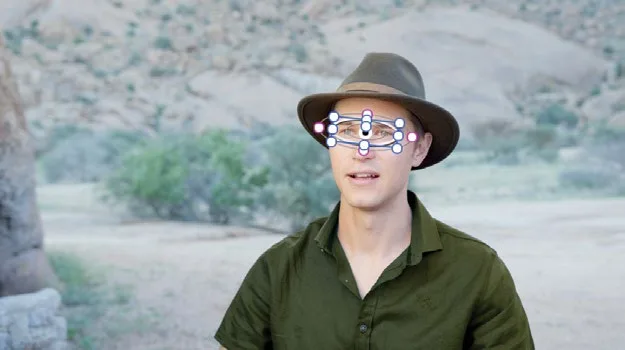
这个镜头还需要再做一处调整。眼睛通常是人物镜头中的视觉焦点,我们可以用 Power Window 配合 Tracker 跟踪,让眼睛看起来更锐利,从而进一步提升画面效果。There is one more adjustment required for this shot. Since the eyes are typically the focal point for most shots of people, we can further enhance this shot by simulating the eyes to look sharper, using a window and tracking.
- 点击 Viewer 左下角的
Onscreen Overlay按钮,从下拉菜单中选择 Window,显示窗口轮廓。Click the Onscreen Overlay button in the viewer’s lower left and choose Window from the dropdown menu to show the window outline. - 确认画面已停在镜头的第一帧。Make sure you are on the first frame of the shot.
- 用之前同样的方法再添加一个 serial 节点。Add another serial node in the way you used previously.
- 在中央调色面板中,点击 Windows 图标。In the central palettes, click the Windows icon.

我们继续用圆形窗口聚焦在人物的眼睛上。We’ll again use a circle window to focus on his eyes.
- 在 Windows 调色板中,点击圆形窗口。In the windows palette, click the circle window.
- 在 Viewer 中把圆形拖到人物眼睛上,让圆心落在鼻梁处。In the viewer, drag the circle over his eyes, so the center is on the bridge of his nose.
- 用白色顶部、底部和侧边控制点把窗口调整为更小、更扁的椭圆形,覆盖住眼睛;再用 anchor point 控制点让窗口角度与眼睛倾斜方向一致。Use the white top, bottom, and side handles to create a smaller, more oval shape covering his eyes. Use the anchor point handle to align the window with the angle of the eyes.
- 在 Windows 调色板中把 Soft 1 调到约 7.5,增加边缘柔化程度。Use the Soft 1 control in the windows palette to increase the softness to around 7.5.
- 切到 Tracker 调色板。Select the tracker palette.
- 点击 track
Forward按钮开始向前跟踪。Click the track Forward button.
接下来用这个窗口来锐化眼睛。Now we’ll use this window to sharpen the eyes.
- 在主控件中,把 Mid/Detail 向右拖到大约 75.00。这项调整通常叫做局部对比度(local contrast)或 clarity(清晰度),能让眼睛看起来更锐利。In the primary controls, drag the Mid/Detail to the right to around 75.00. This is often referred to as local contrast or clarity to give the eyes a sharper appearance.
NOTE · 注意提示:Midtone Detail(中调细节)并不等同于锐化(sharpening)。它只是调整画面中调区域的对比度,让…
提示:Midtone Detail(中调细节)并不等同于锐化(sharpening)。它只是调整画面中调区域的对比度,让人产生画面被锐化的感觉。Midtone detail is not the same as sharpening. It simply adjusts contrast in the midtone regions of the image, giving the impression that the image is being sharpened.
- 点击检视器左下角的
Onscreen Overlay按钮,在下拉菜单中选择 Off,或按 Shift-` 键,隐藏检视器中的窗口轮廓。Click the Onscreen Overlay button in the viewer’s lower left and choose Off from the dropdown menu or press Shift-` to hide the window outline in the viewer. - 按 Command-D(macOS)或 Ctrl-D(Windows)禁用 Eyes 节点,再按一次同样的快捷键重新启用,对比调整前后的效果。Press Command-D (macOS) or Ctrl-D (Windows) to disable the Eyes node, and then press the keyboard command again to enable it and compare the adjustment.
眼部补光前(左)与眼部补光后(右)。Before eye light (left) and after eye light (right).
Tracker(追踪器)是一个常用工具,主要用于为二级调色追踪窗口(Power Window)。虽然使用起来很简单,但它是一个非常强大的调色面板,能胜任很多任务。The tracker is a commonly used tool, most often when tracking windows for secondary color corrections. As simple as it is to use, it is a very advanced palette that can handle many tasks.
本卡术语Terms in this card
覆盖Overwrite 播放头Playhead 对比度Contrast Gamma(中间调)Gamma 饱和度Saturation 示波器Scopes 窗口Power Window 限定器Qualifier 二级调色Secondary Correction 跟踪器Tracker 调色Grade 静帧Still 节点Node
相关知识卡Related Cards
矢量示波器Vectorscope 视频示波器Video Scopes 限定器Qualifier 二级调色Secondary Color Correction 跟踪器Tracker 节点编辑器Node Editor