用 Qualifier(限定器)选取区域Selecting Areas with the Qualifier
16 steps
简介Overview
Qualifier 调色板是另一种用于二级调色中隔离特定颜色的方式。与 HSL Curves 或 Color Warper 相比,Qualifier 更加精细,可以通过色相、亮度和饱和度三种维度来选取颜色。这种细致的控制能力,即使画面中存在与目标物体颜色相近的元素,也能让你获得干净的隔离遮罩(matte)。The qualifier palette is another method of isolating a color for secondary color corrections. Compared to the HSL curves or Color Warper, the qualifier is a more sophisticated palette that includes several ways to select a color using hue, luminance, and saturation. This detailed level of control enables you to get a clean isolation, or matte, of objects even when other elements in the shot are of a similar color.
TIP · 提示NOTE:Qualifier 仅用于创建遮罩,本身并不是调色工具。只有当你在调色面板中开始做调整时,才能看到它产生的效果…
NOTE:Qualifier 仅用于创建遮罩,本身并不是调色工具。只有当你在调色面板中开始做调整时,才能看到它产生的效果。Qualifiers are used only as a method of creating a matte. They are not color-grading tools themselves, and you only start to see their effects when you begin adjustments in the color-grading palettes.
- 在时间线上选中第 10 个缩略图。Select thumbnail 10 in the timeline.
这就是之前课程中调整过的采访镜头,现在需要进一步精修。This is the interview shot we adjusted in an earlier lesson, but it now needs refining.
Qualifier 非常适合隔离特定颜色,因为它的控制项会通过色相、饱和度和亮度层层缩小选取范围。使用方法与 chroma keyer 类似:用 Eyedropper 在你感兴趣的区域上点击,所选区域就是要被调整的部分。在这个镜头中,制片人认为 Sean 的蓝色衬衫与画面整体不协调,希望把它改成绿色。The qualifier is extremely useful for isolating specific colors since the controls narrow down the selection using hue, saturation, and luminance. You begin using the qualifier much like you would a chroma keyer. Using an Eyedropper, you click over an area of interest. The area you select is what you want to be adjusted. In this case, the producers feel Sean’s blue shirt doesn’t match the rest of the shot and would prefer it to be green.
Qualifier 有多种类型。这里将使用 3D qualifier,因为它可以直接拖拽完成选取。There are several different types of qualifiers. In this case, you’ll use the 3D qualifier, so you can simply drag on your selection.
- 在中间窗口的工具栏中,点击 Qualifier 图标。In the middle window toolbar, click the Qualifier icon.
- 在
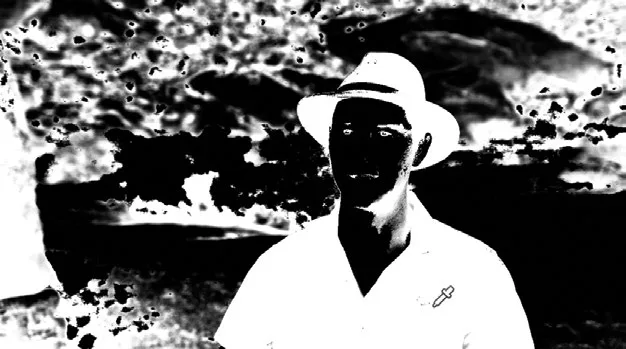
Qualifier窗口的右上角,点击第四个按钮——3D Qualifier 工具。In the top right corner of theQualifierwindow, click on the fourth button, which is the 3D Qualifier tool. - 在 Viewer 中,从蓝色衬衫左侧稍上方的位置开始按下并拖拽。拖拽时,画面会变成黑白:白色区域为你的选区(key),黑色区域会被排除在外。一直拖到整件衬衫都变成白色为止。In the viewer, click and drag from just above the left of the blue shirt. When you draw, the image will turn black and white. The white area will be your selection, or key, and the black area will be excluded from the selection. Continue to draw the line until the shirt is all white.
TIP · 提示NOTE:在这个阶段不必追求完美的选区,只需确保你所要调整的区域大部分已被纳入 Qualifier 即可…
NOTE:在这个阶段不必追求完美的选区,只需确保你所要调整的区域大部分已被纳入 Qualifier 即可。At this stage, you are not trying to achieve a perfect selection; you just want to ensure that you have included a large portion of the area you are trying to adjust in your qualifier.
松开鼠标后,Viewer 会恢复正常显示,但会留下一条蓝色线,标示出你刚才在画面中绘制的选区。Once you have finished dragging the selection, the viewer will return to normal but will show a blue line that shows the selection that you drew in the viewer.
下一步是对选区进行细化和清理。首先要把 viewer 的输出切换为显示选区。Your next step will be to refine and clean up your selection. To do so, you must first change the viewer’s output to show your selection.
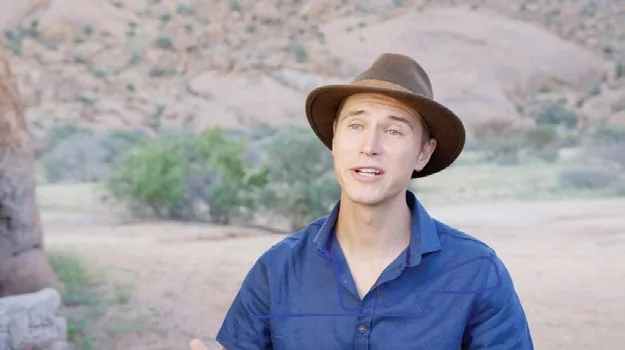
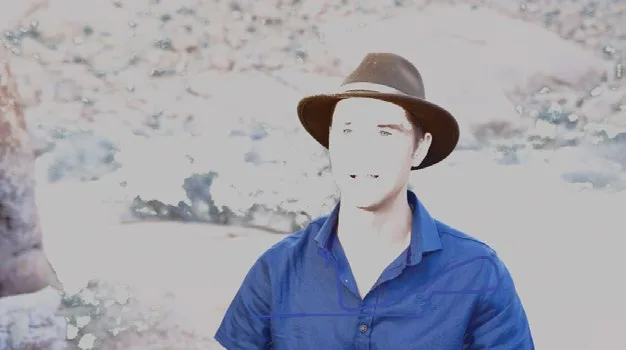
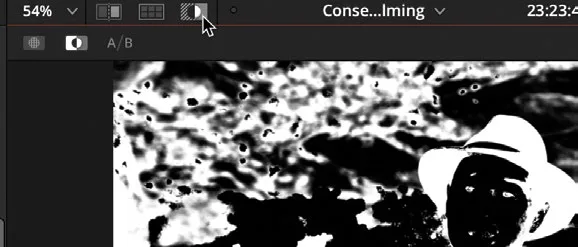
- 在 viewer 左上角点击 Highlight 图标,或按 Shift-H。In the upper left corner of the viewer, click the Highlight icon or press Shift-H.
此时选中的像素保持原色,未选中的像素变为灰色。目标是让图像尽量变灰,只保留衬衫本身的颜色。You are now seeing the pixels you selected against gray pixels that are not selected. The goal is to make as much of the image gray while the shirt remains its natural color.
选区已经不错,但可能还需要稍作清理。Our selection is pretty good but it might just need some cleaning up.
- 在 Highlight 仍开启的情况下,点击 viewer 左上角的 Black And White 按钮,图像会回到黑白高亮显示状态。With the Highlight tool still turned on, click the Black And White button at the top left corner of the viewer and your image will go back to the black-and-white highlight.
尽量消除这些杂点,让观众察觉不到选区的存在。You want to smooth out this noise as much as possible so the selection goes unnoticed by an audience.
NOTE · 注意Qualifier 工具的选区质量既取决于素材本身,也取决于工具。使用 H.264 这类高压缩编码时,可供 qualif…
Qualifier 工具的选区质量既取决于素材本身,也取决于工具。使用 H.264 这类高压缩编码时,可供 qualifier 使用的颜色信息有限,选区容易出现不均匀的情况;而使用 Blackmagic RAW 这类高质量素材时,由于颜色信息更丰富,选区也会更精细。The quality of the selection when using the Qualifier tool can depend on your footage as well as the tool itself. When using heavily compressed files, such as the H.264 codec, the qualifier does not have much color information to work with, leading to uneven selections. Using higher-end files such as Blackmagic RAW will get you more refined selections since there is much more color information to work with and therefore select.
- 放大到图像的右侧。Zoom in to the right side of the image.
- 播放片段,可能会在衬衫上看到轻微的杂点,呈现为细小的黑色斑点。Play the clip, and you might see slight areas of noise in the shirt that show up as slight specks of black.
- 在
Qualifier窗口右侧的 Matte Finesse 工具中,将 Clean White 参数向右拖动到约 0.7,即可清除选区中的杂点,衬衫也变成纯白色。In the Matte Finesse tools on the right side of theQualifierwindow, click and drag right on the Clean White parameter until it reaches approximately 0.7. This cleans up the noise that was in our selection, and the shirt now looks solid white.
TIP · 提示Clean 和 Blur 控件不要调得过大,否则选取区域会重新渗入未选中的部分…
Clean 和 Blur 控件不要调得过大,否则选取区域会重新渗入未选中的部分。Don’t go too far with the clean and blur controls or your qualified area can begin to bleed back into the non-selected area.
- 点击 viewer 左上角的
Highlight按钮,关闭高亮显示。Turn off the highlight by clicking theHighlightbutton at the top left corner of the viewer.
- 按 Z 键,把图像重新适配到窗口大小。Press Z on the keyboard to make sure the image is fitted back to the window.
- 为了避免蓝色路径在
Qualifier窗口里干扰视线,关掉 Show Paths 选项。To prevent the blue path from being distracting in theQualifierwindow, turn off the Show Paths option. - 在左侧窗口的主控件中,点按并向右拖动 Hue 控件,把 Sean 衬衫的颜色从蓝改成接近橄榄色。In the primary controls in the left window, click and drag the Hue control to the right and change the color of Sean’s shirt from blue to almost olive.
- 向左拖动 Offset 主滚轮,降低衬衫的亮度。Drag the Offset master wheel to the left to drop the brightness of the shirt.
衬衫颜色还是偏浓了一点。The shirt still has a little too much color in it.
- 向左拖动 Sat 控件,数值大约停在 30,衬衫看起来就不那么鲜艳了。Click and drag the Sat control to the left until it sits around 30 and the shirt looks less vibrant.
通过 Qualifier,我们利用图像中的色相、饱和度和亮度信息,精确地分离出了特定区域。这种方式既能改变物体颜色、调整局部色调的浓淡,也能简单地把选取范围调亮或调暗。Qualifier 对选区的控制非常精准。不过从画面上看,衬衫虽然改对了,但调整已经明显影响了画面其他部分——这个可以再修。Using the qualifier, you have used the hue, saturation, and luminance information in the image to isolate a very specific area. Using the qualifier in this way allows you to change the color of objects or dial specific hues back into a certain area or simply make selections brighter or darker. The qualifier very precisely controls what you select in an image. You can see from our image, however, that while the shirt looks correct, our adjustments have had a nasty effect on the rest of the shot. However, that can be fixed.

本卡术语Terms in this card
时间线Timeline 编码器Codec H.264H.264 曲线Curves 偏移Offset 饱和度Saturation 色彩扭曲器Color Warper HSL 曲线HSL Curves 窗口Power Window 限定器Qualifier 二级调色Secondary Correction 调色Grade 静帧Still 键盘快捷键Keyboard Shortcuts 模糊Blur 节点Node
相关知识卡Related Cards
时间线Timeline HSL 曲线HSL Curves 遮罩微调Matte Finesse 限定器Qualifier 二级调色Secondary Color Correction