认识 Color页面布局Exploring the Color Page Interface
9 steps
简介Overview
本节练习会教你如何对片段做色彩调整,修正过曝、低对比度、白平衡不准等常见问题。The exercises in this lesson will teach you how to make color adjustments on clips to correct common issues such as overexposure, low contrast, and incorrect white balance.
以上校正以及调色创作都在 DaVinci Resolve 的 Color页面中完成。我们先来看看 Color页面的布局。All these corrections, along with the creative process of color grading, take place within the color page in DaVinci Resolve. Let’s start by examining the color page layout.
- 打开 DaVinci Resolve,进入
Project Manager窗口。Open DaVinci Resolve to theProject Managerwindow.
在第 4–6 课中,你会用一个关于南非 Conservation Film Company 的纪录片来学习调色流程。你用到的工程文件是用 DaVinci Resolve 打包的 archive(归档工程)。归档工程是自包含的,所有素材都包含在内,只需恢复归档,工程和素材链接就会一起就位。In Lessons 4–6, you’ll learn a color-grading workflow using a documentary about the Conservation Film Company in South Africa. The project you will use was archived using DaVinci Resolve. An archive is a self-contained project that includes all its media. All you need to do is restore the archive, and the project will be available with all the media already linked.
- 在
Project Manager窗口中右键单击,选择 Restore Project Archive。Right-click in theProject Managerwindow and choose Restore Project Archive. - 定位到 R20 Beginner Guide lessons > Lesson 4,选中 Conservation.dra 文件夹,点击 Open。Navigate to R20 Beginner Guide lessons > Lesson 4. Select the Conservation.dra folder and click Open.
- 在 Project Manager 中打开 Conservation Film Company 工程,然后进入
Edit页面的 Timelines 智能柜(smart bin),双击 Conservation Intro 加载该时间线。In the Project Manager, open the Conservation Film Company project, and then from the edit page Timelines bin, double-click Conservation Intro to load the timeline.
这条时间线只有五个片段,全部由 Blackmagic Camera 拍摄。This timeline has only five clips. All the clips are from a Blackmagic Camera.
DaVinci Resolve 最大的优势之一是剪辑与调色完全集成在同一应用中,只需一键即可在两者之间切换。One of the best aspects of DaVinci Resolve is that editing and color grading are completely integrated into a single application, so you can easily move between the two with a single click.
- 在
DaVinci Resolve窗口底部,点击Color按钮进入Color页面。At the bottom of theDaVinci Resolvewindow, click theColorbutton to go to the color page.
NOTE · 注意注意:如果你的界面布局与下方截图不一致,请进入 Workspace 菜单,选择 Reset UI Layout…
注意:如果你的界面布局与下方截图不一致,请进入 Workspace 菜单,选择 Reset UI Layout。If your UI layout does not look like the image below, go into the Workspace menu and choose the Reset UI Layout option.
Gallery(画廊)存放可应用到时间线其他片段的已保存调色版本;Viewer(监视器)显示当前播放头位置的画面;Node Editor(节点编辑器)用来连接色彩校正、调整和特效,打造独特风格。The gallery includes saved The viewer shows the The Node Editor connects adjustments that you can frame at the playhead’s color corrections, image copy to other clips in current position adjustments, and effects the timeline. in the timeline. to create unique looks.
左侧调色板包含色彩、对比度、RAW 图像处理等主要调整工具;中间调色板提供 Curves、Keyframe窗口、Tracking 和 Keying 等控制;右下区域显示 Keyframes Editor、Scopes 或元数据信息。The left palettes contain The center palettes The lower right area may primary adjustments for provide access to curves, display the Keyframes color, contrast, and RAW windows, tracking, Editor, scopes, or a image processing. and keying controls. metadata display.
时间线分为缩略图和 mini-timeline 两部分。The timeline is divided into thumbnails and a mini-timeline.
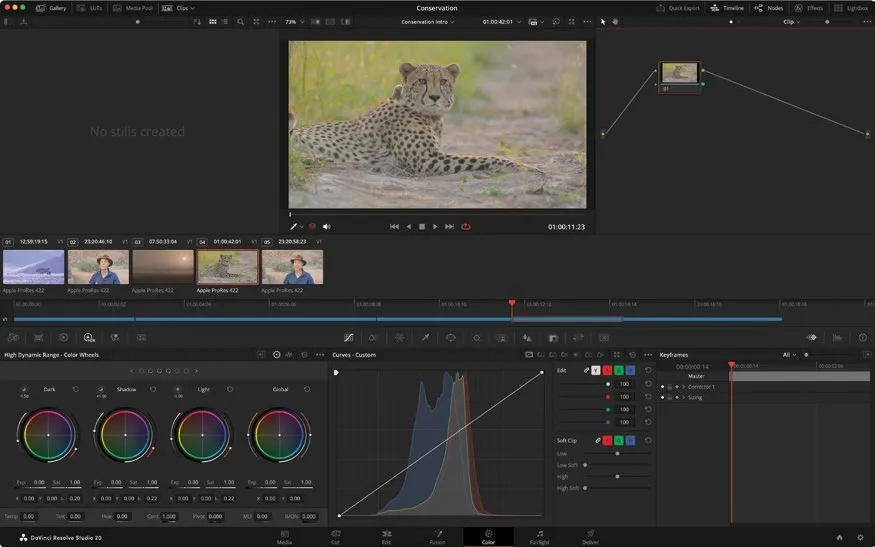
NOTE · 注意注意:当电脑显示器分辨率低于 1920 x 1080 时,左右两侧面板和按钮会合并,Timeline 窗口下方只会显示两…
注意:当电脑显示器分辨率低于 1920 x 1080 时,左右两侧面板和按钮会合并,Timeline窗口下方只会显示两个窗口。When you’re using DaVinci Resolve on a computer display with a resolution lower than 1920 x 1080, the left and center panels and buttons might consolidate and the interface will just have two windows below the Timeline window.
切换到 Color页面时,剪辑时间线上的播放头位置会保留为 Color页面时间线上的位置。Color页面不会修改任何剪辑点或转场,只是提供更适合调色的时间线查看方式。When you switch to the color page, the playhead’s position from the editing timeline remains the playhead’s position in the color page timeline. The color page does not change or alter any cuts or transitions; it just provides a way of looking at your timeline that’s more appropriate for color correction.
- 点击第 02 号缩略图,即时间线上的第二个片段。Click thumbnail number 02, the second clip in the timeline.
选中的缩略图会出现橙色边框,播放头跳转到该片段的第一帧。An orange outline appears around the selected thumbnail, and the playhead jumps to the first frame of that clip.
- 在缩略图下方,双击 Apple ProRes 422 HQ 名称,切换为显示片段名称。Below the thumbnail, double-click the Apple ProRes 422 HQ name to switch to viewing clip names.
缩略图下方的 mini-timeline 用细条表示每个片段,宽度与片段时长成比例。与 Cut页面一样,mini-timeline 会显示时间线上的所有片段。The mini-timeline below the thumbnails displays thin bars to represent each clip. A bar’s width is proportional to a clip’s duration. Like the cut page, the mini-timeline shows all the clips in a timeline.
- 按下 Spacebar,播放头开始沿时间线播放。Press the Spacebar, and the playhead will begin to play through the timeline.
让时间线持续播放,可以看到橙色高亮在片段之间跳转,无论在时间线哪个位置,当前查看的始终是被选中的那个片段。If you leave the timeline playing, you’ll notice that the orange highlight around the thumbnail will jump from clip to clip, so no matter where you are in the timeline, the clip you’re looking at will always be the one selected.
- 再次按下 Spacebar 停止播放。Press the Spacebar again to stop playback.
TIP · 提示注意:如果某条轨道在 Edit 页面被禁用,它在 Color 页面的 mini-timeline 中会显示为灰暗状态…
注意:如果某条轨道在 Edit页面被禁用,它在 Color页面的 mini-timeline 中会显示为灰暗状态。If a track is disabled in the edit page, it will be dimmed in the color page’s mini-timeline.
掌握了 Color页面的基本布局后,就可以开始做调色调整了。Now that you have a basic understanding of the color page layout, you’re ready to make some adjustments.
本卡术语Terms in this card
媒体夹Bin 项目管理器Project Manager 时间线Timeline 归档Archive ProResProRes 分辨率Resolution 编辑页Edit page 关键帧Keyframe 播放头Playhead 转场Transition 调色页Color page 对比度Contrast 曲线Curves 示波器Scopes 白平衡White Balance 窗口Power Window 调色Grade 元数据Metadata 合并Merge 节点Node