设置合成节点Setting Up Composite Nodes
14 steps
简介Overview
此时你应该已经掌握了 Fusion 的基础知识。接下来的练习会进一步探索更多工具,学习更高效地操作节点与 Viewer。这次练习是屏幕替换,并引入新的合成技法。要把屏幕内容合成进另一张画面,需要匹配透视、反射、景深、噪点、色彩一致性等视觉合成中的关键要素。By now, you should have a good understanding of the basics of Fusion. In this next exercise, you will explore more tools and learn how to navigate nodes and viewers more effectively. This second exercise involves a screen replacement and the introduction of new techniques. To integrate the screen content into another image, you’ll need to match its perspective, reflections, depth of field, noise, color consistency, and other essential aspects of visual effects compositing.
练习素材来自剧情长片《Machine for the Aura》,由 Ana Monserrat 和 Nahuel Srnec 执导,使用 Blackmagic Pocket Cinema Camera 4K 拍摄,先后在华沙国际电影节首映并入围北京国际电影节竞赛单元。关于本片后期工作流程的完整介绍可在 Blackmagic Design 官网阅读:You’ll work with footage from the feature film Machine for the Aura, directed by Ana Monserrat and Nahuel Srnec. The film was shot on a Blackmagic Pocket Cinema Camera 4K, premiered at the Warsaw International Film Festival, and later screened in competition at the Beijing International Film Festival. You can read a full article about its post- production workflow on the official Blackmagic Design website:
https//www.blackmagicdesign.com/media/release/20211221-02https//www.blackmagicdesign.com/media/release/20211221-02
练习中使用的并非原始摄影机文件,而是经过转码的代理版本:分辨率更低、位深更浅、文件更小,并采用了不同的色彩空间与 gamma 设置,以降低系统负载。You won’t be working with the original camera files but with a proxy version in a different format, with a smaller resolution, lower bit depth, smaller size, and different color space and gamma settings. This is to reduce the load on your system.
该时间线包含 10 份 Fusion 合成,每份对应流程中的一个步骤,每个合成上方都有一个标记(marker),简要说明该步骤内容。This timeline contains 10 copies of the Fusion Composition, each representing a different step in the process. There is also a marker above each composition with a brief explanation of the corresponding step. If you get lost at any point during this
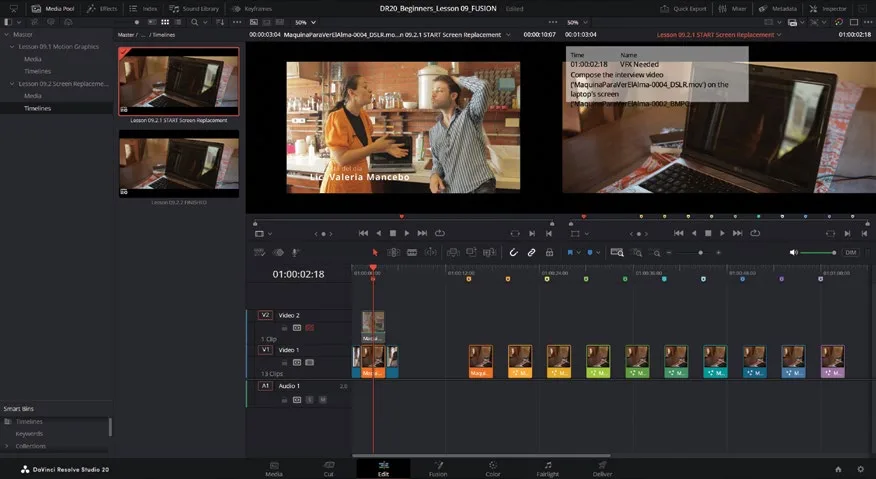
练习中如果跟丢进度,随时可以回到这条时间线,找到想接续的步骤位置继续。lesson, you can always return to this timeline to find the spot where you want to catch up with the exercise.
时间线中第二条片段需要做 VFX:要把笔记本电脑屏幕替换为 Video Track 2 上的画面。The second clip in the timeline requires some VFX work: you need to replace the laptop’s screen with the clip in Video Track 2.
启用 Video Track 2 查看要合成到笔记本屏幕上的素材;看完后再禁用 Video Track 2(之后会改用另一种方式把该轨道的视频引入 Fusion 合成)。Enable Video Track 2 to view the video that you will composite over the original laptop screen. Once you’ve done that, disable Video Track 2 again (we’ll bring that video from Video Track 2 into the Fusion Composition using a different technique).
也可以把时间码跳到 01:01:00:00,查看最终合成的效果。You can also go to timecode 01:01:00:00 to get an idea of the final composition we will create.
- 把播放头放到时间线第二条片段上(时间码 01:00:02:18)。Place the playhead over the second clip in the timeline (timecode 01:00:02:18).
- 按 Shift-5 或点击界面底部的
Fusion按钮,进入Fusion页面。Go to the Fusion page by pressing Shift-5 or clicking theFusionbutton at the bottom of the interface.
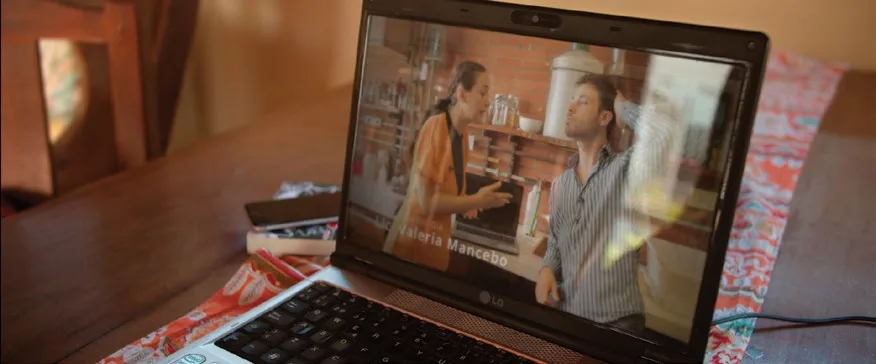
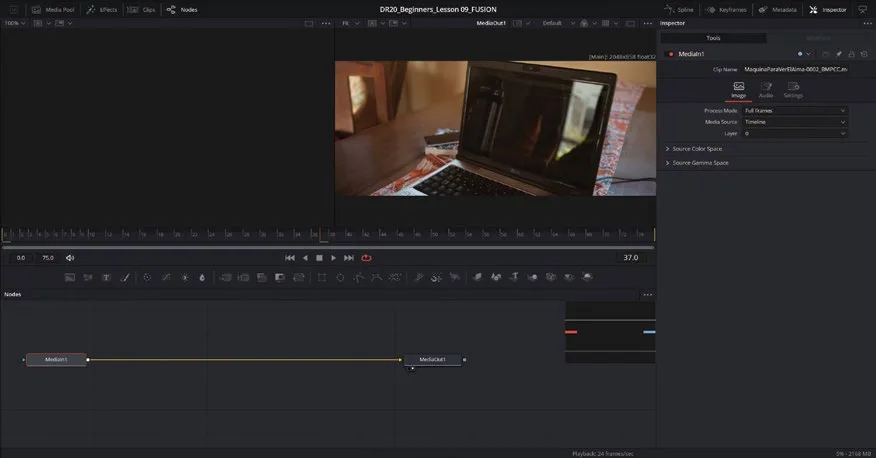
当你在 Fusion页面且播放头下有一个片段时,Fusion 会自动创建一个 Fusion Composition,并把该片段作为 MediaIn1 节点,分辨率与片段一致。不过时间线和片段的分辨率并不总是相同。When you jump to the Fusion page with a clip under the playhead, Fusion will automatically create a Fusion Composition with the clip as the MediaIn1 node at the clip’s resolution. In this case, the clip and the timeline happen to have the same resolution, but that won’t always be the case.
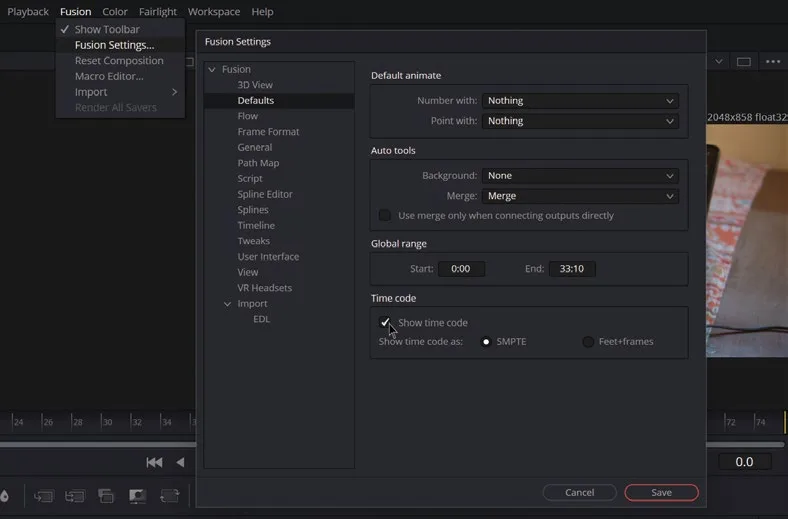
TIP · 提示注意 Fusion 页面的时间标尺显示帧数而不是时码(其他 DaVinci Resolve 页面显示时码),因为 VFX…
注意 Fusion页面的时间标尺显示帧数而不是时码(其他 DaVinci Resolve页面显示时码),因为 VFX 工作中通常以帧为单位。如果你更习惯使用时码,可以打开顶部 Fusion 菜单,选择 Fusion Settings,在 Defaults 标签页中找到 Show Timecode 选项。Note that the time ruler in the Fusion page shows frames instead of timecode, as in the other DaVinci Resolve pages. This is because working with frames is the common practice in VFX. If you prefer to use timecode, go to the Fusion menu (at the top of the screen) and select Fusion Settings. In the Defaults tab, you’ll find the Show Timecode option.
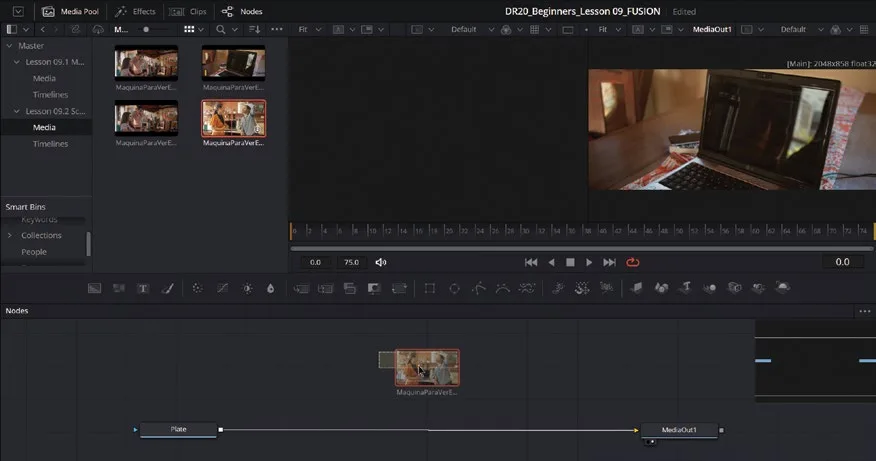
- 按 F2(或右键点击 MediaIn1 选择 "Rename…"),将 MediaIn1 重命名为 Plate。Press F2 (or right-click MediaIn1 and select “Rename…”) and rename MediaIn1 to Plate.
NOTE · 注意在 VFX 中,plate(背景板)指合成里的基础或背景元素,名称来源于早期使用的实体胶片板。最早的 plate 指用来…
在 VFX 中,plate(背景板)指合成里的基础或背景元素,名称来源于早期使用的实体胶片板。最早的 plate 指用来拍摄背景场景或基础素材的一段胶片;在数字合成中,这个词沿用下来,表示最底层的图层或背景元素,其他特效都在其上叠加。本质上,plate 是合成的起点或背景,CG 或特效等额外元素都会合成到它上面。In visual effects (VFX), the term plate refers to the base or background elements of a composition because it historically comes from the use of physical film plates. Originally, a “plate” referred to a piece of film stock used to capture a background scene or base footage. In digital compositing, this term has carried over to denote the foundational layers or background elements to which other visual effects are added. Essentially, the “plate” serves as the starting point or background upon which additional elements, such as CG or effects, are composited.
- 点击屏幕左上角的
Media Pool按钮打开媒体池,进入 Lesson 09.2 Screen Replacement bin,把 MaquinaParaVerElAlma-0004_DSLR.mov 拖到 Node Editor 中。Open the media pool by clicking theMedia Poolbutton at the top left of the screen, go to the Lesson 09.2 Screen Replacement bin, and drag the MaquinaParaVerElAlma- 0004_DSLR.mov clip to the Node Editor. - 会自动生成一个新的 MediaIn 节点。按 1 把它加载到左侧 viewer,然后重命名为 ScreenContent。A new MediaIn node will be created. Press 1 to load it in the left viewer and rename it ScreenContent.
- 关闭媒体池。Close the media pool.
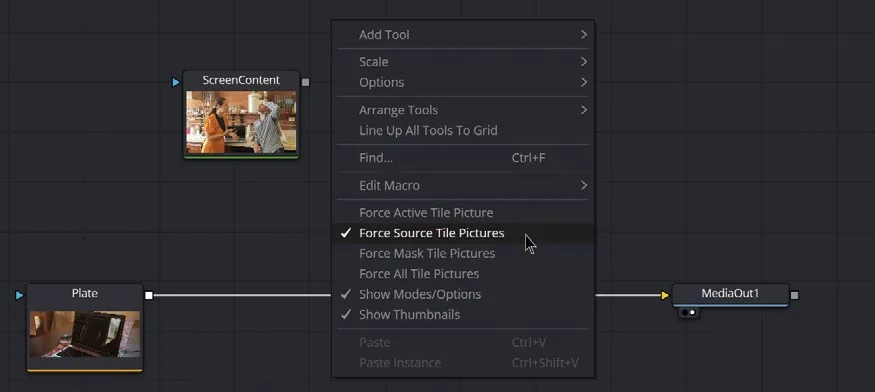
- 在 Node Editor 灰色区域右键,选择 Force Source Tile Pictures,让每个 MediaIn 节点显示缩略图。Right-click the gray area of the Node Editor and select Force Source Tile Pictures to enable a thumbnail in each MediaIn node.
NOTE · 注意第一次生成缩略图时可能不会显示图像。解决办法是:选中 Plate 和 ScreenContent 节点,加载到任意 vi…
第一次生成缩略图时可能不会显示图像。解决办法是:选中 Plate 和 ScreenContent 节点,加载到任意 viewer,再移动播放头即可加载图像。The first time you create thumbnails, they may not display the images. To fix this, select the Plate and ScreenContent nodes, load them into any viewer, and move the playhead to load the images.
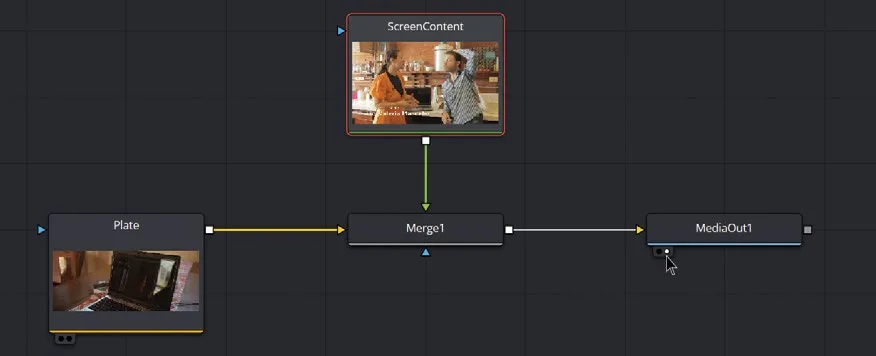
- 添加一个 Merge 节点,把 ScreenContent 合成到 Plate 之上。确保 ScreenContent 连接到绿色(前景)输入端。Add a Merge node to composite the ScreenContent over the Plate. Make sure the ScreenContent is connected to the green (foreground) input.
接下来要介绍一些新工具和更快的添加方式。之前都是从工具栏选工具,这次改用 Select Tool 对话框——只要知道工具名称,速度会快很多。Select Tool 对话框里列出了 Fusion 中所有可用的节点和工具,列表很长,所以要用搜索框快速定位。In this exercise, you’ll explore new tools and a quicker way to add them. Up to this point, you’ve relied on tools from the toolbar; next, you’ll use the Select Tool dialog, which is much faster—as long as you know the name of the tool you’re looking for. In the Select Tool dialog, you can find all the nodes and tools available in Fusion. Since the list is extensive, you’ll use the search box to quickly locate what you need.
- 选中 ScreenContent 节点,按 Shift-Spacebar 打开 Select Tool 对话框。Select the ScreenContent node and press Shift-Spacebar to open the Select Tool dialog.
- 在 Select Tool 对话框中输入 corner。Type corner in the Select Tool dialog.
- 选择 Corner Positioner,点击
Add按钮。Select the Corner Positioner and click the Add button.
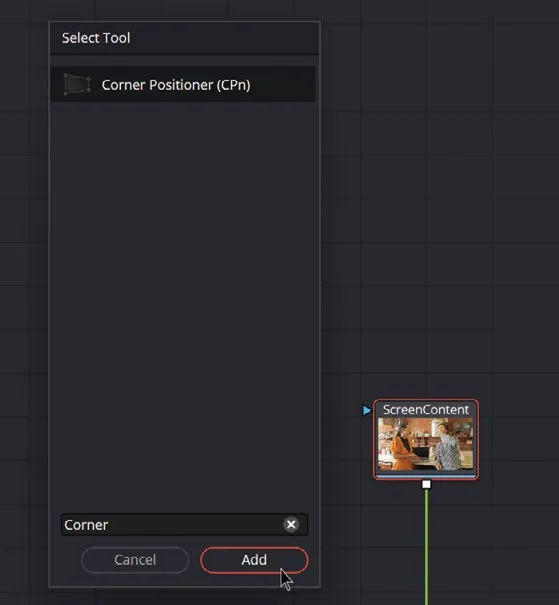
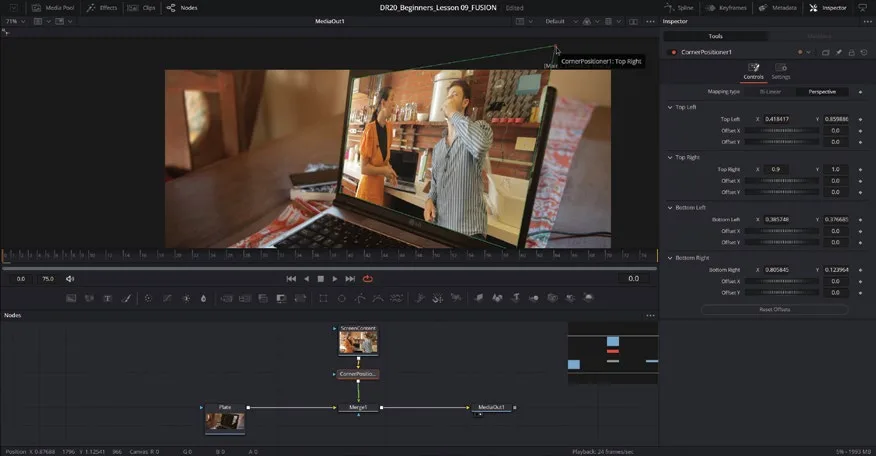
ScreenContent 节点之后会添加一个 CornerPositioner1 节点。A CornerPositioner1 node is added after the ScreenContent node.
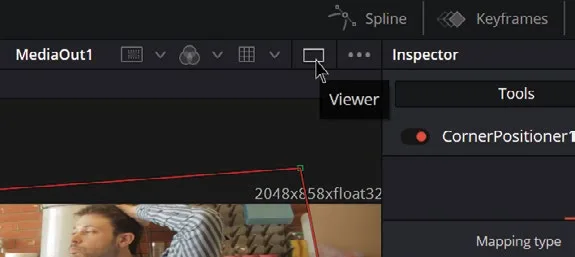
- 这个合成用单个大 Viewer 更方便。点击 Viewer 右上角的
Viewer按钮即可切换;再按一次可恢复双 Viewer。For this composition, it’s better to have a single, larger viewer instead of two. To achieve this, press theViewerbutton at the top right of the viewer. To re-enable both viewers, simply press it again. - 在 Viewer 中拖动 Correct Positioner 的四个角,使其对齐笔记本屏幕。Click in the viewer and drag each corner of the Correct Positioner so it matches the laptop screen.
TIP · 提示提示:用 Command + 滚轮(macOS)或 Ctrl + 滚轮(Windows)缩放并平移 Viewer,便于精…
提示:用 Command + 滚轮(macOS)或 Ctrl + 滚轮(Windows)缩放并平移 Viewer,便于精确操作。Remember to zoom and reposition the viewer using Command-scroll wheel (macOS) or Ctrl-scroll wheel (Windows) for more control and precision.
本卡术语Terms in this card
媒体夹Bin 媒体池Media Pool 时间线Timeline 分辨率Resolution 编辑页Edit page 标记Marker 播放头Playhead 色彩空间Color Space Gamma(中间调)Gamma 时间码Timecode 合成Compositing Fusion 合成Fusion 合并Merge 节点Node
相关知识卡Related Cards
媒体池Media Pool 时间线Timeline 合成Compositing Fusion 页面Fusion Page MediaIn 节点MediaIn Node Merge 节点Merge Node 节点编辑器Node Editor