添加模糊蒙版Add Blur and Mask
18 steps
简介Overview
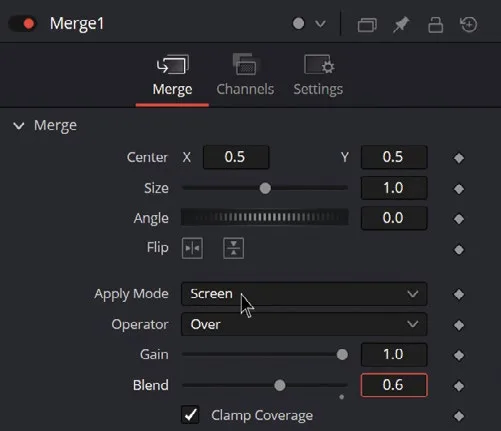
合成元素:原素材中的反光已经丢失,我们通过修改 Merge 节点的 Apply Mode 来恢复,原理类似 Edit 页 Inspector 里的 Composite Mode。同时把 Blend 调低,让 ScreenContent 不是 100% 不透明,使 Plate 自身的反光和噪点透出来。Integrating the Elements You’ve lost all the reflections from the original shot, so you’ll try a compositing trick to recover them by changing the Apply Mode in the Merge node. This process is similar to changing the Composite Mode in the Inspector on the edit page. You’ll also decrease the Blend, so the ScreenContent isn’t at 100% opacity, allowing some of the reflections and noise from the Plate to show through.
- 选中 Merge1 节点,打开 Inspector,把 Apply Mode 改为 Screen,Blend 设为 0.6。Select the Merge1 node, go to the Inspector, and change the Apply Mode to Screen and the Blend to 0.6.
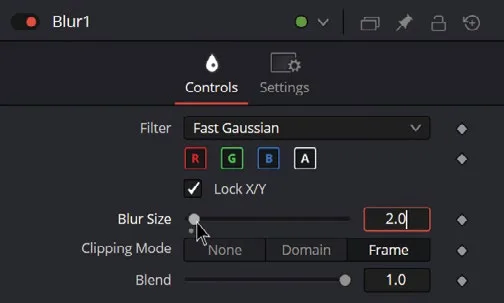
真实反光虽然找回来了,但 Plate 和 ScreenContent 的清晰度与景深仍有明显差异——ScreenContent 过于锐利。我们给它加一点模糊,让边缘更柔、中心更清晰。Now that you have recovered the real reflections, there is still a noticeable difference in the definition and depth of field between the Plate and the ScreenContent, which is too sharp. You’ll add a blur to soften the ScreenContent and mask it so that it’s softer at the edges and sharper in the center.
- 在 Corner Positioner 之后添加一个 Blur 节点(工具栏第八个图标,或在 Select Tool 对话框中搜索 Blur)。Add a Blur node after the Corner Positioner (it’s the eighth icon in the toolbar, or search for Blur in the Select Tool dialog).
- 在 Inspector 中把 Blur Size 改为 2.0。Change the Blur Size in the Inspector to 2.0.
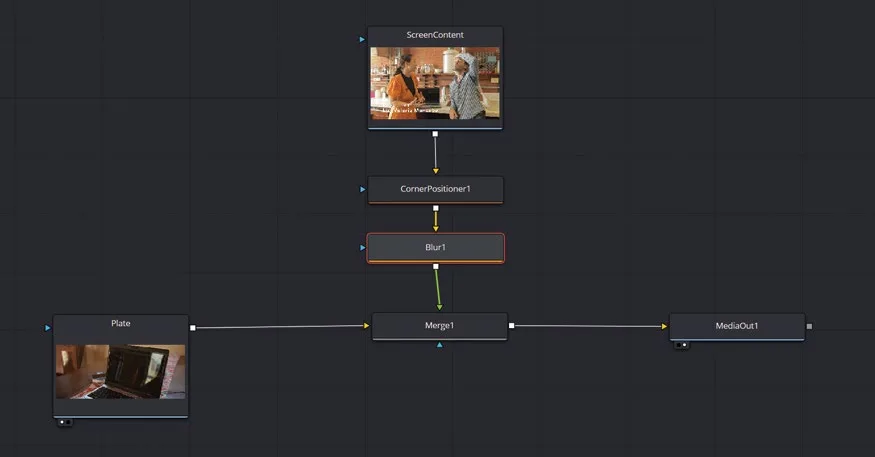
Node Editor 应显示如下结构:Your Node Editor should display the following:
- 选中 Blur 节点后,添加一个 Ellipse(工具栏中间、矩形图标右侧的那个图标)。With the Blur node selected, add an Ellipse (the icon to the right of the rectangle in the middle of the toolbar).
你会发现模糊现在只作用于椭圆内部,这和你的需求正好相反!Notice that the blur now affects the image only inside the ellipse, which is the opposite of what you wanted!
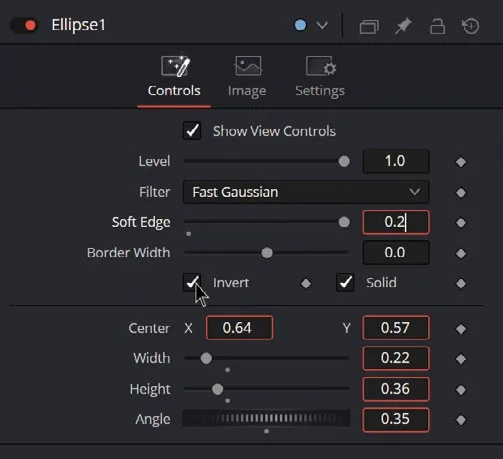
- 选中 Ellipse1 节点,在 Inspector 中勾选 Invert(让模糊作用于圆形外部),并将 Soft Edge 设为 0.2。Select the Ellipse1 node, check the Invert option in the Inspector (to make the blur work outside the circle), and set the Soft Edge to 0.2.
- 调整位置和大小,让效果轻微作用于笔记本屏幕中心,边缘强度更高。如果不确定,可以参考以下参数:Center X 0.64,Y 0.57,Width 0.22,Height 0.36,Angle 0.35。Adjust the position and size so that it subtly affects the center of the laptop screen, with more intensity at the edges. If you’re unsure, use the following settings as a guide: Center X 0.64, Y 0.57, Width 0.22, Height 0.36, Angle 0.35.
你可能觉得应该把 Blur 节点放在 Corner Positioner 之前,但那样的话,Corner Positioner 扭曲图像时产生的边缘就不会被模糊掉了。You might think we could apply the Blur node before the Corner Positioner, but if you do that, the edges created by the Corner Positioner when it distorts the image won’t be blurred.
接下来你要校正 ScreenContent 的白场、黑场、饱和度以及色彩。这里要用 Color Corrector 节点。注意,最终合成镜头的调色通常由调色师在 Color页面完成,但 VFX 师有责任把合成中的各个元素相互匹配好。Next, you’ll correct the white and black levels, saturation, and color of the ScreenContent. You’ll use a Color Corrector node. Note that the color grading of the final composition is usually done by a colorist in the color page, but the VFX artist is responsible for correctly matching each element of the composition with the others.
TIP · 提示为了更准确地评估亮度,可以在 viewer 中开启 waveform:点击左上角的 SubView 图标,选择 Wave…
为了更准确地评估亮度,可以在 viewer 中开启 waveform:点击左上角的 SubView 图标,选择 Waveform,按需调整大小。还可以在 viewer 右上角的 Options(…)菜单中开启 Gain 和 Gamma 控制,方便匹配画面。To better evaluate luminance levels, activate the waveform in your viewer by clicking the SubView icon at the top left and selecting Waveform. You can resize it as needed. You can also access the Gain and Gamma controls by clicking the Options (…) menu at the top right of the viewer, which will help with matching.
- 点击 viewer 右上角的 Options(…)按钮,选择 Gain/Gamma。Click the Options (…) button at the top right of the viewer and select Gain/Gamma.
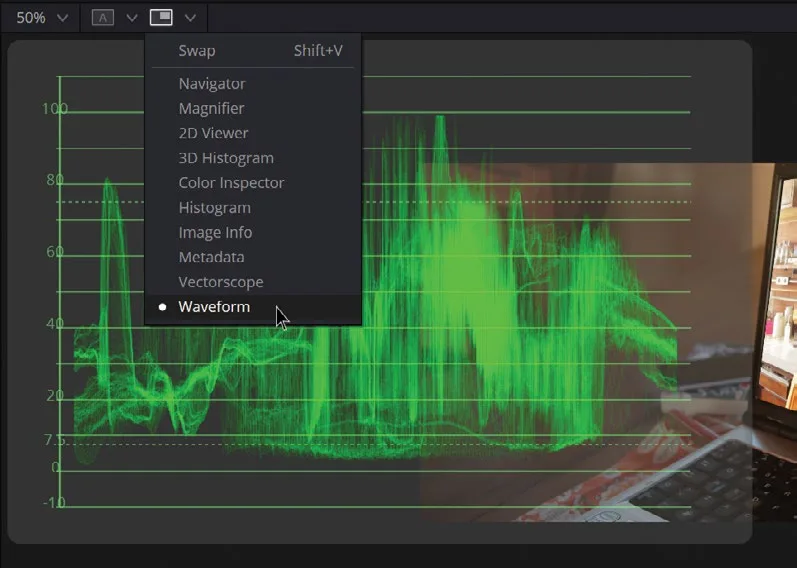
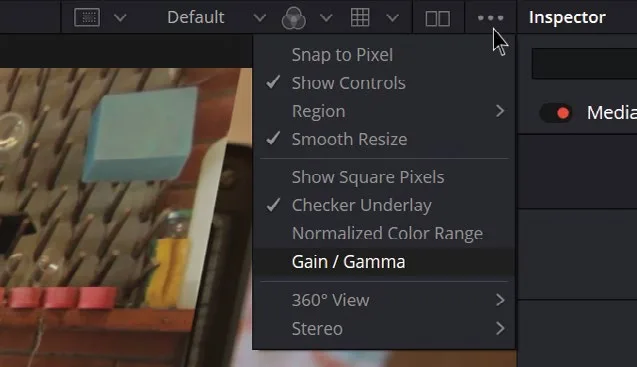
这样会打开 Gain/Gamma 控制,它只影响显示效果,对处理和最终渲染没有任何影响。这些控件能帮你更准确地评估元素的融合情况。你可以提高 Gain 来更好地观察阴影部分。如果想关闭 viewer 中的这些调整,回到 Options 菜单再次点击 Gain/Gamma 即可。This will open the Gain/Gamma controls, which only affect the visualization and have no impact on the processing or final render. These controls will help you accurately evaluate the integration of elements. You can raise the Gain to better assess the shadows. To deactivate these changes in the viewer, simply return to the Options menu and click Gain/Gamma again.
- 提高 Gain 值来更好地观察阴影部分,对比 Plate 节点和 ScreenContent 节点中的阴影亮度是否一致。Raise the Gain value to better assess the shadows. Look for similar shadow levels in both the Plate node and the ScreenContent node.
- 在 Blur 之后添加一个 Color Corrector 节点(工具栏中第五个图标)。After the Blur, add a Color Corrector node (it’s the fifth icon in the toolbar).
- 在 Inspector 中把 Saturation 降到大约 0.92,然后点击并拖拽色轮向绿色方向偏移,添加一点绿色调。In the Inspector, reduce the Saturation to around 0.92 and add a hint of green by clicking and dragging the color wheel toward green.
- 调整 Gain 和 Lift,让 SrceenContent 与背景画面融合。我把 Gain 设为 1.32、Lift 设为 0.03。Adjust the Gain and Lift so the SrceenContent blends with the Plate. I used 1.32 for the Gain and 0.03 for the Lift.
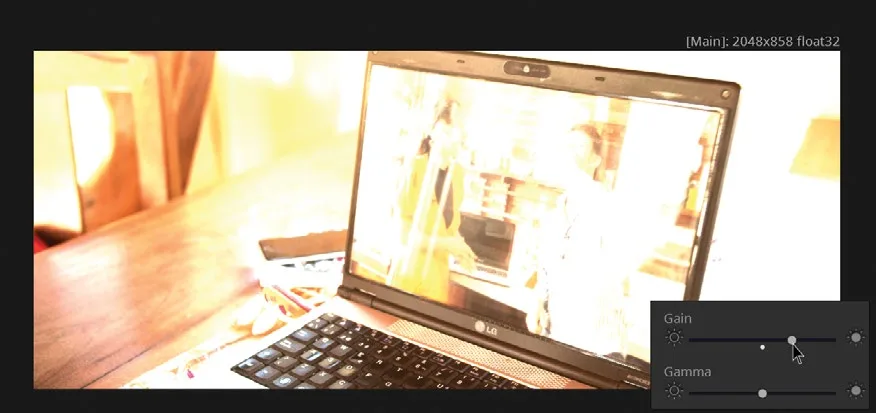
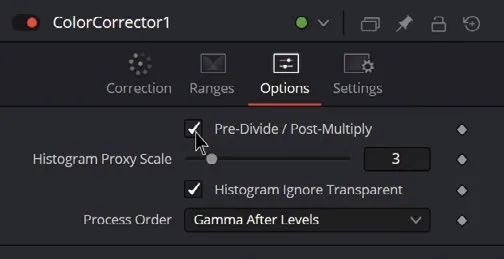
等一下!出问题了——调整 Lift 值时背景也跟着变了。这是因为图像使用了 premultiplied RGB 通道,颜色数据已经和 alpha 通道预先混合了。要在不影响背景的前提下只调整前景,必须先把 RGB 从 alpha 中 unmix(预除),做完调色再重新混合(Post-Multiply)。这个原理在《The Visual Effects Guide to DaVinci Resolve》里有详细讲解,这里只要知道解决办法在 Options 标签页里。Wait! Something strange happened! Adjusting the Lift value also affected the background. This happens because the image uses premultiplied RGB channels, where the color data is already blended with the alpha channel. To correctly adjust the foreground without impacting the background, you need to unmix the RGB values from the alpha channel before applying color correction. After correction, recombine the RGB and alpha channels. This is covered in detail in The Visual Effects Guide to DaVinci Resolve, but the solution is in the Options tab.
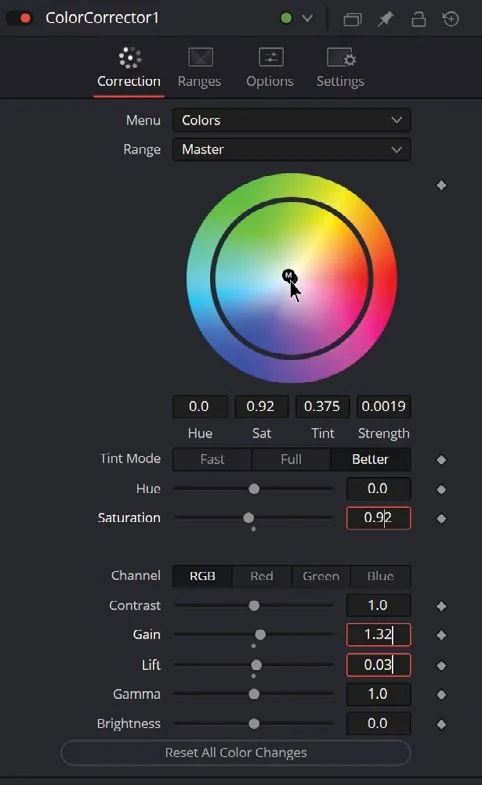
- 切换到 Options 标签页,勾选 Pre-Divide / Post-Multiply。Go to the Options tab and check the Pre-Divide / Post-Multiply function.
还没完!我们还要让前景的噪点跟背景一致。噪点会因相机感光元件、ISO/gain 设置、暗部水平、甚至拍摄当天的温度而不同,两层画面要无缝融合,噪点必须匹配。这里的差异其实不太明显,尤其我们已经把 Apply Mode 改成 Screen 并降低了 Merge 节点的 Blend。但我们还是加一点噪点让它更完美,顺便让你学一下这个常用技巧。You’re almost there! We still need to match the noise levels of the foreground object to those of the background. Noise levels can vary due to factors such as the camera sensor, ISO/gain settings, shadow levels, and even the temperature on the shooting day. To seamlessly integrate the two elements, the noise should match. In this instance, the difference is barely noticeable, especially since we changed the Apply Mode to Screen and lowered the Blend in the Merge node. However, you’ll add a bit of noise to make it nearly perfect and to show you this technique for your future projects.
- 在 viewer 中点击 Options (…) 菜单,取消 Gain/Gamma 的勾选,暂时关掉它。Deactivate the Gain/Gamma controls in the viewer by clicking the Options (…) menu and the Gain/Gamma option.
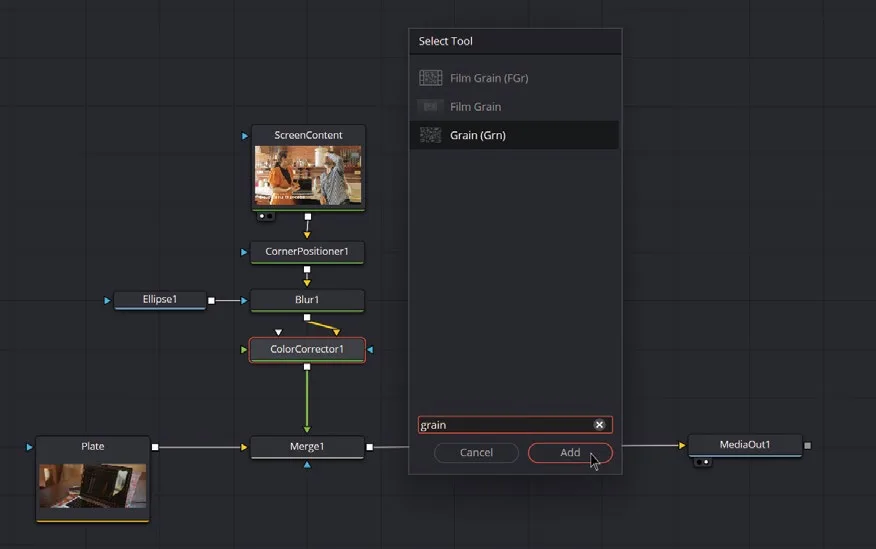
- 选中 Color Corrector 节点,按 Shift+Spacebar,输入 grain,选 Grain (Grn) 并点击 Add。Select the Color Corrector node, press Shift-Spacebar, and type grain. Select Grain (Grn) and click Add.
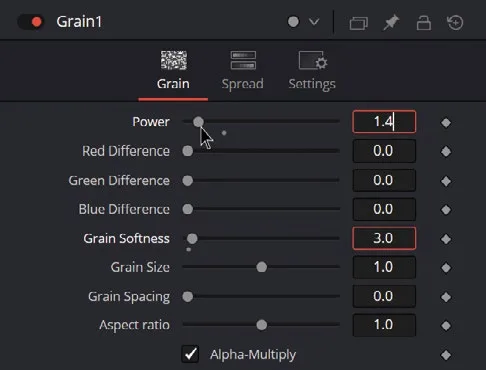
- 在 viewer 中放大画面,在 Inspector 里调整 Grain 节点的 Power 和 Grain Size,让 ScreenContent 的颗粒感和背景画面的噪点匹配。建议 Power 设为 1.4、Grain Softness 设为 3.0。Zoom in to the viewer and adjust the Power and Grain Size of the Grain node in the Inspector in order to match the texture of the ScreenContent with the grain and noise of the Plate. Good values are setting the Power to 1.4 and Grain Softness to 3.0.
NOTE · 注意说明:Noise 和 grain 其实不是同义词。不过在训练教程中我们做了简化,以便完整讲解 Fusion 练习…
说明:Noise 和 grain 其实不是同义词。不过在训练教程中我们做了简化,以便完整讲解 Fusion 练习。“Noise” and “grain” are not synonyms. However, we are simplifying the explanations in this training guide to cover the Fusion exercises fully.
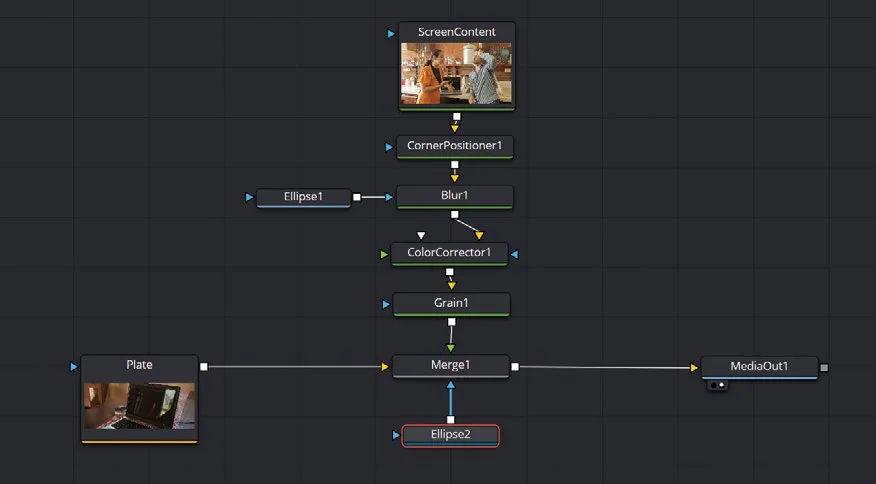
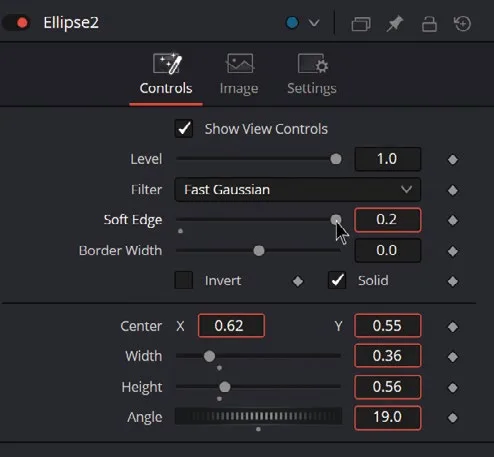
因为要模拟旧款 LCD 笔记本屏幕,透明度不能完全均匀。可以在 Merge1 节点上叠加一个 Ellipse,让屏幕画面的边角变得更暗。Since this is meant to simulate an old LCD laptop screen, the opacity shouldn’t be completely uniform. To achieve this effect, you can add an Ellipse to the Merge1 node so that the screen content becomes less visible in the corners.
- 选中 Merge1 节点,在工具栏里点击 Ellipse 工具,把它添加并连接到该节点。Select the Merge1 node and click the Ellipse tool in the toolbar to add it connected to that node.
- 在 Ellipse2 中把 Soft Edge 调为 0.2。Modify the Soft Edge value to 0.2 in the Ellipse2.
- 调整它的大小、高度和角度,让屏幕画面在中央保持实色,到边角处略微透明。Modify its size, height, and angle so that the screen content is solid in the middle of the screen but loses a bit of opacity toward the corners.
恭喜你完成了本章内容,迈出了在 DaVinci Resolve 中用 Fusion 做 VFX 的第一步。Fusion 还有大量值得探索的功能——高级跟踪、3D 合成、USD 集成等等。本章只触及了 Fusion 能力的表面,但希望你已经对节点式合成的强大与灵活有了扎实的认识。Fusion 是非常出色的工具,只要持续练习,你一定能用它创造出令人惊叹的视觉效果。保持尝试、保持学习,让创意引领你的方向!That’s it! You did it! You’ve successfully completed this chapter and taken your first steps into the world of VFX with Fusion inside DaVinci Resolve. There is so much more to explore, from advanced tracking and 3D compositing to USD integration and beyond. You’ve only scratched the surface of what Fusion can do, but hopefully this chapter has given you a solid understanding of the power and flexibility of node-based compositing. Fusion is a fantastic tool and, with practice, you can master it to create incredible visual effects. Keep experimenting, keep learning, and let your creativity lead the way!
本卡术语Terms in this card
渲染Render 编辑页Edit page 检查器Inspector 调色页Color page Gain(亮部)Gain Gamma(中间调)Gamma Lift(暗部)Lift 偏移Offset 饱和度Saturation 调色Grade 静帧Still 模糊Blur 合成Compositing Fusion 合成Fusion 合并Merge 节点Node