追加静帧Appending Stills
9 steps
简介Overview
追加静帧(Appending Stills)有时直接复制粘贴调色并不是正确做法,因为粘贴会覆盖片段上已有的节点。这种情况下静帧就特别好用:它包含的节点可以追加到片段已有节点之后,而不会破坏原有设置。Appending Stills Sometimes copying and pasting a grade is not the correct way of working, since simply pasting a grade will overwrite any nodes that have already been applied to the clip. In this case, stills become extremely useful because the nodes contained within them can be added to nodes already on a clip.
- 选中 clip 10 缩略图,这是你之前为这段采访做的一级和二级调色。Select the clip 10 thumbnail. This is the primary and secondary grade you did of the interview.
- 在 Viewer 中右键,选择 Grab Still。Right-click in the viewer and choose Grab Still.
- 在 Gallery 中把这张静帧重命名为 INTERVIEW GRADE。In the gallery, rename the still INTERVIEW GRADE.
- 选中 clip 11。Select clip 11.
这就是之前做过色彩匹配的 Sony 机器拍的素材,现在需要把另一个机位上那一整套复杂调色也应用过来。This is the clip from the Sony camera that we matched to earlier, but you now need it to take all the complex grades you applied to the other angle.
- 在 Gallery 中右键点击 INTERVIEW GRADE 静帧,从菜单中选择 Append Node Graph。Right-click the INTERVIEW GRADE still in the gallery and choose Append Node Graph from the menu.
该静帧的调色会追加到片段已有的节点之后。The grade from the still will be added to the nodes already applied to the clip.
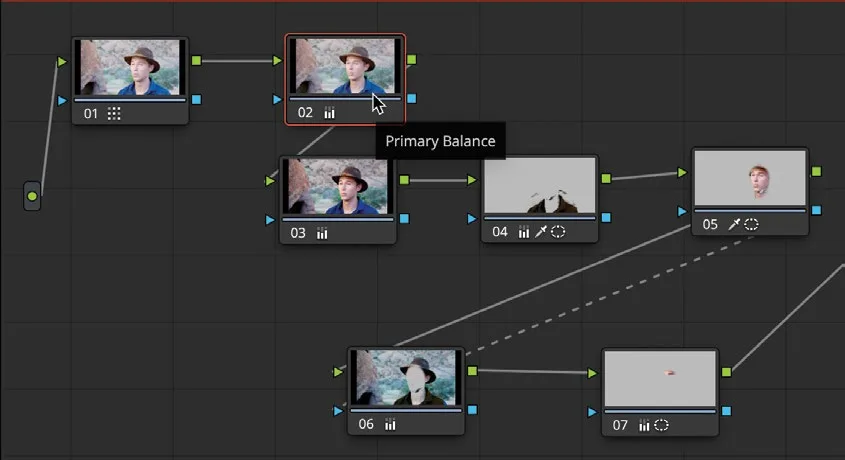
如果能保持现状就好了……但还需要做几处调整,才能让两段片段重新匹配。If only you could leave it there…but several adjustments are needed to get the clips to match again.
- 删除 node 03,因为它是第一次调色时做的对比度调整节点。Delete node 03 since it is the contrast adjustment from the first grade.
- 选中新的 node 03,也就是刚才用来改衬衫颜色的那个节点。Select the new node 03, which is now the shirt we changed the color of.
- 点击 Power Window 图标旁的
Overlay按钮,开启窗口。Turn on the Window by clicking the onscreenOverlaybutton next to the window icon.
可以看到窗口位置完全偏了,衬衫的 key 也要再清理一下。As you can see, the window is totally out of position, and the key for the shirt needs some cleaning up as well.
- 在 Viewer 左上角打开
Highlight按钮。In the top left corner of the viewer, turn on theHighlightbutton.
用 Power Window 的控制点把窗口重新摆到衬衫上,记得尽量贴边。Using the power window control points, reposition the power window so it just sits over the shirt. Remember to try to get it as close as possible to the shirt.
TIP · 提示提示:在窗口路径上任意位置单击即可添加控制点,让选区更精确…
提示:在窗口路径上任意位置单击即可添加控制点,让选区更精确。You can add extra control points by simply clicking any part of the window path to make a more accurate selection.
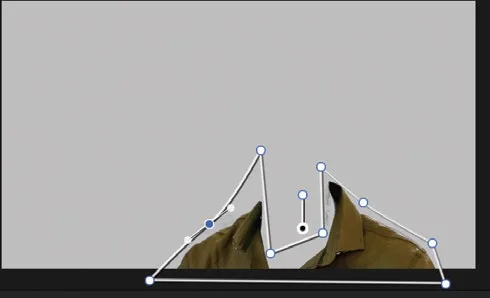
现在衬衫区域干净多了,不过 key 还需要稍微调一下。Now the shirt looks much cleaner; however, the key does need a little bit of tweaking.
在 Viewer 左上角关闭 Highlight按钮。In the top left corner of the viewer, turn off the Highlight button.
点击窗口上方的 Overlay(叠加)按钮,从窗口图标切换到 Qualifier(限定符)图标,开启 Qualifier。Turn on the Qualifier by clicking the onscreen Overlay button from the window icon to the qualifier icon.
现在可以看到所有 Qualifier 路径已绘制在所选的衬衫区域上。虽然路径位置还不太准确,但已经得到了一个不错的抠像。和之前窗口的思路一样,只需做一点微调即可。You should now see all the qualifier paths drawn for the selection of the shirt. Even though they are not quite in the right place, you have a pretty good key. Again, however, like the window, it just needs a slight adjustment.
点击中间窗口的 Qualifier 工具,打开 Qualifier窗口。Click the Qualifier tool in the middle window to bring up the Qualifier window.
点击 Picker Subtract(拾取减去)工具,然后取消勾选 Auto B/W Highlight(自动黑白高光)。Click the Picker Subtract tool and then deselect the Auto B/W Highlight.
在 Viewer(检视器)中,于 Sean 左肩和脖子右侧的噪点处按住并拖动。In the viewer, click and drag over the noise over Sean’s left shoulder and on the right side of the neck.
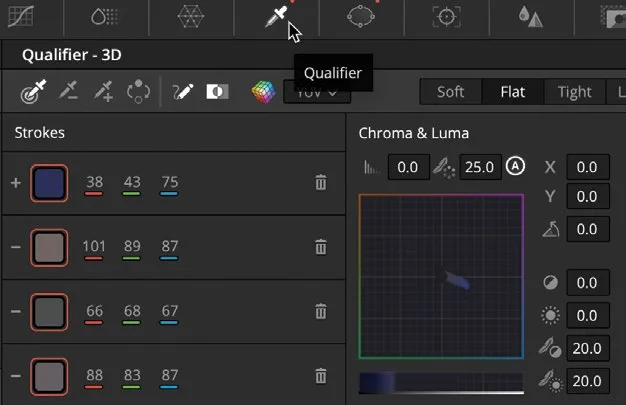
右领口有一块深绿色区域。使用同样的工具拖选该区域,将其移除。Just on the right neckline is a dark green area. Using the same tool, drag over the section to remove it.
返回 Qualifier窗口,点击 Picker Add(拾取添加)按钮,在衬衫右肩顶部小心地画一条线,把蓝色边缘加入选区。Go back into the Qualifier window and click the Picker Add button and carefully draw a line on the top of the right shoulder of the shirt to add the blue edge to the selection.
噪点已清除,但面部区域也需要稍作调整。We have now got rid of the noise, but the face needs a slight adjustment as well.
选中节点 04。Select node 04.
在 Qualifier窗口中,将 Clean White(清除白色)参数向右拖到约 40,使 Sean 面部的蓝色区域消失;再将 Clean Black(清除黑色)参数拖到约 50,让肤色选区更平滑。In the Qualifier window, click and drag the Clean White parameter to the right to around 40 so the blue sections on Sean’s face disappear, and the Clean Black parameter to around 50 so the skin selection is smooth.
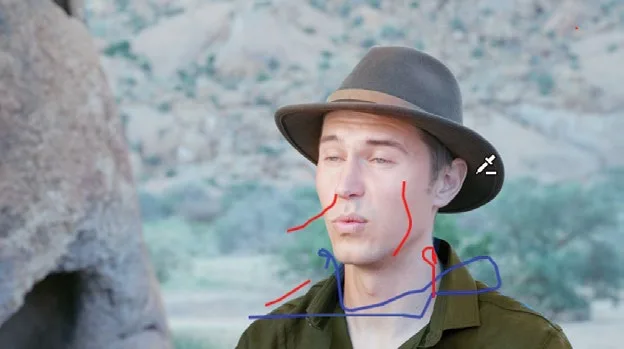
可以看到人物颈部仍残留一小块蓝色区域,需要将它加入选区。You can see that there is a slightly blue section now on the subject’s neck, so we just need to add that to the selection.
返回 Qualifier,点击 Picker Add按钮,在颈部蓝色区域上拖动选区。至此抠像已经相当不错,但别忘了这一级调色还有跟踪过的 Power Window。Go back into the Qualifier and click the Picker Add button and drag the selection over the blue neck area. We now have a pretty good key but remember that this grade had a tracked power window as well.
保持 04 号节点选中状态,点击中间窗口中的 Window(窗口)工具。With node 04 still selected, click the Window tool in the middle window.
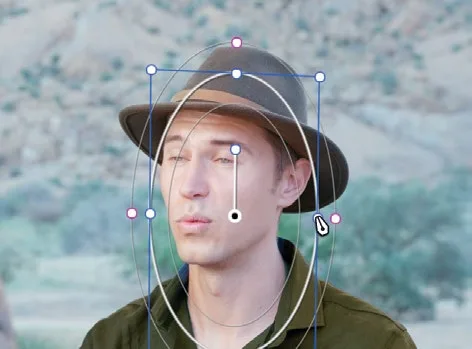
在 viewer 中调整圆形 Power Window 的大小和位置,让它完整、舒适地覆盖整张脸。Resize and reposition the circular power window in the viewer so it comfortably covers all of the face.
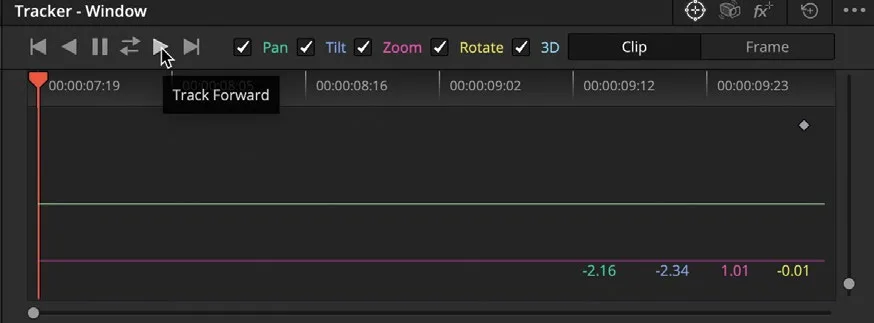
点击中间窗口的 Tracker(跟踪)工具,再点 Track Forward(向前跟踪)按钮,确认窗口能准确跟随人脸。Click the Tracker tool in the middle window and click the Track Forward button to make sure the window is tracked accurately to the face.
选中 06 号节点,重复以上流程:将 Power Window 移到眼部区域,然后进行跟踪。Select node 06 and repeat the above process by moving the power window over the eyes and tracking it.
本卡术语Terms in this card
覆盖Overwrite 对比度Contrast 窗口Power Window 限定器Qualifier 二级调色Secondary Correction 跟踪器Tracker 调色Grade 静帧Still 节点Node
相关知识卡Related Cards
一级调色Primary Color Correction 限定器Qualifier 二级调色Secondary Color Correction 跟踪器Tracker