用静帧匹配镜头Matching Shots with Stills
9 steps
简介Overview
用静帧匹配镜头Matching Shots Using Stills
把两段镜头放在一起看,它们大体一致,但有一点不同:刚才调过色的 11 号片段肤色偏粉,对比度也稍高。我们可以用之前保存的静帧做并排比对,把肤色调到尽量接近。Looking at the two shots together now, they look mostly the same, apart from one thing: the skin tone on clip 11 that we just applied the grade to looks a little bit pink and has a little too much contrast. We can use the still we saved from the previous clip to compare the skin tones side by side to get them as close as possible.
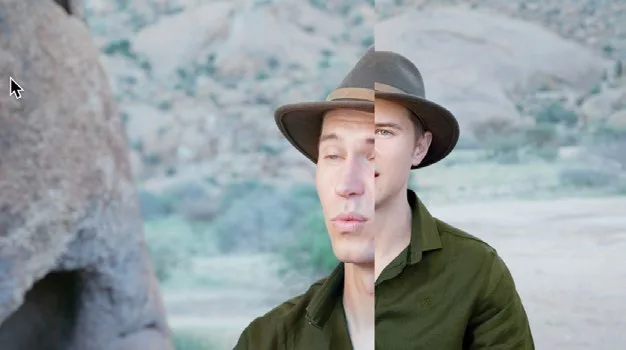
- 保持 11 号缩略图选中,双击 INTERVIEW GRADE 静帧,生成 split screen(分屏对比)。With thumbnail 11 still selected, double-click the INTERVIEW GRADE still to create a split screen.
双击静帧后,viewer 中会出现一条竖向分界线,左侧显示时间线上的片段(即 11 号片段),右侧显示所选 gallery 静帧。After double-clicking a still, a vertical split appears in the viewer, showing the timeline clip (clip 11) on the left and the selected gallery still on the right.
- 在 viewer 中点击并向右拖动这条竖线,露出更多时间线片段的画面。左右拖动时你会发现,相比静帧,时间线片段略微偏暗、对比度也略低。Click and drag the vertical line in the viewer to the right to reveal more of the timeline clip. By dragging left and right, you will notice that the timeline clip is slightly darker and lacks a little contrast when compared to the still.
- 把竖线稍微向右拖一点,让画面同时显示时间线片段的肤色和参考静帧的部分肤色,便于比对。Drag the vertical line slightly right until you have a good position to see the skin tone on the timeline clip and some of the skin tone from the reference still.
- 选中 04 号节点,也就是你做肤色限定(skin tone qualifier)的那个节点。Select node 04, which is your skin tone qualified node.
- 执行
Workspace > Viewer Mode > Enhance Viewer,或按 Option-F(macOS)/ Alt-F(Windows),将 viewer 最大化。Choose Workspace > Viewer Mode > Enhance Viewer or press Option-F (macOS) or Alt-F (Windows) to expand the viewer.
这样在不需要操作 Node Editor 或 gallery 时,能获得更大的画面观察区域。This gives you a better view when you do not need to access the Node Editor or gallery.
这个调色花了不少时间,建议在此阶段先保存一版。Since we are adjusting a grade that took some time to get right, you may want to save it at this stage.
- 在 viewer 中右键,选择 Grab Still。Right-click in the viewer and choose Grab Still.
- 将这帧静帧命名为 INTERVIEW ALT ANGLE。Label the still INTERVIEW ALT ANGLE.
TIP · 提示静帧可以在调色过程中的任意阶段快速保存当前效果。随着调色不断深入,grade 会越来越复杂。在任意节点 Grab 一帧静…
静帧可以在调色过程中的任意阶段快速保存当前效果。随着调色不断深入,grade 会越来越复杂。在任意节点 Grab 一帧静帧,相当于给当前 grade 留一个时间快照,后续一旦调过头就能随时回退应用。Stills are a great way of taking a snapshot of a grade at any stage. The more you progress with color correction, the more complex your grades will become. Grabbing a still saves a version of a grade at any point in time, making sure you can reapply it if you make mistakes further down the line.
- 在左侧 primary 面板中,将 Contrast 略微提高到约 1.094,Pivot 调到约 0.030,让 Sean 面部的亮部和暗部更接近静帧。In the primary controls in the left window, drag the Contrast up slightly to around 1.094 and the Pivot to around 0.030 so the highlights and shadows on Sean’s face are a closer match to the still.
- 将 Mid/Detail 向右拖到约 20.00,让面部细节稍微清晰一些,不再那么柔。Drag the Mid/Detail right to around 20.00 so the features look slightly less soft.
在 Gamma 色彩控制中,把中心控制点向绿色方向轻推,使红色和蓝色读数都到 -0.01。Using the Gamma color control, drag the center control point slightly toward green so the red and blue controls both read -0.01.
将 Color Boost 拖到约 8.00。Drag the Color Boost up to around 8.00.
TIP · 提示Color Boost 可以单独提升低饱和度区域的饱和度,比 Saturation 控制更实用,因为高饱和度区域不会受到…
Color Boost 可以单独提升低饱和度区域的饱和度,比 Saturation 控制更实用,因为高饱和度区域不会受到影响。Color Boost lets you raise the saturation in areas of low saturation. This can sometimes prove more useful than the saturation control, since areas of higher saturation will not be affected.
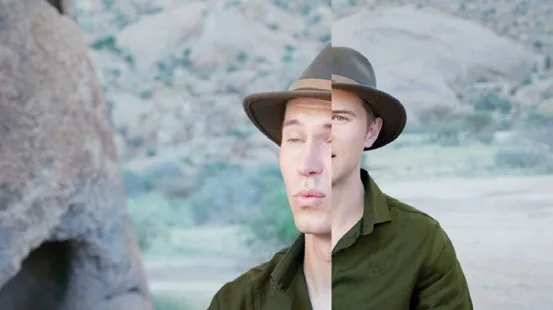
接下来重点关注 Sean 面部右侧、嘴角到脖子那块区域,对照静帧进行匹配。You will focus on the area of Sean’s face that is to the right of his mouth and that lines up with his neck on the still.
可以看到两边的画面已经非常接近,静帧可能略微再暗一点点。You can see that the areas are very close, and the still might be ever so slightly darker.
将 Gamma master 轮稍向左推,直到两个画面中的肤色完全匹配。Drag the Gamma master wheel left slightly until the skin tones between the two shots look matched.
点击 viewer 左上角的分屏按钮,关闭分屏。Click the split screen button in the top left corner of the viewer to turn the split screen off.
按键盘的 Up Arrow 键跳到上一个镜头,再按 Down Arrow 键跳回到刚才匹配好的镜头。Press the Up Arrow key on the keyboard to jump to the previous shot and then press the Down Arrow key to jump back to the shot we have just matched.
现在两段素材的肤色已经非常接近,在镜头之间切换时几乎看不出差别。这正是你追求的目标:第二个采访镜头是另一个角度,灯光可能略有不同,不一定能完全匹配,但肤色在镜头切换时是一致的。The skin tones now look so close that when you jump between the shots you can hardly tell the difference. This is what you are aiming for, as the second interview clip is at an alternative angle, meaning that its lighting may be slightly different, so it may not match exactly, but the skin tone looks the same when jumping from shot to shot.
选择 Workspace > Viewer Mode > Enhance Viewer,或按 Option-F(macOS)/ Alt-F(Windows),退出放大 viewer。Choose Workspace > Viewer Mode > Enhance Viewer or press Option-F (macOS) or Alt-F (Windows) to exit the expanded viewer.
想继续练习镜头匹配,可以从缩略图 04 抓一张静帧,应用到缩略图 05,打开分屏,用前面学过的方法尝试匹配两个镜头。To try more shot matching, grab a still from thumbnail 04, apply the still to thumbnail 05, turn on split screen and, using the techniques you have learned, try to match the shots.
利用 gallery 和参考静帧分析画面构成、确定需要做的调色方向,能让镜头匹配更轻松。同时应配合示波器来减少视觉偏差——肉眼会本能地强制把两个镜头调成一样。参考静帧加示波器的组合能让匹配更精确,保证项目的连续性。Shot matching is made easier when using the gallery and reference stills to help you analyze the makeup of your shot and what corrections need to be made. You should also use the scopes to minimize any visual quirks because your visual perception naturally tends to force you to match shots. The combination of reference stills and scopes will make the shot matching more accurate, providing continuity in your project.
本卡术语Terms in this card
时间线Timeline 对比度Contrast Gamma(中间调)Gamma 饱和度Saturation 示波器Scopes 限定器Qualifier 调色Grade 静帧Still 节点Node
相关知识卡Related Cards
时间线Timeline 镜头匹配Shot Matching 限定器Qualifier 静帧匹配Still Matching 节点编辑器Node Editor