用曲线进行一级色彩校正Using Curves for Primary Color Corrections
9 steps
本卡概念Key Concepts
自定义曲线图是一种图表,可在图像的特定色调范围内进行极为灵活的调整:X 轴表示图像的色调值(从最暗的阴影到最亮的高光),Y 轴表示输出值(向下为调暗,向上为调亮)。A plot graph where you can perform flexible adjustments on specific tonal ranges of images, with the X axis representing tonal values (shadows to highlights) and the Y axis representing output values (darker to brighter).
简介Overview
本练习介绍另一种画面平衡方法。使用自定义曲线(custom curves)能让你对色调和色彩做出最大幅度的调整,但操作上也需要更精细的打磨。In this exercise, you’ll look at a final method of creating a balanced shot. Using custom curves, you’ll have the greatest degree of flexibility for making tonal and color adjustments, but this technique also requires some more finessing.
- 选中第 15 个片段。Select clip 15.
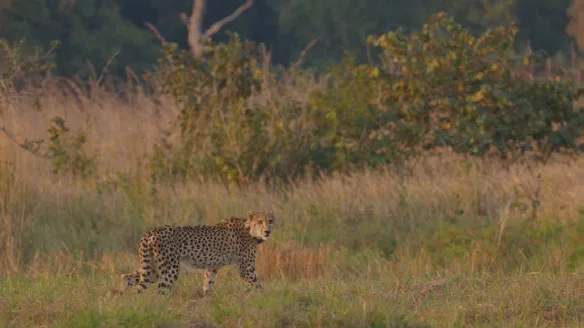
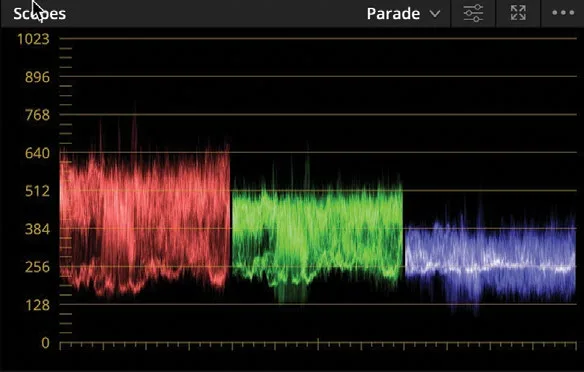
单看画面可能察觉不到对比度不足,但看示波器就会发现波形轨迹全挤在图表中间,这是低对比度画面常见的波形特征。Looking at the image, you might not be able to tell that there isn’t a lot of contrast, but looking at the scope, you can see how the trace is all bunched up in the middle of the graph. This is a common trace appearance for low-contrast images.
处理这个镜头的方式和前面几个一样:先校黑点,再校白点,最后校色彩。You will approach this shot in the same way you did the previous shots: correcting black point, white point, and color.
NOTE · 注意提示:屏幕分辨率较低的电脑可能需要点击 Curves 按钮才能显示曲线面板…
提示:屏幕分辨率较低的电脑可能需要点击 Curves按钮才能显示曲线面板。On computers with lower screen resolution, you might have to click the Curves button to display the curves palette.
TIP · 提示提示:在 color 页面,每个片段都有独立的 undo/redo 历史记录。选择 Edit > Undo时,撤销的步…
提示:在 color 页面,每个片段都有独立的 undo/redo 历史记录。选择 Edit > Undo时,撤销的步骤取决于当前选中的片段。In the color page, each clip has its own undo/redo history. Choosing Edit > Undo will undo different steps depending on which clip is currently selected.
因为这个镜头是在下午较晚时拍摄的,阴影部分应该比现在暗得多,画面中接近全黑的区域需要压下去。The shadows should be much darker since the shot was filmed later in the afternoon, and therefore areas of the image should be close to black.
- 把鼠标指针移到自定义曲线图左下角的控制点上。Position the mouse pointer over the control point located in the lower left corner of the custom curve graph.
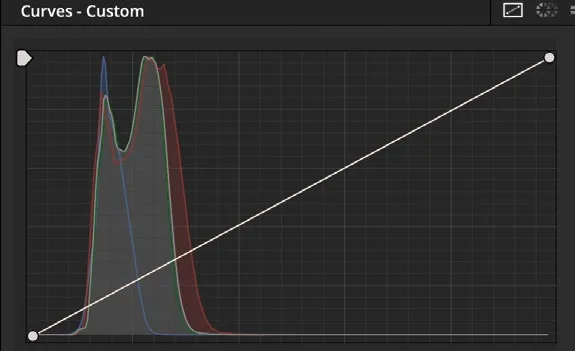
这个点就是黑点(black point)控制点,作用和一级校色器里的 Lift 主轮一样,拖动它可以抬高或压低片段的黑点。This point is the black-point control. Like the Lift master wheel in the primary corrector, adjusting this point raises or lowers the black point in a clip.
- 把该点向右拖动,直到贴住曲线窗口中 Histogram 波形曲线的边缘。此时 Parade 示波器里蓝色通道的波形应该接近 0。Drag the point to the right until it touches the edge of the Histogram curve in the curves window. The trace in the parade should be close to 0 on the blue channel.
把黑点向右移动会让画面中最暗的部分变得更暗。Moving the black point to the right darkens the darkest parts of the image.
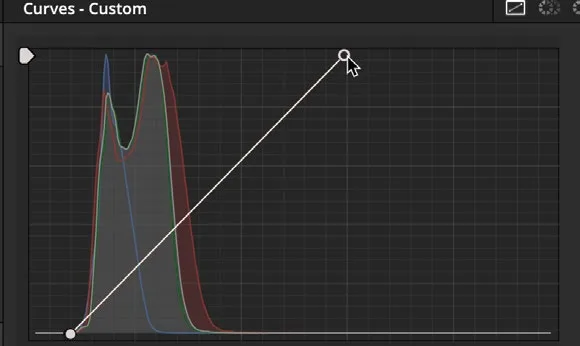
- 把鼠标指针放到自定义曲线图右上角的控制点上。Position the mouse pointer over the control point located in the custom curve graph’s upper right corner.
这个点是白点控制(white-point),和 Gain 主控轮一样,调节它可以提升或压低画面的白点。This point is the white-point control. As with the Gain master wheel, adjusting this point raises or lowers the white point in a clip.
这段素材的高光偏暗,需要提亮一些。The highlights in this shot are fairly dull and could use some brightening.
- 把控制点向左拖动,直到红色曲线落到 1024 刻度线上,也就是从起始位置向左整整两个参考格。Drag the point to the left until the red trace hits the 1024 line. The curve point should sit two full guide squares to the left of where it started.
控制点左移,图像中最亮的部分会随之提亮。Dragging the control point to the left brightens the brightest parts of the image.
还可以通过压暗暗部中调、提亮亮部中调来进一步增加对比度——把两段中调之间的距离拉开,对比度就会增大。这是曲线界面最灵活的地方之一。You can further increase contrast by darkening the darker midtones and brightening the brighter midtones. Stretching the distance between the two ranges will increase the contrast. This is one of the main areas where the curves interface provides a lot of flexibility.
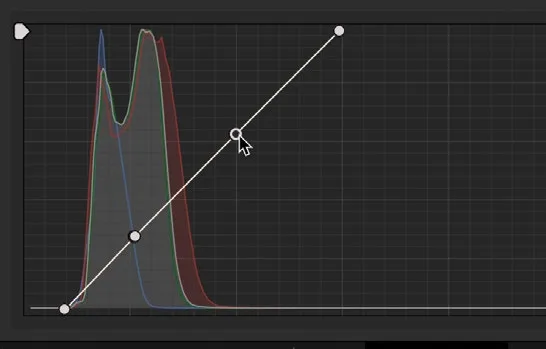
在曲线线上添加两个控制点,一个在下方阴影区,一个在上方高光区,可以精细地控制对比度。You can precisely control the contrast by adding two control points to the curve line: one point in the lower shadows area and one in the upper highlights.
- 在曲线线与蓝色 Histogram 曲线相交的位置点击——大约从底部往上 1/4 处。Click the curve line directly where it meets the blue Histogram curve, about one- quarter of the way up from the bottom.
这样就添加了一个用于调节阴影的控制点。Histogram 上的一个波峰会告诉你,这张图大部分像素集中在下方阴影区域。This adds a point to manipulate the shadows. One of the peaks in the histogram shows you where most of the pixels are in the lower shadow range of this image.
- 再在曲线线顶部往下大约 1/3 处、与下一个参考格相交的位置添加一个点。Add a point about a third of the way down from the top of the curve line, where the curve line meets the next guide square.
这样可以在不削波的前提下推高高光。This will allow you to push the highlights without clipping them.
TIP · 提示提示:在曲线点上单击鼠标右键,可以自动删除该点…
提示:在曲线点上单击鼠标右键,可以自动删除该点。Right-clicking with the mouse on a curve point will automatically delete the point.
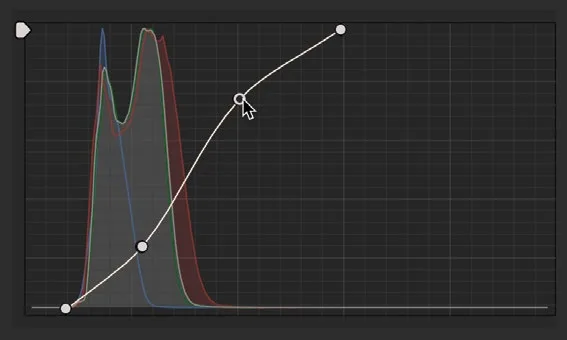
- 向下拖动下方的控制点,直到画面阴影足够暗但没有死黑。Drag down the lower control point until the image’s shadows look sufficiently dark but not crushed.
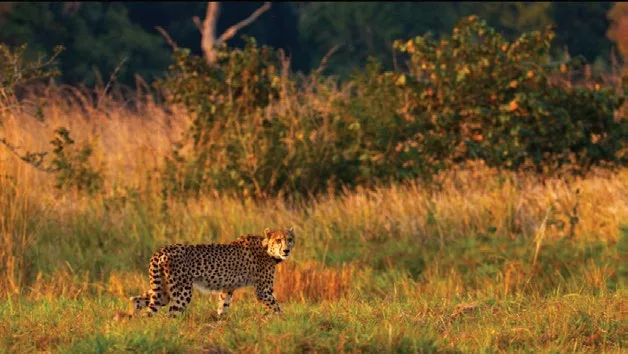
- 向上拖动上方的控制点,让猎豹身上的白色部分更亮,但不要过曝裁切。Drag up the upper control point until the white sections on the cheetah are brighter without being clipped.
选择 View > Bypass All Grades,或按 Shift+D,查看原始画面;再按一次 Shift+D 回到调色后的画面。Choose View > Bypass All Grades, or press Shift-D, to see the original image, and then press Shift-D again to view your corrected clip.
把两个控制点拉成 S 形曲线,是用曲线工具增加对比度的典型方法。相比 Contrast滑块,甚至比调整 Lift 和 Gain 主转轮都更灵活——使用自定义曲线,可以分别控制阴影和亮部的调整幅度。Moving both points into this S-shaped curve is a typical form of adding contrast using a curve control. It offers more flexibility than the Contrast control or even adjusting the Lift and Gain master wheels. Using the custom curves, you can define how much shadows are modified and how much highlights are modified, independently.
TIP · 提示在曲线上放置控制点可以精细雕琢对比度,达到你想要的效果。如果用 Contrast 和 Pivot 控件难以得到理想对比度…
在曲线上放置控制点可以精细雕琢对比度,达到你想要的效果。如果用 Contrast 和 Pivot 控件难以得到理想对比度,可以切换到 Curves(曲线)做更精细的自定义调整。Placing points along a curve will allow you to sculpt the contrast to get the look you want to achieve. If you are having difficulty getting your contrast to look right using the contrast and pivot controls, try switching to the curves for finer, custom contrast adjustments.
本卡术语Terms in this card
分辨率Resolution 调色页Color page 对比度Contrast 曲线Curves Gain(亮部)Gain Lift(暗部)Lift 一级校色器Primary Corrector 示波器Scopes 窗口Power Window 调色Grade