在独立节点中使用曲线Using Curves in Separate Nodes
15 steps
简介Overview
前面已经讲到,当调整最好分开处理时,可以使用节点。接续上一步的片段,你将在两个独立的节点上使用曲线来校正偏色问题。As you have already explored, nodes can be used when you decide adjustments are best performed separately. To further adjust the clip we just worked on, you’ll use the curves on two separate nodes to correct the color cast issue.
和 Primary corrector 的数值栏一样,曲线也可以分别调整各个通道。观察 Parade 示波器可以看到,蓝色轨迹在整个画面中比红、绿通道都低,所以先从蓝色通道入手。As with the primary corrector’s number fields, you can adjust color separately using the curves. Looking at the Parade scope, you can see that the blue trace is lower than the red or green across the image, so you’ll start by adjusting the blue channel.
在继续之前,最好先把节点命名一下。Before we go any further, it might be a good idea to label the nodes.
- 右键点击 node 01,选择 Node Label,输入 CONTRAST。Right-click over node 01, choose Node Label, and then type CONTRAST.
- 右键点击 node 02,选择 Node Label,输入 BLUE BALANCE。Right-click over node 02, choose Node Label, and then type BLUE BALANCE.
- 确认 node 02 处于选中状态。Make sure node 02 is selected.
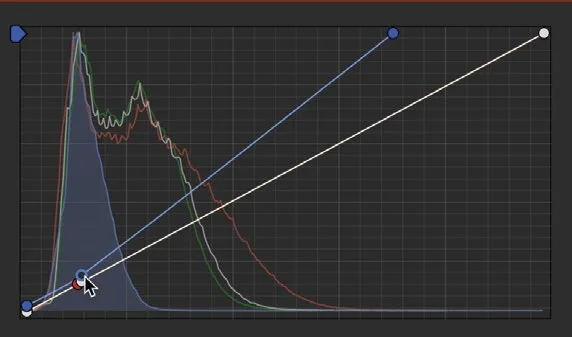
- 在曲线控制区域,点击
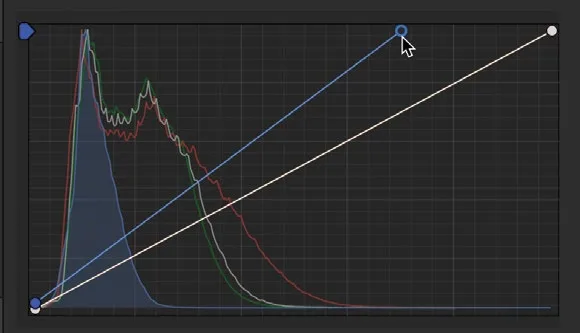
B按钮激活蓝色曲线。In the curve controls area, click the B button to activate the blue curve. - 将蓝色通道的黑色控制点略微上拖,直到 Parade 示波器中蓝色轨迹的底部与绿色轨迹平齐。Drag the blue channel’s black control point up just a hair until the bottom of the blue trace in the Parade scope is level with the green.
- 将蓝色通道的白色控制点向左拖动,直到 Parade 示波器中蓝色轨迹在波形顶部与绿色轨迹对齐。Drag the blue channel’s white control point to the left until the blue trace in the Parade scope aligns at the top of the graph with the green trace.
此时画面看起来几乎偏洋红,说明画面中红色过多。This image now looks almost magenta because there is too much red in the image.
- 按之前的方法再添加一个节点,命名为 RED BALANCE。Add another node as you did previously and label it RED BALANCE.
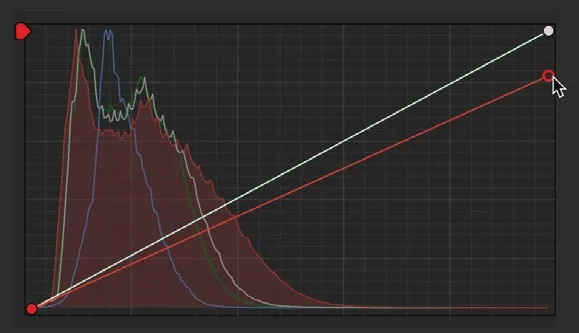
- 点击自定义曲线中的 R(红)通道按钮,将白点向下拖动,直到 parade 示波器波形顶部对齐。Click the R button in the custom curves and drag the white point down until the top of the parade traces are level.
- 小心地将黑点略微向上拖动,使波形底部对齐。此时画面上的橙色色偏已被消除。Carefully drag the black point up slightly so the bottoms of the traces are level. You have now removed the orange cast on the clip.
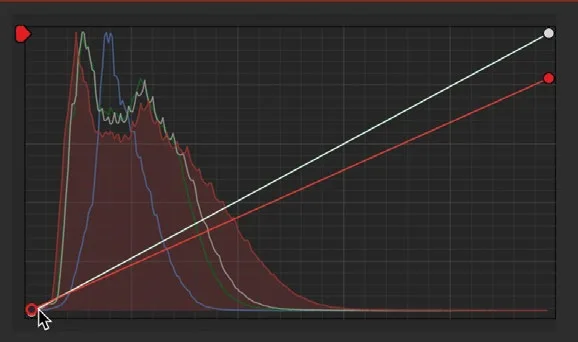
有时候,仅平衡白点、黑点以及阴影和高光的色偏还不够,中间调也常常存在色偏。曲线能很好地校正中间调色偏,因为你可以在曲线上任意位置添加控制点,精准定位需要修正的特定亮度区域,甚至可以直接在画面中点选需要调整的位置。当前镜头看起来仍有些偏蓝,因此需要调整中间调。Sometimes, balancing the white point, black point, and color casts for shadows and highlights is not enough. Often, you will come across color casts in midtones as well. The curves are distinctly capable of correcting color casts in midtones because you can add control points anywhere along the line to pinpoint specific tonal regions that need correcting. You can even pinpoint the area you need to adjust by selecting it in the viewer. Looking at the current shot, it still looks a little blue, so you need to adjust the midtones.
- 再次选中 02 BLUE BALANCE 节点。Select node 02 BLUE BALANCE again.
- 在
Viewer窗口中,点击左下角的屏幕Overlay按钮菜单(当前可能显示为之前用过的 Image wipe 图标),从菜单中选择 Qualifier 工具。In the viewer window, click the onscreenOverlaybutton menu in the bottom left corner. Currently, it might look like the Image wipe icon we were using earlier. From the menu, choose the Qualifier tool. - 在 Viewer 中点击画面左侧的树木区域。In the viewer, click the area of trees on the left side of the image.
树木区域明显带有需要校正的蓝色色偏。在画面中点选并不会单独隔离这些树木,而是会把控制点精确放置在曲线上对应这些树木颜色的位置。The trees appear to have a blue cast that needs to be corrected. Although you are not specifically isolating the trees in the shot by clicking in the viewer, you are placing the control point precisely along the curve line where the color for that tree is located.
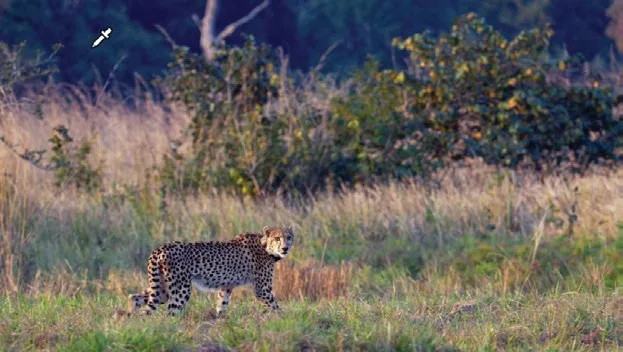
- 将蓝色控制点非常轻微地向下拖动,直到树木及其前方的草地开始呈现出略微偏暖、偏绿的色调。Drag the blue control point down very slightly until the trees and even the grass in front of them start to look slightly warmer and greener.
在曲线图中将控制点向下拖,会通过增加红/品红来降低中间调中的绿色。Dragging the point lower in the graph decreases the green in the midtones by adding more red/magenta.
- 按 Option-D(macOS)或 Alt-D(Windows)查看未应用色相曲线调整的画面;再按一次 Option-D(macOS)或 Alt-D(Windows)回到校正后的画面。Press Option-D (macOS) or Alt-D (Windows) to see the image without the hue curves adjustment. Press Option-D (macOS) or Alt-D (Windows) again to view the corrected clip.
色彩平衡调整前(左)与调整后(右)对比。Before color balance (left) and after color balance (right).
本卡术语Terms in this card
时间线Timeline 对比度Contrast 曲线Curves 一级校色器Primary Corrector 示波器Scopes 窗口Power Window 限定器Qualifier 调色Grade 静帧Still 节点Node
相关知识卡Related Cards
时间线Timeline 自定义曲线调色Custom Curves Parade 示波器Parade Scope 限定器Qualifier