自动调整Making Automatic Adjustments
14 steps
简介Overview
理解了一级调色工具之后,就可以在开始打造复杂风格或单独处理某些颜色/区域之前,先对素材做平衡(normalize)处理。平衡素材通常是调色的第一步,能消除拍摄时产生的偏差,让多段素材的观感统一,便于后续做创意调色。Now that you have a good understanding of how the primary color controls work, you can balance, or normalize, your shots before you start down the path of creating complex looks or isolating certain colors or areas. Normalizing shots is often the first part of the grading process that can remove inaccuracies that might have occurred while filming. Doing this will unify the shots, making it easier to apply creative grades later.
但如果你不确定需要修正什么(尤其是刚开始学调色时),或者时间有限、想快速完成修正,DaVinci Resolve 提供了一系列自动化的快速工具可以帮你处理。However, what happens if you are unsure of what needs correcting, especially if you are just starting out with color grading? Or maybe due to time limitations, you just want to correct shots quickly. DaVinci Resolve provides a range of quick, automatic tools to help you correct shots.
- 在时间线上选中 clip 03。由于清晨的光线条件,这段素材的色调范围(tonal range)相当窄。Select clip 03 in the timeline. You can see that the tonal range is quite narrow due to the lighting conditions of early morning.
- 点击左侧调色面板左上角的
Auto Balance按钮(圆圈中的 A 图标),素材的色调范围和颜色会自动平衡。Click the Auto Balance button (the A within a circle) in the upper left corner of the left palette window, and the clip’s tonal range and color will balance automatically.
NOTE · 注意提示:Auto Balance 不一定对时间线上的每段素材都有效,取决于素材的拍摄方式。例如低光环境下拍摄的素材,Aut…
提示:Auto Balance 不一定对时间线上的每段素材都有效,取决于素材的拍摄方式。例如低光环境下拍摄的素材,Auto Balance 可能会把画面拉得很亮,这未必是你想要的效果。An Auto Balance may not work on every clip in your timeline because it depends on how the material was shot. For example, with a clip shot in low light, the Auto Balance might try to make the image much brighter, which you might not necessarily want.
可以看到 Auto Balance 给出了一个不错的起点,但高光部分稍微偏高,而且偏蓝。As you can see, the Auto Balance has given you a good starting point. However, the highlights are a bit too high, and they are also too blue.
- 添加第二个串行节点:右键点击 node 01,在右键菜单中选择
Add Node > Add Serial,或者按快捷键 Option-S / Alt-S。Add a second serial node by right-clicking node 01 and choosing Add Node > Add Serial from the contextual menu or by pressing Option-S/Alt-S on the keyboard. - 在 Gain(增益)区域,把主轮(master wheel)向左拖,把高光降下来,让蓝色 parade 波形图顶部完整可见,确保没有削波(clipping)。数值大约调到 0.83 左右。In the Gain region, drag the master wheel left to bring the highlights down so that the top of the blue parade graph can be seen to ensure nothing is clipped. The values should be around 0.83.
- 按住并拖动 Gain 色轮中心向橙色方向移动,平衡 parade 顶部的颜色,让画面看起来稍微暖一些。Click and drag the center of the Gain color wheel toward orange to balance out the top of the parade and make the shot look a little warmer.
- 按快捷键 Option-D / Alt-D,或者点击
Bypass按钮,对比调色前后的效果。Press Option-D/Alt-D on the keyboard or press theBypassbutton to see the before and after grade.
先用自动调色打基础,再用额外的节点做精修,这个流程可以得到相当不错的调色效果。自动调整不一定能一步到位,但能帮你走上正确的路。You have done a pretty good grade by using the Auto grade and then refining it with an additional node. Automatic adjustments may not get you to a perfect grade, but they can certainly set you on the right path.
- 在时间线上选中 clip 05。这是同一段采访素材的另一个画面,之前我们做过手动修正。这次可以换一种方式,试试 Automatic White Balance 工具来平衡画面。Select clip 05 in the timeline. This is a different section of the same interview clip that we did our initial correction on. Instead of using a manual adjustment, we could try to use the Automatic White Balance tool to even out the shot.
NOTE · 注意提示:如果在 Color 页面中对同一段素材的不同片段分别调色,DaVinci Resolve 会将它们视为独立素材。若…
提示:如果在 Color页面中对同一段素材的不同片段分别调色,DaVinci Resolve 会将它们视为独立素材。若需要对整段素材进行统一调色,请参阅《The Colorist's Guide to DaVinci Resolve 20》。If you are using different sections of the same clip in the color page, DaVinci Resolve will treat them as separate clips. If you do wish to grade the entirety of a clip, you can learn more about this in The Colorist’s Guide to DaVinci Resolve 20.
- 点击左侧调色面板左上角的 White Balance 工具。此时鼠标指针会变为 Eyedropper(吸管)工具。Click the White Balance tool in the upper left corner of the left palette. You will see that the mouse pointer changes to an Eyedropper tool.
TIP · 提示提示:如果不小心激活了 White Balance 工具,按键盘上的 Esc 键即可恢复默认指针…
提示:如果不小心激活了 White Balance 工具,按键盘上的 Esc 键即可恢复默认指针。If you accidentally click the White Balance tool, simply press the Esc key on the keyboard to go back to the default mouse pointer.
- 将指针移至 Viewer 中,定位在画面中应该为白色的区域(本例中使用 Sean 的牙齿),然后点击选取。Bring the pointer over the viewer and place it over an area that should be white—in this case, we will use Sean’s teeth. Click the selection.
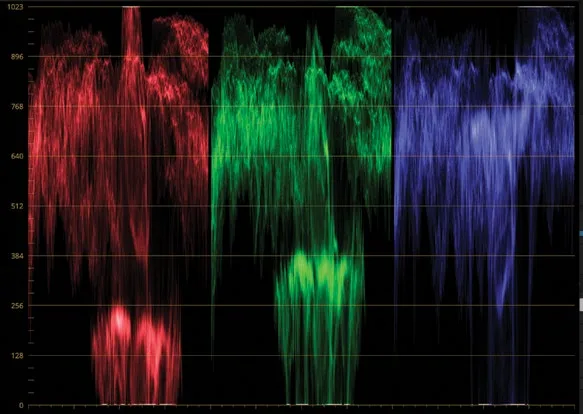
画面会立即去除原本的橙色色偏,因为你指定了一个本应呈白的区域,软件据此自动进行了校正。The clip will immediately lose its orange cast since you have identified an area that should be white, and the software has automatically corrected for this.
当前结果与我们最初的手动调色并不完全一致,但已经比较接近,因此可以再添加一个串行节点做进一步微调,让两个镜头观感统一。It does not quite match the initial grade we did; however, it is quite close, so we can add another serial node and make some further adjustments so the two shots can look similar.
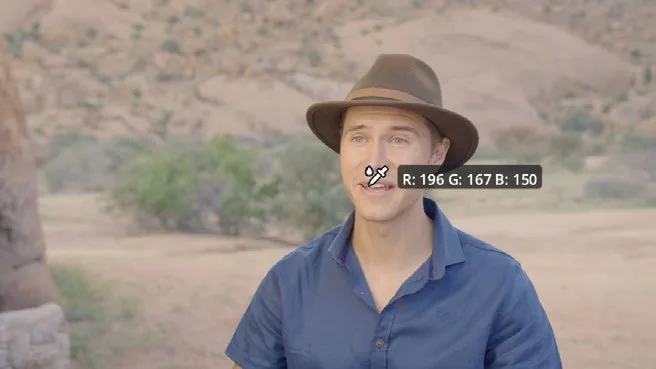
右键点击 node 01,在弹出菜单中选择 Add Node > Add Serial,或者直接按快捷键 Option-S/Alt-S,添加一个串行节点。Add a serial node by right-clicking node 01 and choosing Add Node > Add Serial from the contextual menu or by pressing Option-S/Alt-S on the keyboard.
将 Gain 主色轮向右拖动到约 1.20,使高光部分正确还原。Drag the Gain master wheel right to around 1.20 so the highlights are correct.
将 Lift 主色轮向左拖动到约 0.03,使阴影落在 Parade 示波器的底部附近。Drag the Lift master wheel left to around 0.03 so the shadows sit toward the bottom of the parade.
可以看到,使用自动工具已经为你提供了一个不错的起点,在此基础上稍作调整就能获得均衡的色彩平衡。我们只需再做几处微调,让它与第一段采访的画风尽量接近即可。Again, using an automatic tool has given you a good starting point that you can build on to get a nice, even color balance. We just need to make some final adjustments so it looks close to the first interview.
右键点击 node 01,在弹出菜单中选择 Add Node > Add Serial,或者直接按快捷键 Option-S/Alt-S,添加一个串行节点。Add a serial node by right-clicking node 01 and choosing Add Node > Add Serial from the contextual menu or by pressing Option-S/Alt-S on the keyboard.
在第二个节点上,将 Gamma 主色轮拖到约 -0.06,并将 Gamma 色轮向上推向红色方向。On the second node, drag the Gamma master wheel to around -0.06 and drag the Gamma color wheel up toward red.
本章稍后会介绍镜头匹配(shot matching),不过通过自动白平衡(automatic white balance)也能达到相当接近的效果。A little later in this chapter, you will learn how to match shots, but this gets us pretty close by simply adjusting an automatic white balance.
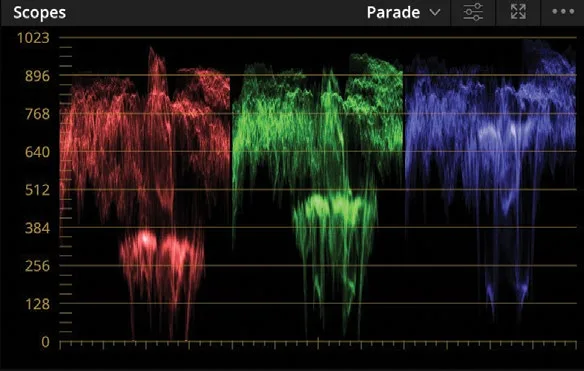

Final auto balance 可以自动设定画面中的黑点(black point)与白点(white point)。The final auto balance allows you to automatically set black and white points in an image.
- 在时间线上选中片段 04。Select clip 04 in the timeline.
- 选择 Lift 色轮左侧的 Pick Black Point 工具,移到 viewer 上。Select the Pick Black Point tool to the left of the Lift color wheel and move it over the viewer.
鼠标位置旁会出现 RGB tooltip,显示该像素的亮度值,范围 0(黑)到 255(白)。选取黑点时,R、G、B 三值应尽量接近 0,但不能全部为 0;如果全部为 0,说明该区域可能不含亮度信息。An RGB tooltip appears next to the point, giving you a brightness value for the pixel you’re hovering over. The values range from 0 (black) to 255 (white). When selecting a black point, you want the red, green, and blue values to be as close to 0 as possible without all displaying 0. If all the values display 0, there’s a chance that there is no brightness information present.
- 在前景中猎豹腿上的一个斑点处点击,阴影会立即变暗,斑点呈现为黑色。Click one of the cheetah’s spots on its leg in the foreground. The shadows will be immediately darkened so the spots now look black.
TIP · 提示提示:可以用鼠标中键滚动,或使用快捷键 Command-+/-(Windows:Ctrl-+/-)缩放 viewer;按…
提示:可以用鼠标中键滚动,或使用快捷键 Command-+/-(Windows:Ctrl-+/-)缩放 viewer;按 Z 可让画面重新适配窗口大小。You can zoom in and out of the viewer by either scrolling a middle mouse button or using the shortcut Command-+/- or Crtl-+/-. Pressing Z on the keyboard will resize the image back to the window.
点击阴影区域后,系统会将其识别为最暗的黑点,并相应调整其他像素,同时校正黑位偏色,避免阴影区域某个通道过度主导。Clicking the shadow area identifies it as your darkest black point and adjusts other pixels accordingly. It also corrects any tint in the black so that no single color channel dominates in the shadow regions.
接下来用同样的方法处理白点:在画面中找到明亮的区域并选取,注意不要选绝对最亮的点,而应选取你认为是柔和白色的区域。也就是说,外景不要选太阳,而应选人物的白 T 恤或白色汽车。Now you’ll do the same for the white point. In the viewer, you’ll locate a bright point in the image and select it. The point should not be the absolute brightest point, but rather an area you think should be soft white. In other words, you do not want to pick the sun in every outdoor shot but rather the white T-shirt someone is wearing or a white car.
本镜头中猎豹尾巴上有一小块白色区域,但目前不在画面内。This shot includes a small white area on the cheetah’s tail; however, it is not currently in the shot.
- 为了与 Edit page 使用同一时码参考,点击 viewer 时码旁的下拉菜单,确认选择 Timeline Timecode。To ensure that you are using the same timecode reference as the edit page, click the dropdown menu next to the timecode in the viewer and make sure it is set to Timeline Timecode.
- 按 Spacebar 播放镜头至尾巴出现,然后用键盘左/右方向键微调播放头,使时码停在 01:00:12:22。Press the Spacebar and play the shot until the tail appears in the shot. Using the Left and Right Arrow keys on the keyboard, nudge the playhead until the timecode reads 01:00:12:22.
在 Gain 色轮左上角,点击白场(white point)拾取器。At the upper left corner above the Gain color wheel, click the white point picker.
把拾取器移到猎豹尾巴的白色区域并点击选中。必要时可以放大查看。Place the picker over the white area of the cheetah’s tail and select it. You can zoom in if needed.
NOTE · 注意注意:DaVinci Resolve 需要三键鼠标才能完整操作。鼠标的滚轮(中键)用途很多,在 Color 页面中,滚动…
注意:DaVinci Resolve 需要三键鼠标才能完整操作。鼠标的滚轮(中键)用途很多,在 Color页面中,滚动滚轮可以放大或缩小 Viewer;放大后,按住中键并拖动即可在放大画面中平移浏览。DaVinci Resolve is an application that requires a three-button mouse. The third wheel on the mouse has numerous uses; however, in the color page, it can be used to zoom in and out of the viewer by scrolling in and out on the wheel. Once zoomed in to the viewer, clicking and holding the middle mouse button will allow you to navigate around the zoomed-in image in the viewer.
点击 Bypass按钮或按 Shift-D 查看原始画面,再次点击或按 Shift-D 即可重新开启调色。Click the Bypass button or press Shift-D to see the original image. Click the button again or press Shift-D to turn the grade back on.
使用 auto select black point 和 white point 工具,可以快速决定画面中哪里应该是黑、哪里应该是白,从而轻松调整图像的色调范围。Using the auto select black point and white point tools has allowed you to adjust the tonal range of the image quickly and easily by allowing you to decide what should be black and what should be white in the image.
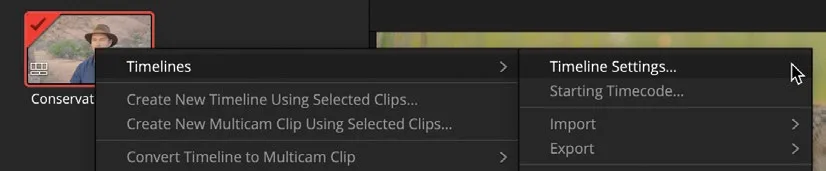
本卡术语Terms in this card
时间线Timeline 编辑页Edit page 播放头Playhead 标准化音量Normalize 调色页Color page Gain(亮部)Gain Gamma(中间调)Gamma Lift(暗部)Lift 示波器Scopes 白平衡White Balance 窗口Power Window 调色Grade 时间码Timecode 节点Node
相关知识卡Related Cards
时间线Timeline Parade 示波器Parade Scope 一级调色Primary Color Correction 镜头匹配Shot Matching