使用独立的 Timeline 设置Using Separate Timeline Settings
3 steps
简介Overview
引子 Timeline 已经调色完成,需要保留当前的调色状态。下一节将介绍 DaVinci Resolve 强大的色彩管理(color management)功能,但不希望当前 timeline 受到这些设置的影响。解决办法是让 timeline 脱离项目设置(project settings),独立运行,这样调色就不会被改变。Now that our introduction timeline is completed, you’ll want to keep the grades exactly as they are. In the next section, we will start looking at DaVinci Resolve’s incredibly powerful color management. However, we don’t want the current timeline to use any of those settings. So to ensure that it keeps its own settings, we’ll make it independent from the project settings, meaning the grades will not change.
- 在
Color页面打开 Media Pool,选择 Timelines 智能文件夹(smart bin)。Open the media pool in the color page and select the Timelines bin. - 在 Conservation Intro timeline 上右键,从右键菜单中选择
Timelines > Timeline Settings。Right-click the Conservation Intro timeline and, from the contextual menu, choose Timelines > Timeline Settings.
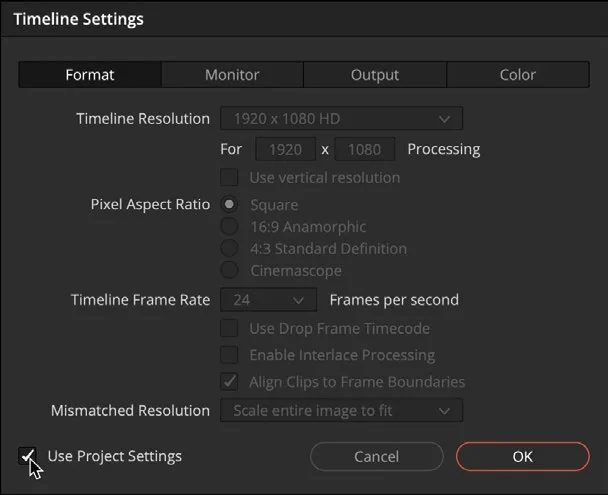
- 在弹出的窗口中,从 Timeline 菜单取消勾选
Use Project Settings复选框,然后点击 OK。From the Timeline menu, uncheck the Use Project Settings box and select theOKbutton.
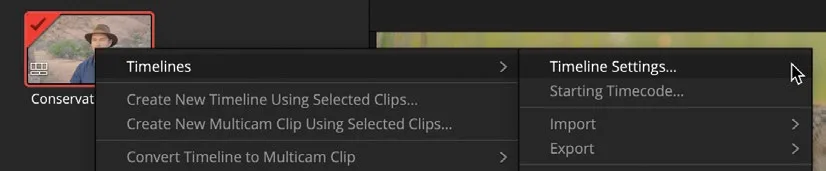
现在该 timeline 使用独立的设置,之后对项目设置(project settings)的任何修改都不会影响这条已调色的 timeline。The timeline now uses its own independent settings, so any changes that we now make to the project settings will not affect our graded timeline.
本卡术语Terms in this card
媒体夹Bin 媒体池Media Pool 时间线Timeline 色彩管理Color Management 调色页Color page 窗口Power Window 调色Grade 项目设置Project Settings