使用 Lift、Gamma 和 Gain 进行色彩校正Color Correcting Using Lift, Gamma, and Gain
12 steps
- 确认已选中第 02 段素材。Make sure you have clip number 02 selected.
这段素材看起来偏灰、对比度低,而且有明显偏色:本应接近白的区域都偏灰。从 Parade 示波器上可以看到,波形顶部远未到达示波器的上沿,说明画面里的高光不够亮。Looking at this clip, it appears a little flat with little contrast in the shot, and there is a notable color cast. Areas of the clip that should be near white look gray. This is reflected in the parade. The top of the trace, rather than being close to the top of the parade, sits well below it. This means the highlights in the image are not bright enough.
这次不用 Offset 调节,而是用 Lift、Gamma 和 Gain 来做调整。其中 Gain 用来控制画面中较亮的部分。Instead of using the Offset controls, you will use the Lift, Gamma, and Gain controls to make the adjustments. The Gain control allows you to adjust the brighter parts of the image.

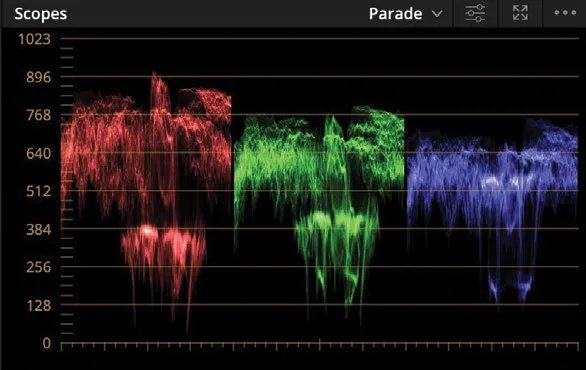
- 在主调色轮的 Gain 区域,把 master 推杆向右拖,让高光开始变亮。In the Gain region of the primary color wheels, drag the master wheel right so that the highlights start to look brighter.
- 参照 Parade 示波器,把高光调到红色通道波形顶部刚好触及上沿的 1024 刻度线。此时 Gain 数值大约在 1.11 左右。Using the Parade scope, adjust the highlights so the top of the trace touches the top 1024 line in the red channel. The value in the Gain control should be around 1.11.
NOTE · 注意如果把波形推过 1024 刻度线,会看到画面局部开始出现之前提到的裁切(clipping)。你可以试着继续推 Gain…
如果把波形推过 1024 刻度线,会看到画面局部开始出现之前提到的裁切(clipping)。你可以试着继续推 Gain master 轮看看效果:人脸的细节会变得过亮并丢失层次。If you go beyond the 1024 line on the parade, you will notice areas of the image starting to clip, as mentioned earlier. You can try this to see the effect if you continue to push the Gain master wheel: details in the face will start to look very bright but will essentially lose detail.
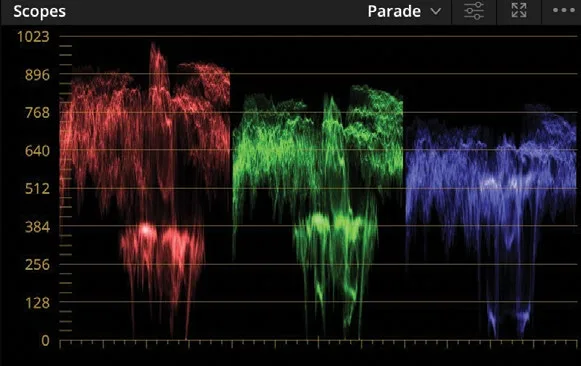
现在高光部分好看多了,但画面整体仍然偏橙。从 Parade 上也能看出,红色通道波形顶部明显高于蓝、绿通道,说明高光里红色成分太多,导致画面亮部偏暖。The highlights in the image now look better. However, the image still looks quite orange. This is reflected in the parade since the top of the red channel is higher than either the blue or the green channel. This shows that there is more red in the highlights, and therefore your brighter areas of the image look quite warm.
加色法下,纯白需要等量的红、绿、蓝混合而成。在 Parade 示波器上表现为三条通道波形在顶部完全平齐;同理,纯黑则对应三条通道在底部完全对齐。To create pure white using additive colors, you mix an equal amount of red, green, and blue. A white image would have the red, green, and blue traces completely level along the top of the Parade scope. Conversely, pure black would have the three color channels completely aligned at the bottom of the graph.
基于这个原理,可以借助 Parade 示波器来更方便地做色彩平衡。That being the case, you’ll use the Parade scope to make color balancing easier.
NOTE · 注意实际画面中,Parade 示波器看起来不均匀是正常现象。比如日落场景,红色通道就会明显高于绿、蓝通道,这是由拍摄时段决定…
实际画面中,Parade 示波器看起来不均匀是正常现象。比如日落场景,红色通道就会明显高于绿、蓝通道,这是由拍摄时段决定的。Sometimes the parade may look uneven due to the nature of a shot. For example, a sunset will have a much higher red channel compared to the green and blue, simply due to the time of day it was recorded.
- 使用 Gain 色轮,从中心点向远离红色、朝青色的方向拖动,让 Parade 波形顶部右侧大致平齐。此时画面中央(也就是主体位置)仍然有一小段红色波峰,这属于正常现象,因为肤色本来就落在红与黄之间的通道区域。Using the Gain color wheel, click and drag the center point away from red, toward cyan, so the tops of the parade traces are approximately level toward the right side. For now, there is a peak of red in the center, which is our subject; however, you would expect this to be redder since skin tone sits in the channel between red and yellow.
- 如果操作过程中出现误调,可以直接点击每个调节区域右上角的
Reset按钮恢复到默认状态。If at any point you make a mistake, you can simply reset the controls by clicking theResetbutton in the upper right corner of each region. - 再次提亮高光区域,把红色通道波形顶部调到刚好触及上方 1024 线。Make the highlights a little brighter again by getting the top of the parade in the red channel to touch the top 1024 line.
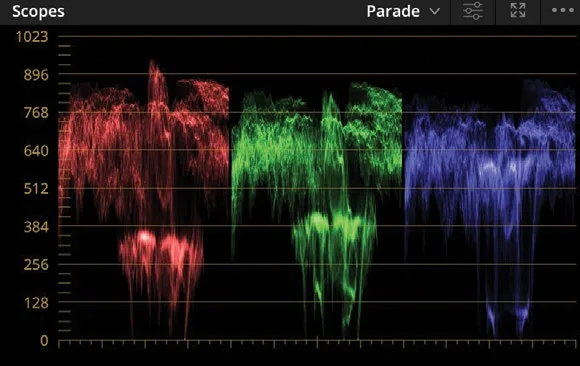
现在画面高光看起来已经正常,但整体仍然偏平,还需调整阴影来提升对比度。同时画面偏冷,因为阴影区域蓝色成分偏多——在波形上可以看到阴影部分的蓝色通道数值更高。Now the highlights of the image look correct; however, you need to adjust the shadows as well to improve the contrast in the shot since it still looks a little flat. It also looks a little too cold due to the fact that there is more blue in the shadows. This can be seen in the parade since the blue channel in the shadows is higher.
- 在 Lift 色轮上,把中心点从蓝色一侧向黄色方向拖动,蓝色通道波形底部随之下降。但你会发现绿色通道几乎没动,阴影因此开始偏绿。Under the Lift color wheel, drag the center point away from blue toward yellow, and you will see the bottom of the blue scope start to drop down. You will notice, however, that the green channel does not really move, and therefore the shadows start to look a little green.
- 继续把中心点向红色方向拖,直到波形底部在三个通道上对齐。Continue to drag the center point more toward red until the bottom of the parade is level across all three channels.
画面立刻不再那么冷了。要不是借助示波器,很难察觉冷色偏其实集中在暗部。画面仍有些平——看主体 Sean 颈后衬衫领口位置,呈现的是灰色而非纯黑。Immediately, the shot looks less cool. Without the scopes, it might have been difficult to pick up on the fact that the blue tint was actually in the darker areas of the image. The shot still looks a little flat. If you look behind our subject, Sean, to where his shirt collar sits off his neck, the area appears to be gray, not black.
- 把 Lift 主控轮向左拖,让阴影更深,直到衬衫领口看起来是黑色,或波形底部刚好触及 0 线。Drag the Lift master wheel to the left so that the shadows start to look darker. Drag the wheel until the area of the shirt collar looks black or until the bottom of the parade touches the 0 line.
NOTE · 注意把暗部电平压到波形底端以下,原理和高光相同。阴影削波意味着暗部细节丢失,但视觉上不如高光明显,常用作在暗部隐藏噪点等瑕疵…
把暗部电平压到波形底端以下,原理和高光相同。阴影削波意味着暗部细节丢失,但视觉上不如高光明显,常用作在暗部隐藏噪点等瑕疵的技巧。Dropping the levels below the bottom of the parade works in the same way as it does in the highlights. Clipping the shadows will mean detail will be lost in darker areas. This, however, is not as noticeable as it is in the highlights and can also be used as a technique to hide such things as noise in dark areas of an image.
画面对比度立刻提升,阴影也不再发灰。Immediately, the shot’s contrast has improved, and the shadows no longer look gray.
- 点击观众窗口右上角的
Bypass按钮,或按键盘快捷键 Shift-D,查看未校正的原始画面。再次点击Bypass按钮关闭旁路,显示已应用的调色结果。Click the Bypass button in the upper right corner of the viewer, or press Shift-D on the keyboard, to show the clip without the correction. Click the Bypass button again to turn it back off to show the adjustments you have made.
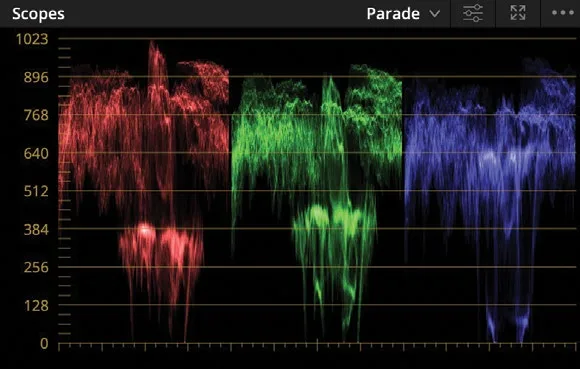
通过以上操作,你已经借助 Lift 和 Gain 精确控制黑场与白场的位置,完成了画面对比度的调整;同时分别针对高光和阴影去除了偏色,而不是用 Offset 一刀切地调整全片色调。Using these controls, you have now accurately adjusted the clip’s contrast by controlling where the black and white points sit by using the Lift and Gain controls. You have also adjusted the color in the highlights and shadows to remove any tint that may have been present in those areas, rather than using the Offset control that would adjust the color for all areas of brightness in the clip.
NOTE · 注意DaVinci Resolve 的观众窗口是预览用,并非校色级监视器。对于网络或社交媒体交付的项目,观众窗口的输出基本够…
DaVinci Resolve 的观众窗口是预览用,并非校色级监视器。对于网络或社交媒体交付的项目,观众窗口的输出基本够用;而面对电视广播或数字影院交付的项目,需要使用 Blackmagic Design UltraStudio 或 DeckLink 采集输出卡,连接经过校色的广播级/影院级监视器。DaVinci Resolve’s viewers are previews that are not intended to be color-critical displays. For projects that are intended for online delivery or social media, the viewer output may be suitable. For television broadcast or digital cinema, you can use a Blackmagic Design UltraStudio or DeckLink card to connect to a broadcast or digital cinema calibrated display.
接下来看 Gamma。Now let’s look at Gamma.
Gamma 色轮下方的 master wheel(主轮)用来调整画面整体亮度,同时保持之前设定好的黑场和白场。通常在设定好黑场和白场之后,可以用 Gamma 轮做进一步的微调——这一步往往也是为画面塑造风格(look)的起点。Gamma 有时也叫 midtones(中间调),因为它主要控制图像的中间亮度区域。The master wheel under the Gamma color balance control adjusts the brightness while maintaining the black and white points that you set previously. In general, once you set your black and white points, you can make further adjustments using the Gamma wheel. This is often where you can start to build more of a look for the shot. Gamma is sometimes referred to as midtones because it adjusts the middle tonal range of an image.
接下来我们把画面再压暗一些,但不再动 Lift 参数。In this case, we will make the image a little darker again, but we will not adjust the Lift parameter.
- 把 Gamma 的 master wheel 向左拖,让 Sean 的衬衫再暗一些、稍微更突出。拖完后,master wheel 上方的 luminance、red、green、blue 数值应该都在 -0.06 左右。Drag the Gamma’s master wheel to the left to make Sean’s shirt a little darker, but make it pop a little more. The luminance, red, green, and blue values above the master wheel should end up around -0.06.
画面看上去还是偏绿,所以可以再往回收一点,让主体更暖。从 parade scope 中段可以看到 green(绿)通道的读数略高于其他两路。Your image still looks a little green, so you may want to ease that off a little and make the subject a little warmer. You can see in the middle of the parade that the green channel sits slightly higher.
- 在 Gamma 色轮中心点按住并向洋红(magenta)方向拖动,让画面少一点绿、多一点暖意。目标参考值:red -0.03,green -0.06,blue -0.03。Click and drag the center of the Gamma color wheel toward magenta so the image looks a little less green and has a warmer feel. The values you are aiming for are red -0.03, green -0.06, and blue -0.03.
可以看到,Gamma 的调节相当主观。画面该更亮还是更暗、更暖还是更冷,作为调色师由你决定。As you can see, the Gamma control is more subjective. As the colorist, you can decide if the shot should be brighter or darker, warmer or cooler.
TIP · 提示NOTE:相信你的眼睛。video scopes 是辅助参考,但不必苛求每一格都完全对齐。可以先试着加一点颜色…
NOTE:相信你的眼睛。video scopes 是辅助参考,但不必苛求每一格都完全对齐。可以先试着加一点颜色,看看效果是否满意——如果只盯着 scopes 调,很容易把颜色推过头。Trust your eyes. While the video scopes are there to help you, they don’t always have to line up exactly. Start by adding a color and see if you get a result that you like. Sometimes grading solely by the scopes can push the color too far in one direction.
Lift、Gamma 和 Gain 并非只作用于暗部、中间调和亮部这三块严格独立的区域,三者的影响范围其实有相当大的 overlap(重叠)。这种重叠能让调整更自然、更平滑,但也意味着你需要在三个色轮之间反复切换才能得到最佳结果——因为调任何一个,都会对另外两个的效果产生可见的影响。The Lift, Gamma, and Gain controls are not narrow adjustments that change only the dark, midrange, or bright areas. In fact, their ranges overlap by a considerable amount. This overlap helps you make more natural, smoother-looking adjustments, but it also means that you’ll need to move among the three color balance controls to achieve the best results because adjusting one control visibly impacts the others.

本卡术语Terms in this card
调色轮Color Wheels 对比度Contrast Gain(亮部)Gain Gamma(中间调)Gamma Lift(暗部)Lift 偏移Offset 示波器Scopes 窗口Power Window 调色Grade 静帧Still 键盘快捷键Keyboard Shortcuts
相关知识卡Related Cards
一级调色轮Primary Color Wheels Parade 示波器Parade Scope 视频示波器Video Scopes