应用 EQApplying EQ
9 steps
简介Overview
另一组能让音频更悦耳(尤其是对话片段)的工具,就是对 EQ 做调整。Fairlight 有专门作用于整条轨道的 EQ 控件,通过增减特定频率来控制声音的「温暖度」。接下来就用 EQ 让 Chris 的对白更暖一些。Another set of controls you can use to help sweeten your audio, especially when it comes to dialogue clips, is to apply an adjustment to the EQ. Again, Fairlight has dedicated EQ controls that can be applied to an entire track. EQ is often used to control the “warmth” of the audio signal by increasing or decreasing certain frequencies. You will use the EQ controls to help “warm up” Chris’s dialogue audio.
- 双击 DIALOGUE 轨道的 EQ 设置。Double-click the EQ settings for the DIALOGUE track.
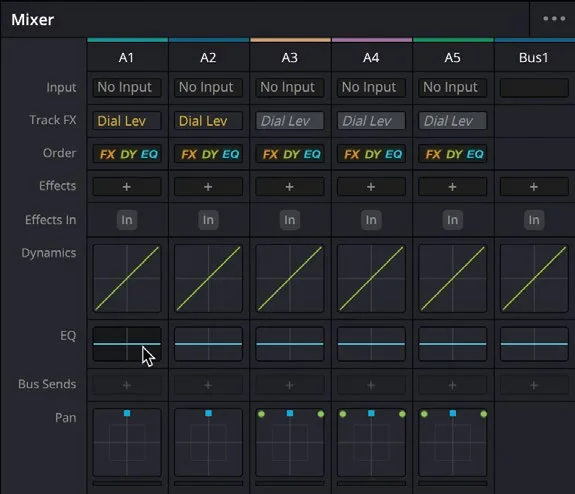
此时会弹出 6-Band Equalizer 设置窗口。The 6-Band Equalizer settings window opens.
- 播放时间线上的前两个片段。Play back the first two clips in the timeline.
音频播放时,图中会实时显示 Chris 声音各个频率的曲线。As the audio plays in the timeline, you can see the graph representing the various frequencies of Chris’s voice.
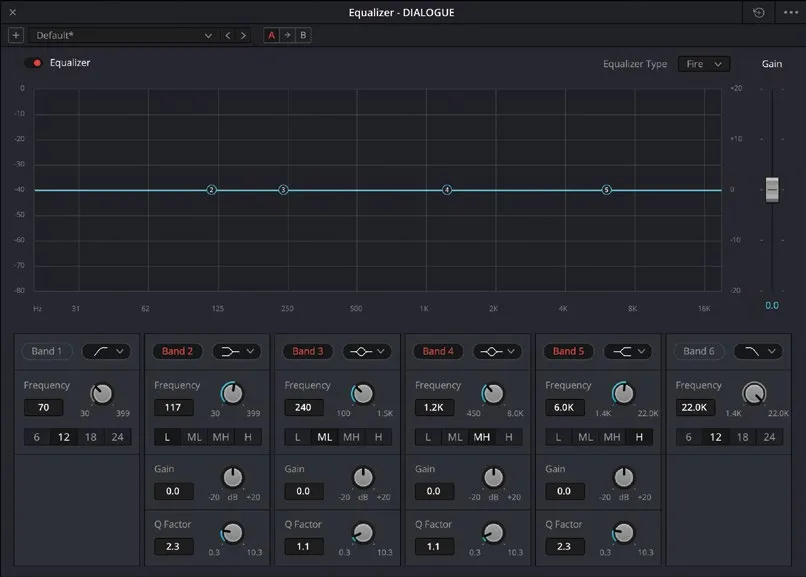
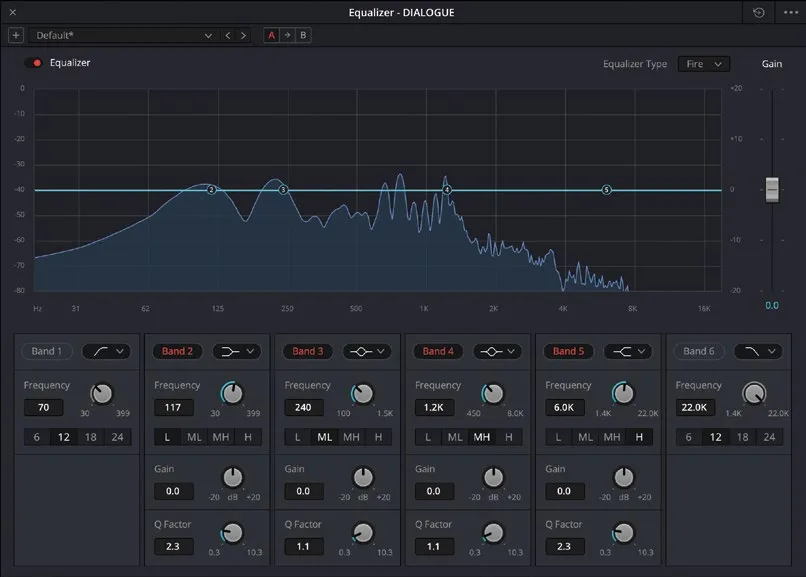
由于 Chris 嗓音偏低沉,他的声音主要分布在 500 Hz 以内的低频段。通过增减不同频段的电平,就可以调整 EQ 效果。Unsurprisingly, since Chris has a reasonably deep voice, most of the frequencies in his voice are grouped in the lower frequency range, up to around 500 Hz. You can adjust the EQ by increasing or decreasing the levels of the various frequencies.
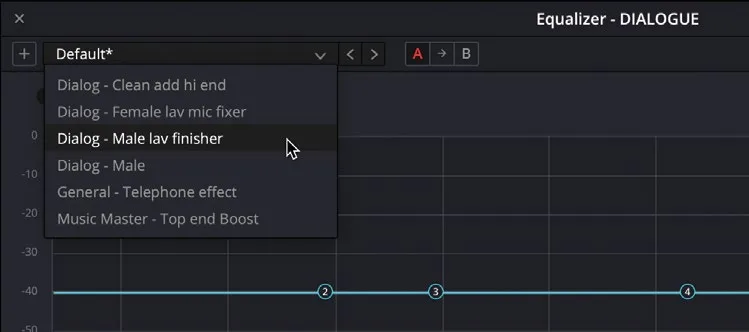
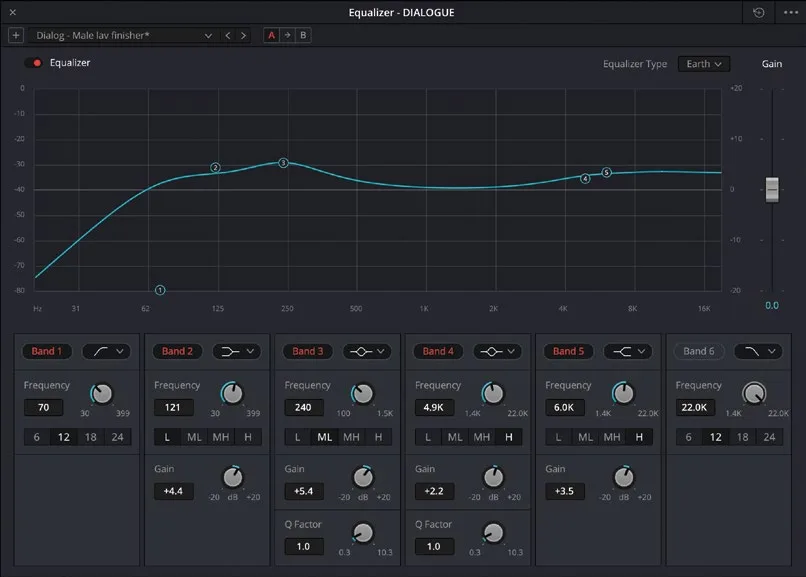
- 在 preset 列表中选择「Dialog – Male lav finisher」。In the preset list, select the “Dialog – Male lav finisher” option.
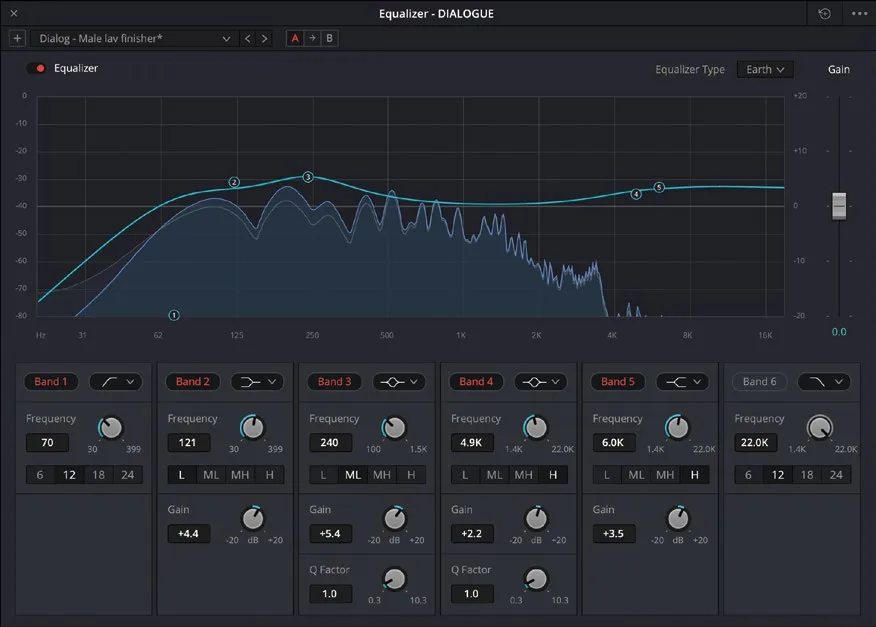
可以看到这个预设会衰减最低频段,同时提升约 250 Hz 和 4 kHz 附近的频率。From the controls, you can see that this loads a preset that rolls off the frequencies at the very lower end and increases the frequencies around the 250 Hz range, and again at around the 4 kHz range.
- 再次播放 DIALOGUE 轨道的前两个片段,试听变化。Play back the first two clips in the DIALOGUE track again to hear the changes.
低频调整让 Chris 的声音更暖,高频调整则效果不太明显。图上较淡的白色轮廓线代表调整前的原始频率。You should hear that Chris’s audio sounds slightly warmer, thanks to the adjustment made to the lower frequencies, while the adjustments to the upper frequencies probably have less of an impact. The fainter, white-outlined indicators on the graph represent the original frequencies.
NOTE · 注意如果在调整后的 EQ 和「平直」(未加 EQ)版本之间难以分辨,可以在播放时反复启用和禁用 EQ 来对比…
如果在调整后的 EQ 和「平直」(未加 EQ)版本之间难以分辨,可以在播放时反复启用和禁用 EQ 来对比。If you find it hard to discern between the adjusted EQ and the “flat” (non-EQ’d) version, you can enable and disable the EQ as the audio is playing back.
有时 EQ 调整带来的变化会非常明显。Sometimes EQ adjustments can be quite dramatic.
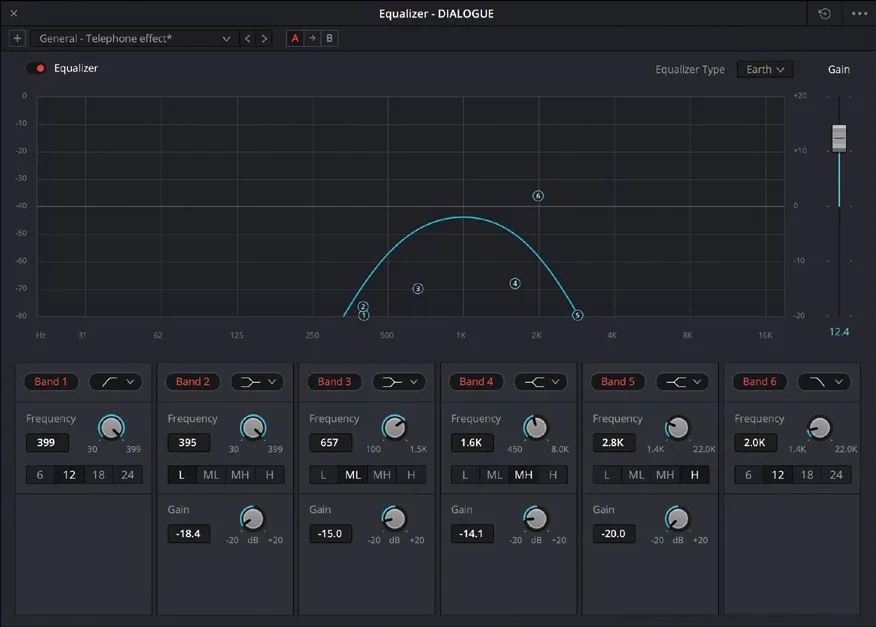
- 选择 “General Telephone effect” 预设。Select the “General Telephone effect” preset.
从曲线图可以直观看到,这个预设把频率限制在 300 Hz 到 3 kHz 之间,并在 1 kHz 附近轻微降低电平。You can tell immediately from the graph that this preset limits the frequencies to between 300 Hz and 3kHz, while slightly reducing the level at around 1 kHz.
- 再次播放前两段片段,听听 Chris 的声音仿佛真的从电话那头传来!Play back the first two clips again to hear Chris sounding like he’s speaking on the end of a telephone call!
- 点击 EQ 控件窗口右上角的
Reset按钮,然后重新选择 “Dialog – Male lav finisher” 选项。Click the Reset button at the top right of theEQ controlswindow and reselect the “Dialog – Male lav finisher” option. - 关闭 DIALOGUE 轨道的
EQ窗口,回到调音台面板,双击 VO 轨道的 EQ 控件打开窗口。Close the EQ window for the DIALOGUE track, and in the mixer, double-click the EQ controls for the VO track.
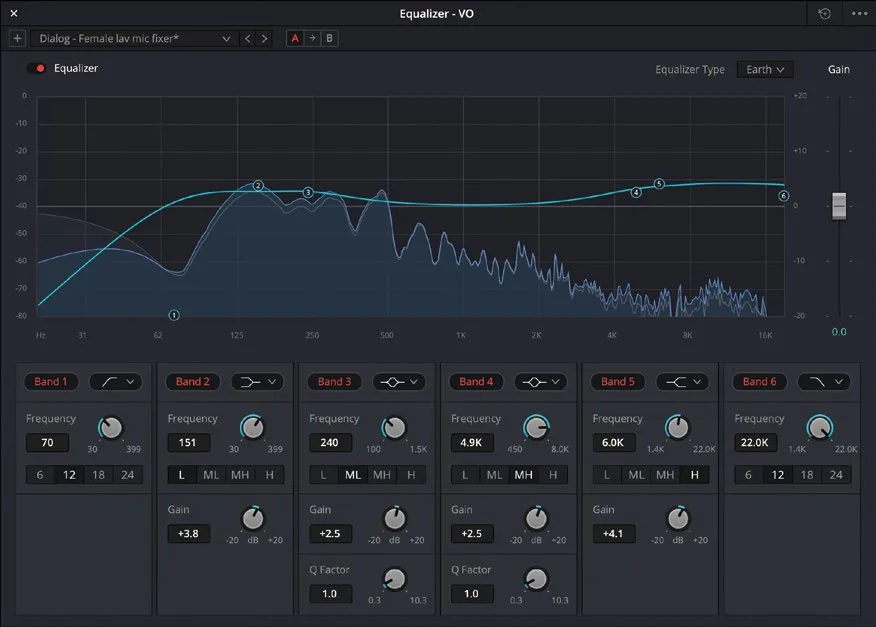
- 在
EQ窗口中选择 “Dialog – Female lav mic fixer” 预设,为录制的旁白增加更多温暖感。In the EQ window, choose the “Dialog – Female lav mic fixer” preset to add more warmth to the recorded voiceover.
听完该预设对这条轨道人声的效果后,关闭 EQ窗口。When you have listened to how the preset affects the voice for this track, close the EQ window.
这类预设是调整音频片段 EQ 的良好起点。如需进一步了解手动调整轨道 EQ 的方法,请参阅《The Fairlight Audio Guide to DaVinci Resolve 20》。Presets like these are useful starting points for adjusting the EQ of your audio clips. For more information on manually adjusting a track’s EQ, see The Fairlight Audio Guide to DaVinci Resolve 20.
NOTE · 注意如果需要在下一步前追上进度,打开 media pool,选择 TIMELINES bin,然后执行 File > Imp…
如果需要在下一步前追上进度,打开 media pool,选择 TIMELINES bin,然后执行 File > Import > Timeline,导航到 R20 Beginners Guide / Lesson 08 / Timelines / OMO PROMO MIX CATCHUP 03.drt 并点击 Open。If you need to catch up before moving to the next step, open the media pool, select the TIMELINES bin, and choose File > Import > Timeline, navigate to R20 Beginners Guide / Lesson 08 / Timelines / OMO PROMO MIX CATCHUP 03.drt and click Open.
本卡术语Terms in this card
媒体夹Bin 媒体池Media Pool 时间线Timeline 预设Preset 调音台Mixer 配音Voiceover 曲线Curves 窗口Power Window 均衡器EQ Fairlight 音频Fairlight