TASK 2Task 2
标注子剪辑元数据Tag Subclip Metadata
7 steps
- 选中第一个子剪辑,在
Metadata面板的 Description 字段中输入 inspiration。Select the first subclip and, in theMetadatapanel, type inspiration in the Description field. - 选中第二个子剪辑,在 Description 字段中输入 Experiences。Select the second subclip and type Experiences in the Description field.
- 选中第三个子剪辑,在 Description 字段中输入 Brand。Select the third subclip and type Brand in the Description field
- 选中最后一个子剪辑,在 Description 字段中输入 #EXSW。Select the final subclip and type #EXSW in the Description field.
- 在 SUBCLIPS 智能夹中全选所有子剪辑,在
Metadata面板的 Keyword 字段中删除 INTERVIEW 关键词,输入 SUBCLIP,然后点击Metadata面板底部的 Save。Select all the clips in the SUBCLIPS bin and, in theMetadatapanel, delete the INTERVIEW keyword and type SUBCLIP in the Keyword field. Click Save at the bottom of theMetadatapanel. - 在 Inspector 的 Name 字段中输入 CL %Keywords - %Description,并按提示从菜单中选择对应的元数据选项。In the Name field in the Inspector, type CL %Keywords - %Description, selecting the metadata options from the menus as they appear.
- 点击 Name 字段外的区域,所有子剪辑便会按对应元数据自动重命名。Click away from the Name field, and the subclips are now all renamed using the appropriate metadata.

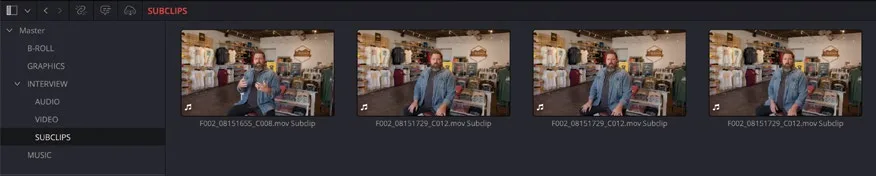
现在可以像 Lesson 1 中那样,把这些子剪辑当作普通素材正常剪辑使用。You can now edit using these subclips just like any other clip, as you did in Lesson 1.
NOTE · 注意NOTE:在 Lesson 1 中使用这些子剪辑时,每个子剪辑都被赋予了一个镜头编号并添加到 clip name 中,使…
NOTE:在 Lesson 1 中使用这些子剪辑时,每个子剪辑都被赋予了一个镜头编号并添加到 clip name 中,使它们按自然顺序排列,便于操作。When you used these subclips in Lesson 1, each subclip was given a shot number that was also added to the clip name so that they were ordered naturally for you to work with them.
子剪辑的一个限制是:虽然它引用的是原始源媒体文件,但范围被锁定在你最初设置的入点和出点。因此建议在创建子剪辑时,把入点稍微提前、出点稍微推后,预留一点余地,方便之后在时间线上修剪。Adjusting Subclip Limits One limitation of a subclip is that, even though it references the original source media file, it is limited to the initial In and Out points you used to create it. Therefore, it’s good practice to set your initial In and Out points a little before and after the portion you want to subclip, thereby leaving a little wiggle room when you later trim the clips in the timeline.
如果之后发现子剪辑缺了几帧,可以右键点击子剪辑,选择 Edit Subclip 来扩展它的范围。However, when you find that you need a few extra frames not included in your subclip, you can always extend the limits of a subclip by right-clicking a subclip and choosing Edit Subclip.
这样可以调整子剪辑的起始和结束时间码,Media Pool 和时间线上的子剪辑范围会同步更新。This allows you to adjust the start and end timecodes for the subclip, updating the limits of the subclip in both the media pool and the timeline simultaneously.

到这里你应该已经体会到 DaVinci Resolve 在项目管理上的强大能力。记住,虽然不同项目对组织程度的要求不同,但本课介绍的方法可以在项目的任何阶段使用,而且在 Edit page 上的使用方式与在 Media page 上一样便捷。项目组织并不是只在项目开始时做一次的事,而是要在整个剪辑过程中不断打磨和完善。You should now have a good understanding of just how powerful Resolve is at helping you organize your projects. Remember, while some projects may require much more organization than others, the techniques demonstrated throughout this lesson can be applied at any point in a project and in many cases can be applied as readily in the edit page as they can in the media page. Project organization doesn’t just occur once at the start of a project; it is something that you will constantly refine as you continue working.
本卡术语Terms in this card
媒体夹Bin 入点和出点In & Out Points 媒体池Media Pool 子片段Subclips 时间线Timeline 编辑页Edit page 检查器Inspector 修剪Trim 关键词Keywords 元数据Metadata 时间码Timecode