匹配不同摄影机素材Matching Different Cameras
9 steps
本卡概念Key Concepts
Neural Engine 是 DaVinci Resolve 中跨所有页面使用的功能,在调色页面中用于多种 Resolve FX 和工具,例如 Magic Mask;其许多功能仅在 DaVinci Resolve Studio 中提供。A feature used across all pages in DaVinci Resolve, including several Resolve FX and tools on the color page such as Magic Mask, with many of its features available only in DaVinci Resolve Studio.
- 在时间线上选中 clip 10,按空格键播放,让它一直走到 clip 11,然后停止播放。Select clip 10 in the timeline and press the Spacebar to play it back. Let it run into clip 11 and then stop playback.
这两条素材是在同一时间、同一环境下拍摄的,但因为来自不同摄影机,画面观感不同。Clip 10 来自 Blackmagic,clip 11 来自 Sony,两台机器的色彩 profile 不同,所以即使都曝光正常,成片也不一样。前面讲过,色彩管理会把它们统一映射到同一个 deliverable profile,所以我们不需要从零开始匹配,只要让它们彼此接近,切镜头时观感就不会太跳。Here we have two clips shot at the same time in the same environment. However, they look different because they were shot on different cameras. Clip 10 is from a Blackmagic camera, and clip 11 is from a Sony. While both clips have been shot correctly, the cameras have different profiles and therefore they look different. As we have established, color management will put them in the same deliverable profile, so you don’t have to try to match them from scratch. You do want them to look like each other, so it is less noticeable when switching from one camera to another.
以 Blackmagic 这条为主机位,先调它,再去把 Sony 匹配过来。Since the Blackmagic camera is our A camera, we will adjust it first, and then we will grade the Sony to match.
- 选中 clip 10,把 Gain master 轮向右拖到约 1.11,提亮高光。Select clip 10 and then drag the Gain master wheel right to around 1.11 to lift the highlights of the shot.
- 把 Lift master 轮向左拖到约 -0.07,压暗阴影,提升画面对比度。接下来开始匹配。Drag the Lift master wheel to the left to around -0.07 to get the shadows darker and improve the contrast in the shot. Now we need to match it.
现在需要一个方便并排对比的参考。DaVinci Resolve 自带 stills gallery,可以把当前画面抓成一帧静帧,再拿来和别的素材对比。Stills gallery 的细节会在第 6 课展开,这里只需要一张参考帧。At this point, you need an easy reference to compare the clips side by side. DaVinci Resolve has a stills gallery that allows you to take a snapshot of a clip and compare it to another clip. You will look at the stills gallery in much more detail in Lesson 6. For now, you just need a reference frame.
- 在 viewer 窗口上右键,从菜单里选 Grab Still。Right-click the viewer window and, from the menu, choose Grab Still.
- 如果 Gallery 没打开,点界面左上角的
Gallery按钮,刚才抓的静帧就在里面。If the Gallery is not open, click theGallerybutton in the top left corner of the interface. You will see the still you grabbed. - 在时间线上选中 clip 11。Select clip 11 in the timeline.
- 点 viewer 左上角的
Image Wipe按钮。Click the Image Wipe button in the top left corner of the viewer.
画面会被分成两半,左边是当前时间线上的素材,右边是那张静帧。拖动分割线,可以调整两边各自露出的比例。You will see that the image splits in two, with the left side of the frame showing you the selected timeline clip and the right side showing the still. If you drag the split around, you can adjust it to show more or less of each side.
- 把分割线稍微往右拖一点,让我们这条素材上 Sean 的脸多露一些。可以明显看到两边的色彩还不太一致。Drag the split slightly to the right to show a little more of Sean’s face on our timeline clip. You can see that the color just doesn’t quite match.
- 在时间线上保持 clip 11 选中状态,右键点击 clip 10,从菜单中选择 Shot Match to this Clip,DaVinci Resolve 就会把 clip 11 匹配到 clip 10。With clip 11 still selected in the timeline, right-click clip 10 and, from the menu, choose Shot Match to this Clip, and DaVinci Resolve will match clip 11 to clip 10.
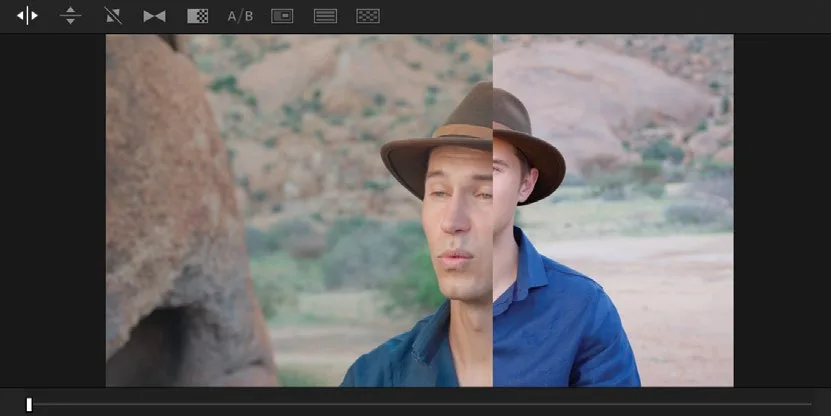
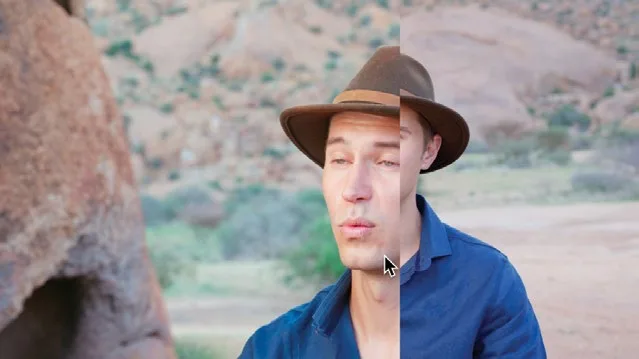
匹配效果已经相当不错,但画面仍需微调——高光部分稍亮,色调也略偏冷。While the match does a pretty good job, the shot still needs a slight adjustment, as it appears slightly too bright in the highlights and a little cold.
把 Gain 主轮向左拖到大约 0.95,让高光略微压下来一些。Drag the Gain master wheel to the left to around 0.95 just to bring the highlights down slightly.
使用 Gamma 色轮,把中心点稍微往橙色方向拖。这是个很小的调整,控制数值上可能几乎看不出变化,但你会发现画面变暖了一点。Using the Gamma color wheel, drag the center slightly toward orange. This is a minor adjustment that may not even register on the controls, but you will notice the shot get slightly warmer.
点击 Image Wipe按钮,取消分屏对比。Click the Image Wipe button to remove the wipe.
按键盘上的 Option-D / Alt-D 切换调色开关,对比查看调整前后的差异。Press Option-D/Alt-D on the keyboard to toggle the grade off to see the adjustments made.
把两段素材一起播放,可以看到差异已经小了很多。虽然并不是完全一致,但观众基本看不出区别。由于各机位的灯光位置不同,不同角度的画面总会有些细微差异。调色这门学问,往往就是看你能做到什么程度。Play the two clips together, and you can see that the result is now much less noticeable. While it’s not an exact match, the viewer would not notice much of a difference. Different camera angles will always look slightly different due to such things as light sources being in different places for each camera. With color grading, it is often a case of what you can get away with.
DaVinci Resolve Neural Engine:Color Match 功能依赖 DaVinci Resolve Neural Engine 来完成调色。Neural Engine 是内置在 DaVinci Resolve 中的 AI 加速模块,用来为用户加速特定处理流程。它并非生成式 AI,也不会调用第三方 AI 工具。The DaVinci Resolve Neural Engine The Color Match uses the DaVinci Resolve Neural Engine to perform the grade. The Neural Engine is AI built directly into DaVinci Resolve that speeds up certain processes for the user. It is not generative and does not access third-party AI tools.
原镜头|用 Magic Mask 选中主体Original shot Subject selected with Magic Mask
本卡术语Terms in this card
时间线Timeline 变速Speed 色彩管理Color Management 对比度Contrast Gain(亮部)Gain Gamma(中间调)Gamma Lift(暗部)Lift 神经网络引擎Neural Engine 窗口Power Window 调色Grade 静帧Still