创建 Fusion 合成Creating a Fusion Composition
9 steps
简介Overview
在这个练习中,你将制作一个独特的动态标题,方便日后修改复用。首先导入一个 DaVinci Resolve 工程,其中包含本课练习的多个进度版本,万一跟丢可以随时加载。Creating a Fusion Composition In this first exercise, you'll create a unique animated title that you can modify and use in your own projects. You will start by importing a DaVinci Resolve Project that contains several copies of this lesson's exercises with different stages of progression so you can load them if you get lost during the lesson.
- 打开 DaVinci Resolve,在 Project Manager 项目管理器中点击
Import按钮。Open DaVinci Resolve and, in the Project Manager, click theImportbutton. - 定位到 R20 Beginners Guide / Lesson 09,选择工程文件 DR20_Beginners_Lesson 09_FUSION.drp,点击 Open 打开。工程导入 Project Manager 后,双击将其打开。Navigate to R20 Beginners Guide / Lesson 09, select the project DR20_Beginners_Lesson 09_FUSION.drp, and choose Open. Once the project has been imported into the Project Manager, double-click to open it.
- 选择
Workspace > Reset UI Layout。Choose Workspace > Reset UI Layout. - 按 Shift-4 进入 Edit page 编辑页面,或点击屏幕底部的
Edit按钮。Press Shift-4 to go to the edit page or click theEditbutton at the bottom of the screen. - 点击
Relink Media按钮。Click the Relink Media button. - 在 Relink Media 对话框中点击 Locate,定位到 R20 Beginners Guide 文件夹,点击 Open 完成素材重新链接。In the Relink Media dialog, click Locate, navigate to the R20 Beginners Guide folder, and click Open to relink the files.
NOTE · 注意本课的素材文件位于 MEDIA 文件夹中…
本课的素材文件位于 MEDIA 文件夹中。The media files for this lesson are located in the MEDIA folder.
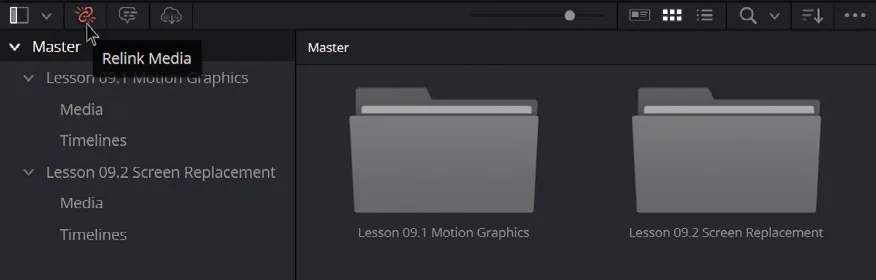
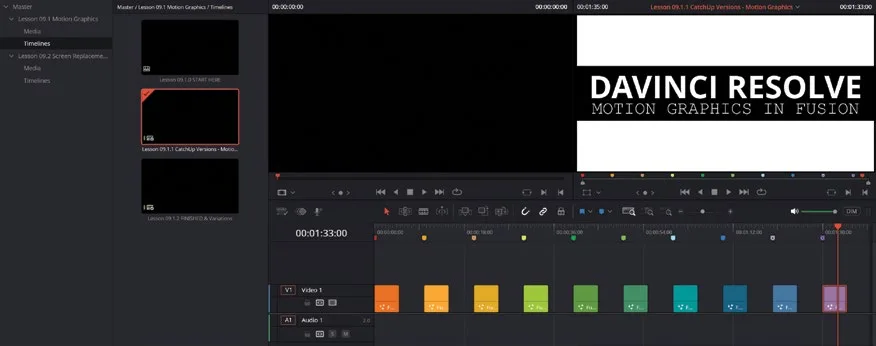
本课包含两个练习:09.1 运动图形 和 09.2 屏幕替换,每个练习都有各自的 clip 和 bin,可在 Media Pool 中找到。虽然练习要从零开始,但你可以随时使用 catch-up timeline,其中已包含每个 Fusion 合成步骤的多个版本。练习过程中如果跟不上,直接打开 catch-up timeline 加载所需的 Fusion 合成即可。例如,第一个练习中的 Lesson 09.1.1 CatchUp Versions - Motion Graphics timeline 位于 Master > Lesson 09.1 Motion Graphics > Timelines bin,完成的练习在时间码 00:01:30:00 处。This lesson is structured in two exercises: Lesson 09.1 Motion Graphics and Lesson 09.2 Screen Replacement. Each exercise has its own clips and bins, which you can find in the media pool. Although you will start the exercises from scratch, you can always use the catch-up timelines, which contain multiple versions of the Fusion compositions you will work on, with every step already included. So if you get lost during this lesson, simply jump into the catch-up timeline and load the Fusion composition you need. For example, in the first exercise, you'll find the Lesson 09.1.1 CatchUp Versions - Motion Graphics timeline in the Master > Lesson 09.1 Motion Graphics > Timelines bin. The finished exercise is located at timecode 00:01:30:00.
- 确认 Lesson 09.1.0 START HERE timeline 已打开。如果没有,可在 Lesson 09.1 Motion Graphics > Timelines bin 中找到。Ensure that the Lesson 09.1.0 START HERE timeline is open. If not, you will find it in the Lesson 09.1 Motion Graphics > Timelines bin.
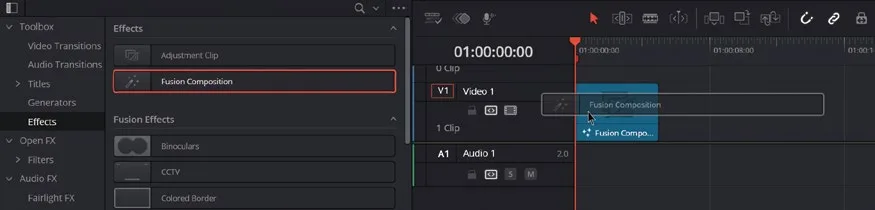
- 点击界面左上角的
Effects按钮打开 Effects Library,导航到Toolbox > Effects,选中 Fusion Composition 并拖到 timeline 的开头。默认时长为 5 秒。In the top left of the interface, click theEffectsbutton to open the Effects Library, navigate to Toolbox > Effects, and select and drag the Fusion Composition to the beginning of the timeline. By default, it will be 5 seconds long. - 把 playhead 放在刚加到 timeline 上的 Fusion Composition 上(默认就在 timeline 起点),然后按 Shift-5 跳转到 Fusion page,或者点击界面底部的
Fusion按钮。Place the playhead over the Fusion Composition you just added to the timeline (it should already be positioned at the start of the timeline), and then press Shift-5 to jump to the Fusion page or click theFusionbutton at the bottom of the interface.
Fusion 界面分为四个主要区域:顶部是 viewer,用来预览画面(左边是 viewer 1,右边是 viewer 2);底部是 Node Editor,用来搭建和管理节点树;右边是 Inspector,用来调整所选节点的参数;左边是 Media Pool 和 Effects Library,提供各种工具和特效(和 Edit page 一样,需要点击左上角的 Media Pool 或 Effects按钮来打开)。右上角的按钮可以打开 Spline Editor 和 Keyframes Editor。The Fusion Interface Welcome to the Fusion page! Fusion's interface is divided into four main areas: the viewers at the top, where you can preview your work (the one on the left is viewer 1, and the one on the right is viewer 2); the Node Editor at the bottom, where you build and manage your node tree; the Inspector on the right, which lets you adjust the parameters of the selected node; and the media pool and Effects Library on the left, which provide access to a wide range of tools and effects (you need to open them by clicking the Media Pool or Effects buttons at the top left of the screen, just like in the edit page). You can also open the Spline Editor and Keyframes Editor with the buttons at the top right.
左右两个 viewer 可以显示不同的画面,或对合成中任意特效的参数进行调整。The left and right viewers In the Inspector, you can display and can show different images or manipulate the parameter of any effects from your composite. selected effect or tool in the Node Editor.
工具栏上的按钮用来向 Node Editor 添加常用特效或工具。Workspace 可以显示 Node Editor、Keyframes Editor 或 Spline Editor 的组合。Navigator 是整个节点树的缩略图(按 V 启用)。The toolbar has buttons The work area can show The Navigator is a for adding commonly any combination of the miniature representation used effects or tools Node Editor, Keyframes of the entire node tree to the Node Editor. Editor, or Spline Editor. (press V to enable it).
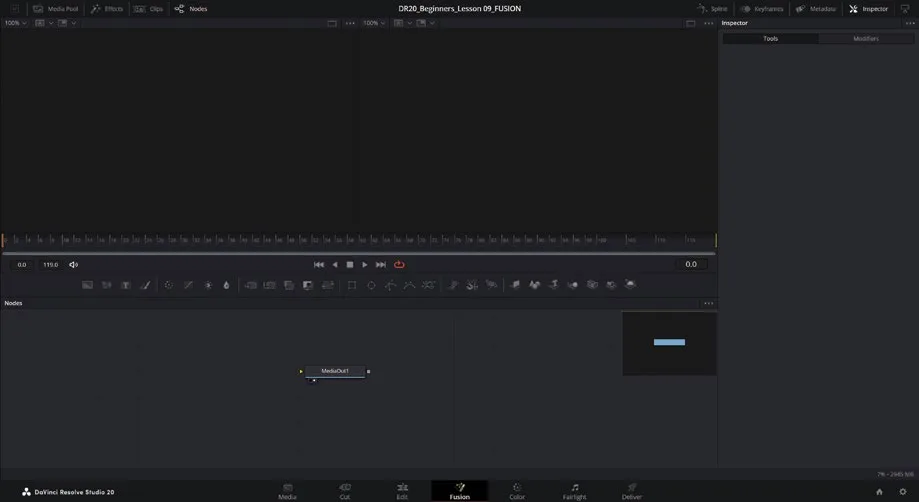
界面中部是 transport controls,左边是 Render Range(从 frame 0.0 到 119.0),右边是 Current Time(从 frame 0.0 开始)。下方是 toolbar,提供常用工具的快捷入口。本练习会用到 Background、Text+、Merge、Transform 和 Rectangle 五个工具,先在工具栏里找到它们。In the middle of the interface, you will find the transport controls with the Render Range on the left (from frame 0.0 to 119.0) and the Current Time on the right (starting at frame 0.0). Below these controls is the toolbar, which provides quick access to commonly used tools and effects. In this exercise, you will use the Background, Text+, Merge, Transform, and Rectangle tools; try to locate them.
本卡术语Terms in this card
媒体夹Bin 媒体池Media Pool 项目管理器Project Manager 重新链接媒体Relink Media 时间线Timeline 渲染Render 编辑页Edit page 检查器Inspector 关键帧Keyframe 播放头Playhead 时间码Timecode 合成Compositing Fusion 合成Fusion 合并Merge 节点Node 变换Transform
相关知识卡Related Cards
媒体池Media Pool 时间线Timeline 效果库Effects Library Fusion 页面Fusion Page 节点编辑器Node Editor 样条线编辑器Spline Editor