使用音频关键帧Using Audio Keyframes
13 steps
简介Overview
Ducker 虽能根据一个或多个轨道上的音频自动调节另一轨道的电平,但有时你需要在时间线上更精细地混音。Audio Keyframe(音频关键帧)正适合这种场景,可以对片段内的电平进行更灵活的控制。Using Audio Keyframes While the Ducker is a great way of automatically riding the audio levels of one track based on the audio of clips in one or more other tracks, sometimes you want to mix the audio in your timeline with a greater level of control. This is where audio keyframes come in handy, as they allow greater control and flexibility over the specific audio levels within a clip.
为了对比 Fairlight页面打关键帧与使用 Ducker 的区别,先来复制当前时间线。To explore the differences between applying keyframes in the Fairlight page and using the Ducker, you will start by duplicating the current timeline.
- 选择 Timeline > Find Current Timeline in Media Pool,让当前时间线 OMO PROMO MIX 显示在媒体池中。Choose Timeline > Find Current Timeline in Media Pool to show the current timeline— OMO PROMO MIX—in the media pool.
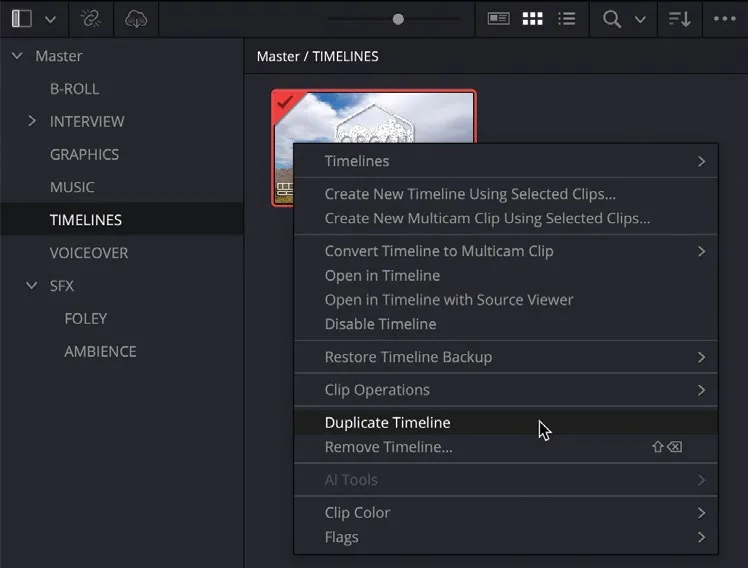
- 在媒体池中右键该时间线,选择 Duplicate Timeline。Right-click the timeline in the media pool and choose Duplicate Timeline.
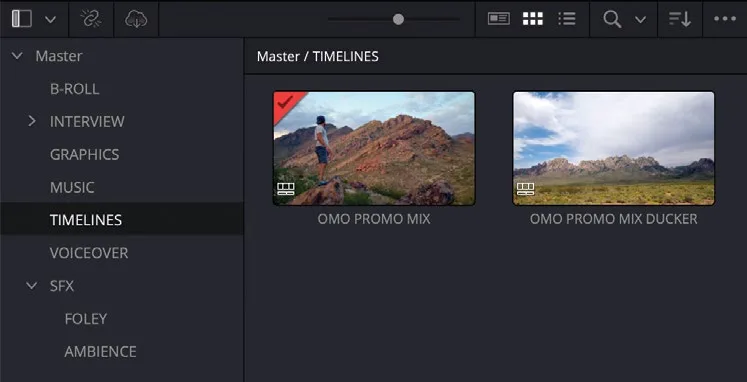
- 右键复制的这条时间线,重命名为 OMO PROMO MIX DUCKER。Right-click the duplicated timeline and rename it OMO PROMO MIX DUCKER.
- 在 Mixer 中,点亮 MUSIC 轨道(A8)上 Ducker 的
Enable按钮。In the Mixer, click theEnablebutton for the Ducker on the MUSIC track (A8). - 点击
Index按钮,并切换到Tracks选项卡。Click the Index button and select the Tracks tab.
Track Index 列出了该时间线中所有可用的轨道。The Track Index lists all the tracks available in this timeline.
- 按住鼠标拖选 A3 到 A7 轨道的可见性(眼睛)按钮,即除对白和音乐轨道以外的全部轨道。Click and drag across the visibility (eyeball) buttons for Tracks A3 to A7—all the tracks except the dialogue and music tracks.
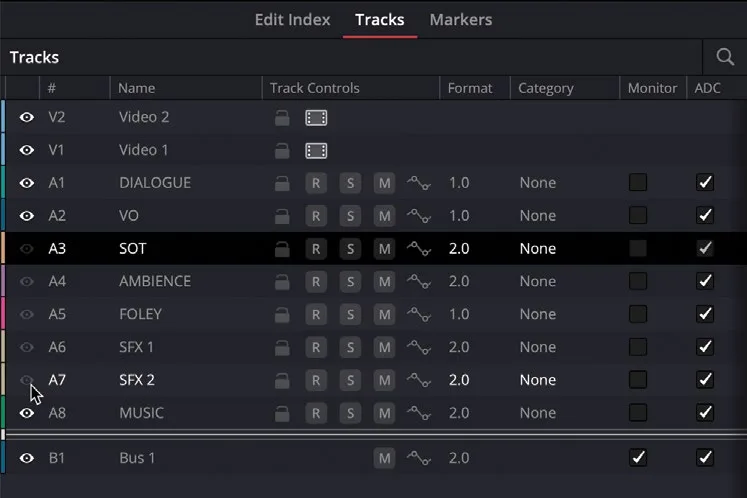
这些轨道随即在时间线和 Mixer 中被隐藏。This hides those tracks in the timeline and mixer.
它们并未被静音,所以仍然可以听到;这样做只是为了简化时间线视图,便于专注地对白和音乐轨道的混音,避免被中间那些轨道干扰。Because they are not muted, you will still hear these tracks, but it helps to simplify the timeline, allowing you to concentrate on the dialogue and music tracks together, without having to work around all the tracks in between.
- 关闭媒体池和 Index,按 Shift+Z 让时间线适配窗口,并调整剩余可见轨道的高度。Close the media pool and Index, and press Shift-Z to fit the timeline and adjust the height of the remaining visible tracks.
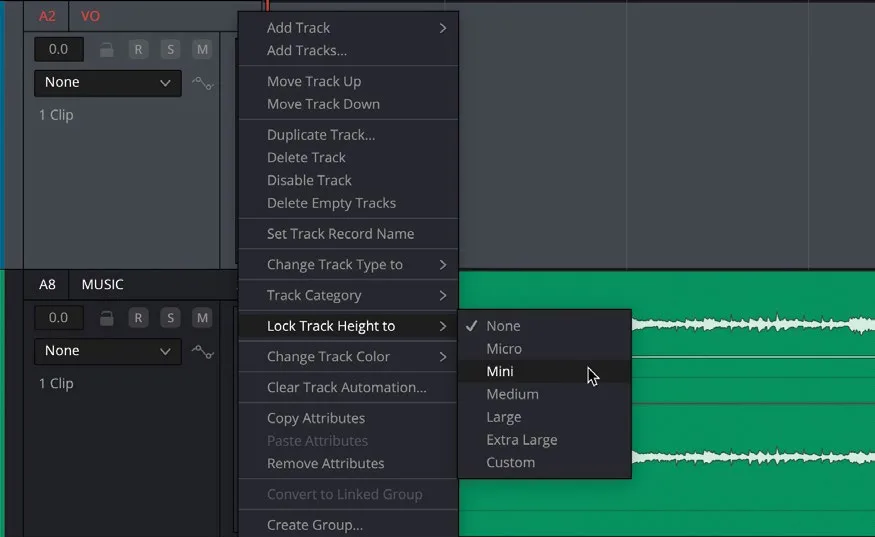
为了让 DIALOGUE 和 MUSIC 轨道靠得更近、便于添加关键帧,可以调整 VO 轨道的高度。To bring the DIALOGUE and MUSIC tracks closer together to make it easier to add keyframes, you can adjust the size of the VO track.
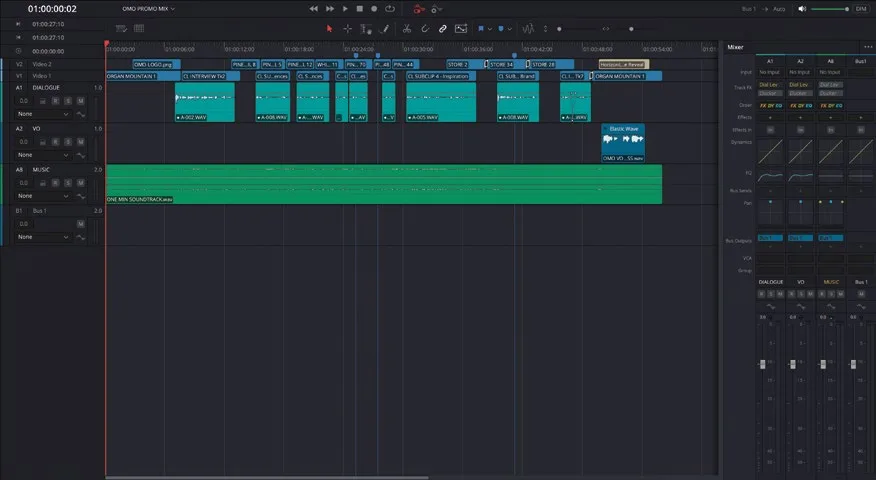
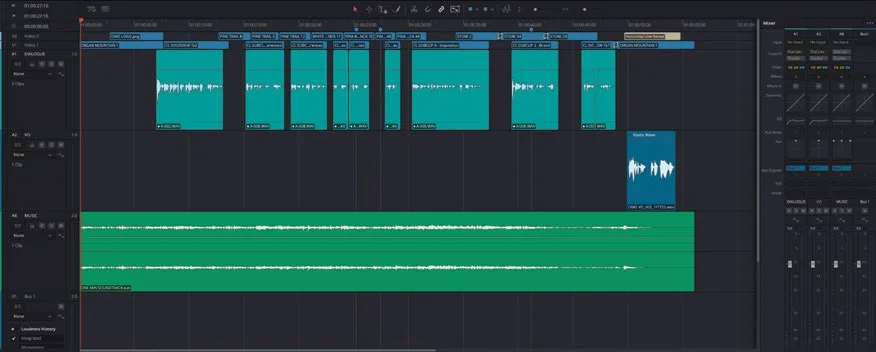
- 右键 VO 轨道控制条,选择 Lock Track Height to > Mini。Right-click the VO track controls and choose Lock Track Height to > Mini.
这样 VO 轨道会变小,但仍然可以访问。This makes the VO track smaller but still accessible.
NOTE · 注意右键控制条并选择 Lock Track Height to > None,即可恢复该时间线轨道的原始高度…
右键控制条并选择 Lock Track Height to > None,即可恢复该时间线轨道的原始高度。You can restore the height of this timeline track by right-clicking the controls and choosing Lock Track Height to > None.
DIALOGUE 和 MUSIC 轨道之间不再夹杂其他轨道,时间线更简洁,关键帧操作也会轻松很多。The simplified and larger timeline will make placing keyframes much easier than if there were many more tracks between the DIALOGUE and MUSIC tracks.
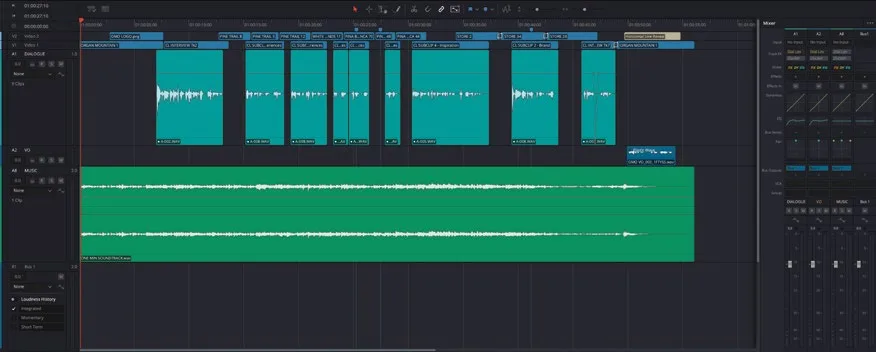
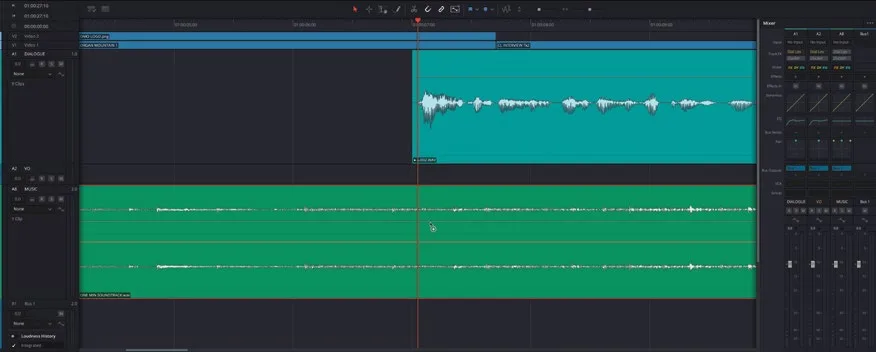
- 把播放头放在第一条对白片段的起点,用 Option 键(macOS)或 Alt 键(Windows)配合滚轮向内放大,聚焦到片段起始位置。Place the playhead at the start of the first clip of dialogue and use Option-scroll (macOS) or Alt-scroll (Windows) to zoom in on the start of the clip.
按住 Option 键(macOS)或 Alt 键(Windows),在音乐片段的 gain 线上 Chris soundbite 开始的位置双击两次,添加两个关键帧。Hold down the Option key (macOS) or Alt key (Windows) and click twice on the gain line of the music clip to add two keyframes around the point where Chris’s soundbite starts.
在时间线上继续滚动,直到看到 DIALOGUE 轨道上该片段的结尾,再在 soundbite 结束位置添加两个关键帧。Scroll along the timeline until you see the end of the clip on the DIALOGUE track and add two more keyframes around the end of the soundbite.
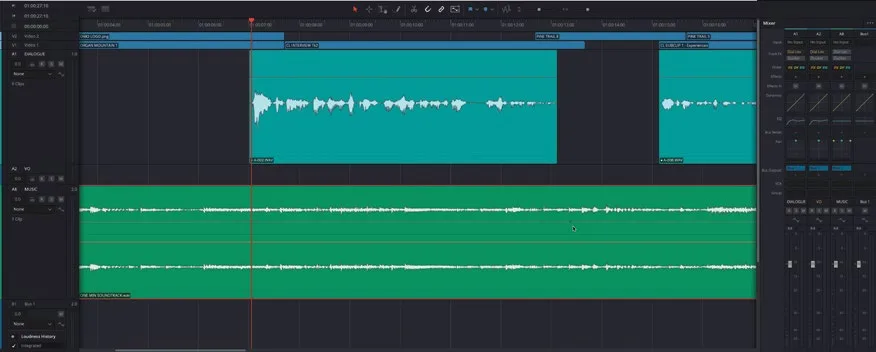
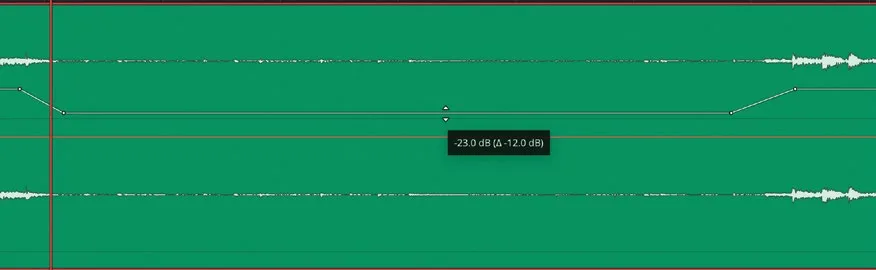
在中间两个关键帧之间拖动音量线,将该段的电平降低约 -12 dB。Grab the volume line between the two middle keyframes and decrease the level for this part of the clip by about -12 dB.
NOTE · 注意在 Fairlight 中,tooltip 会显示音频条的绝对电平,相对电平以 Δ(delta)值表示…
在 Fairlight 中,tooltip 会显示音频条的绝对电平,相对电平以 Δ(delta)值表示。In Fairlight, the tooltip shows the absolute level of the audio bar and the relative level as the Δ (delta) value.
每次 Chris 停顿时重复上述操作,把 soundbite 之间的音乐电平抬起来。Repeat the process each time Chris pauses to raise the level of the music between each sound bite.
注意不要死盯着数字操作,必须实际听一听各元素在混音中的配合效果,必要时对某些段落做更细致的电平调整。要确保观众能完整听到你精心设计的配乐中的每个细节!Be careful, though. Don’t just blindly follow the numbers; you need to listen to how all the elements of the mix are working together, so some level adjustments may need to be made more carefully than others. You want to make sure your audience has an opportunity to hear all the nuances of the soundtrack you have created!
- 音乐混音完成后,在 VO 轨道的轨道控件上右键,选择
Lock Track Height > None。Once the music mix has been completed, right-click the VO track controls and choose Lock Track Height > None. - 重新打开 Tracks Index,拖过各轨道的 visibility 按钮,把时间线上隐藏的轨道全部显示出来。Reopen the Tracks Index and click and drag across the visibility buttons to show the hidden tracks in the timeline.
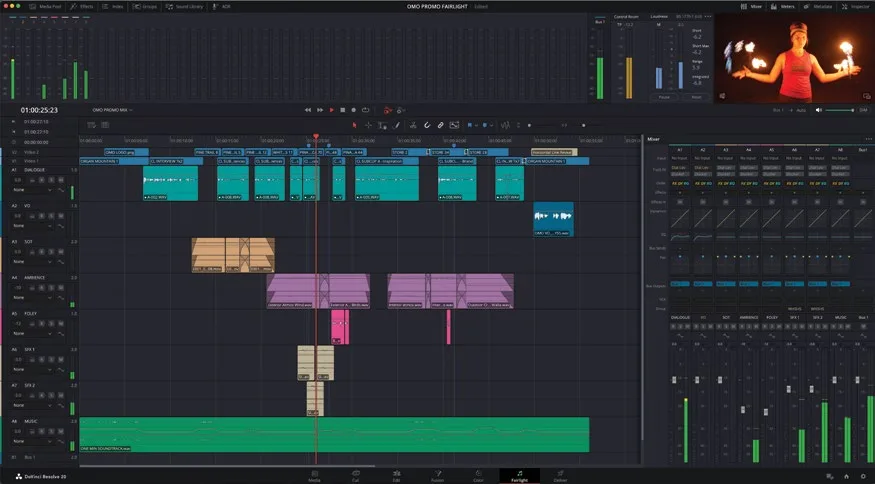
- 按 Shift+Z,调节时间线轨道高度,确保整个时间线一览无余。Press Shift-Z and adjust the timeline track heights so you can see the entire timeline.
- 把播放头回到时间线起点,按播放欣赏完整混音成品!Return the playhead to the start of the timeline and play back to enjoy the full mix!
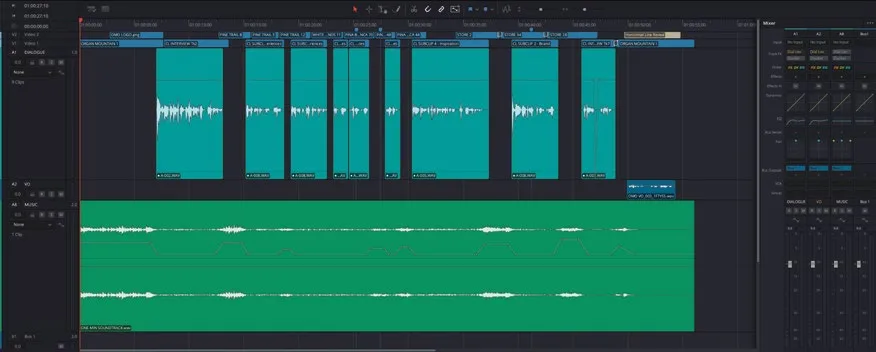
当然,欢迎继续做进一步调整。在 DaVinci Resolve 里做创作,往往需要反复打磨才能达到理想效果,所以尽可以按自己看到的或听到的去调整混音——无论是用 Mixer 还是直接在时间线上处理单个 clip。Of course, feel free to continue making further adjustments. Like much of the creative work you undertake in DaVnci Resolve, you will need to continually refine things to get the results you desire. So feel free to continue adjusting the mix as you see (or hear) fit, whether that’s using the mixer or individual clips in the timeline.
NOTE · 注意NOTE:如需导入本课带音频关键帧的完整时间线成品,可在 Media Pool 里选中 TIMELINES 那个 sma…
NOTE:如需导入本课带音频关键帧的完整时间线成品,可在 Media Pool 里选中 TIMELINES 那个 smart bin,选择 File > Import > Timeline,定位到 R20 Beginners Guide / Lesson 08 / Timelines / OMO PROMO MIX COMPLETED KEYFRAMES.drt,点击 Open 即可。To import a finished version of the timeline for this lesson that uses audio keyframes, open the media pool, select the TIMELINES bin, choose File > Import > Timeline, navigate to R20 Beginners Guide / Lesson 08 / Timelines / OMO PROMO MIX COMPLETED KEYFRAMES.drt, and click Open.
恭喜!你已经完成了 Fairlight页面的入门学习。本课展示了 Fairlight页面的一部分优势,但实际上它的功能远不止于此。想深入了解 Fairlight 在音频工作中的应用——包括 Fairlight FX、ADR 录音和 automation——请参阅《The Fairlight Audio Guide to DaVinci Resolve 20》。Congratulations! You have successfully completed this introduction to working in the Fairlight page! While this lesson has aimed to show you some of the advantages of using the Fairlight page, there is much more to the Fairlight page than can be realistically covered in this beginner’s guide. For more information on using Fairlight for your audio work, including using the Fairlight FX, recording ADR, and automation, see The Fairlight Audio Guide to DaVinci Resolve 20.
对混音满意后,可以返回 Edit页面,在那里你会看到所有在 Fairlight 中做的音频修改都同步过来了,这再次体现了 DaVinci Resolve 工作流程的灵活性!Once you are happy with the mix, you can return to the edit page, where you will see all the audio changes you’ve made in Fairlight, once again highlighting the flexibility of working in DaVinci Resolve!
本卡术语Terms in this card
媒体夹Bin 媒体池Media Pool 声音片段Soundbite 时间线Timeline 编辑页Edit page 关键帧Keyframe 播放头Playhead 调音台Mixer Gain(亮部)Gain 窗口Power Window 静帧Still 音频关键帧Audio Keyframes 闪避器Ducker Fairlight 音频Fairlight