用户偏好设置User Preferences
9 steps
简介Overview
和 Project Settings窗口一样,Preferences 里选项又多又让人眼花缭乱,但实际需要关注的只有少数几个重要项。Like the Project Settings window, the preferences contain a large and bewildering number of options. However, there are only a few important preferences you should be aware of.
- 在
Preferences窗口顶部,点击 User 标签页。At the top of the Preferences window, click the User tab.
默认选中的是 UI Settings 用户偏好组,用来定制 DaVinci Resolve 的界面,例如切换界面语言。The first group of User Preferences that is selected is the UI Settings. These allow you to customize the user interface of DaVinci Resolve. For example, here you can change the language that the user interface uses.
TIP · 提示很多调色师喜欢勾选“Use gray background for user interface”,用更中性的灰色背景让…
很多调色师喜欢勾选“Use gray background for user interface”,用更中性的灰色背景让注意力集中在画面上。Many colorists like to enable the “Use gray background for user interface” option. This creates a more neutral interface that helps you concentrate on the images as you’re grading.
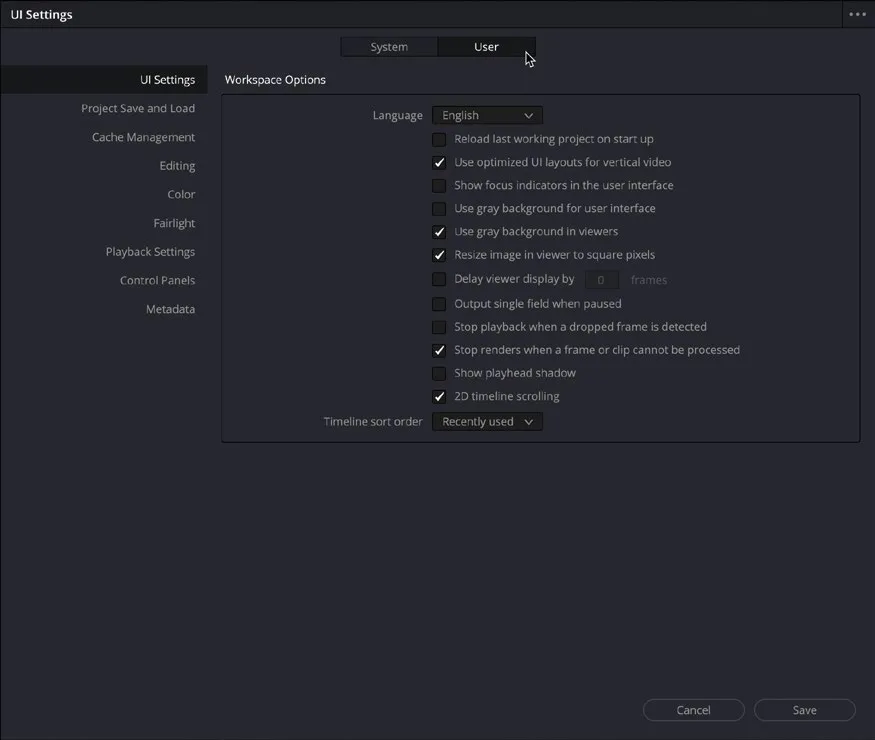
- 点击 Project Save and Load 面板组。Click the Project Save and Load group.
你可能一直好奇,本书为什么从不提醒你随时保存作品——尤其是当其他软件崩溃、让你丢掉辛苦成果时,这种担忧会更强烈。You might have been wondering why this book makes no mention of saving your work as you go along, especially if you’ve ever been in a situation where the software you are working in has crashed, causing you to lose work and valuable time.
好消息是,在 DaVinci Resolve 里你完全不必担心这个问题:你的每一步操作都会被自动保存!这要归功于一项叫做 Live Save 的功能,它位于 User Preferences 的 Project Save and Load 组中,默认就是开启的。Well, thankfully, this isn’t something you ever have to worry about when working in DaVinci Resolve because everything you do is automatically saved as soon as you do it! The explanation for this is a feature called Live Save, which is found in the Project Save and Load group of the User Preferences, and which is enabled by default.
启用 Live Save 后,只要在 Project Manager 中新建项目,DaVinci Resolve 就会实时保存你所做的每一处修改。即便软件崩溃或电脑突然断电(笔记本有电除外),重启 DaVinci Resolve 并重新打开项目,只要 Live Save 处于开启状态,你就不会丢失任何工作。With Live Save enabled, once you create a new project in the Project Manager, DaVinci Resolve begins saving all the changes you make as soon as you make them. If there is ever a problem, such as the software crashing or the power to your computer being interrupted (assuming it’s not a laptop with a charged battery, of course), simply restart DaVinci Resolve and reopen the project. You will not have lost any work as long as Live Save is enabled.
- 确认 Live Save 已开启(默认即为开启状态)。Ensure Live Save is enabled (it should be by default).
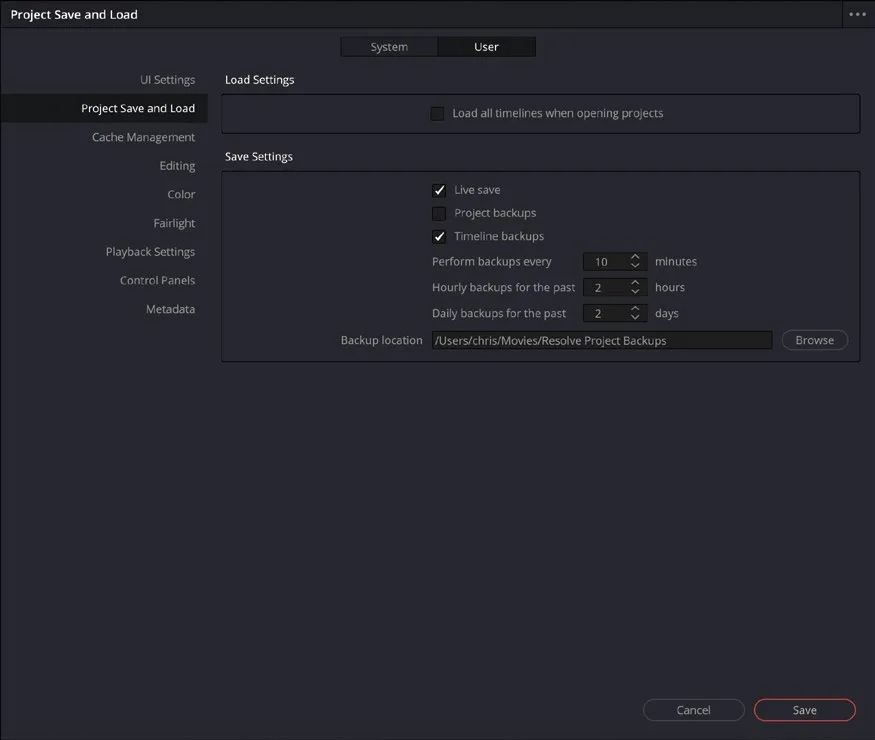
你会注意到这里还有一个 timeline backups(时间线备份)选项。第 2 课中你已经接触过时间线备份的使用,而在 User Preferences 里,你可以指定备份的保存频率和位置。You will also notice there is an option here for timeline backups. You were introduced to using timeline backups in Lesson 2, but here in the User Preferences you can specify how often DaVinci Resolve makes those backups and where they are saved.
默认设置是每 10 分钟保存一次时间线备份。达到一小时(即累积 6 个间隔 10 分钟的备份)后,系统会保存一个按小时计的备份,并在生成新备份时丢弃前一小时的旧备份。也就是说,你手头最多只会保留最近一小时的 6 个备份。The default is to save a timeline backup every 10 minutes. After an hour of backups has been reached (six backups at 10-minute intervals), an hourly backup is saved, and the older backups for the previous hour are discarded as new backups are created. This means you’ll only ever have six backups for the last hour you’ve been working.
一旦开始生成按小时的备份,Hourly Backups(按小时备份)数值就生效了。同样,默认是保留最近两个按小时备份,更早的备份会在新备份生成时被丢弃。Once hourly backups start to be made, the Hourly Backups value becomes relevant. Again, the default is to save the previous two hourly backups, with older backups being discarded as newer ones are created.
每天最后生成的那个备份会成为 daily backup(每日备份),同样默认保留最近两个,更早的每日备份会被新的覆盖。如果你的项目周期较长,可以把这个数值调大,以便保留更长时间的每日备份。The very last backup created on any given day then becomes the daily backup, and, again, the previous two daily backups are saved, with older backups being discarded as newer ones are created. If you are working on a project over a longer stretch of time, you can always increase this value so you always have a daily backup stretching as far back as you feel comfortable with.
时间线备份保存在此处指定的 Backup Location 中。该位置下的文件无法由用户直接管理,备份的恢复方法请按第 2 课所述步骤操作。Timeline backups are saved in the Backup Location detailed here. However, there are no user-manageable files in this location, and timeline backups should always be restored as detailed in Lesson 2.
NOTE · 注意Project Backups(项目备份)功能默认未开启。如需让软件自动对整个项目做增量备份,只需启用 Project…
Project Backups(项目备份)功能默认未开启。如需让软件自动对整个项目做增量备份,只需启用 Project Backups。开启后,项目的备份周期与时间线备份一致。要访问已启用该功能的项目的备份,在 Project Manager窗口中右键点击该项目,选择 Project Backups,即可删除不需要的备份或载入先前的项目备份。载入备份项目时,系统会提示你为项目命名,因为 Resolve 不会覆盖当前版本的项目。Although not enabled by default, if you want to have incremental backups of an entire project made automatically, simply enable the Project Backups option. Once enabled, projects are backed up using the same periodic intervals as timelines are backed up. To access available backups for a project that has this feature enabled, simply right-click the project in the Project Manager window and choose Project Backups, where you can choose to delete any unwanted backups or load a previously saved backup of the project. When loading a backup project, you will be prompted to name the project because Resolve will not overwrite the current version of the project.
- 点击 User Preferences 中的 Editing 组。Click the Editing group for the User Preferences.
这组设置可以让你自定义前三课中用到的许多剪辑功能。例如,New Timeline Settings 用于指定新建时间线时的起始时间码、视音频轨道数量以及音频轨道类型。This group of settings allows you to customize many editing features you used in the first three lessons. For example, the New Timeline Settings allow you to specify the starting timecode, the number of video and audio tracks, and the Audio track type used when creating a new timeline.
Automatic Smart Bins(自动智能 bin)分类用于选择在 Media Pool(媒体池)中启用的自动智能 bin 类型。The Automatic Smart Bins category allows you to choose which automatic smart bins you want to be active in the media pool.
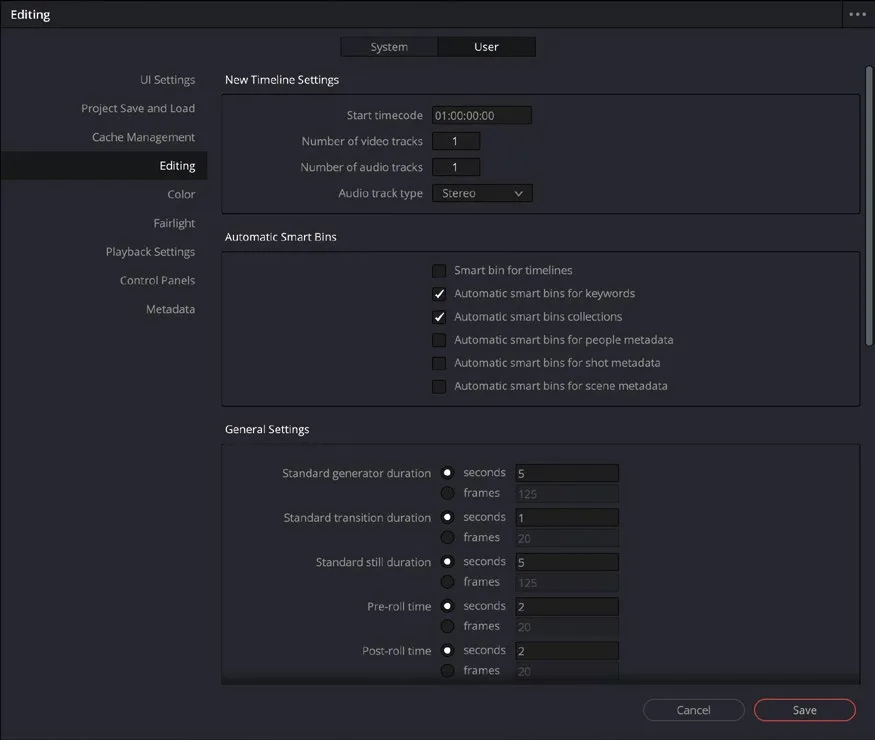
- 勾选启用 "Automatic smart bins for scene metadata",然后点击 Save 保存并关闭
User Preferences窗口。Click to enable “Automatic smart bins for scene metadata” and click Save to save and close theUser Preferenceswindow.
现在生效的是一组新的自动智能 bin,名为 Scene。A new set of automatic smart bins is now active, called Scene.
- 选中 Scene 智能 bin 文件夹,点击展开三角形打开 Scene 智能 bin。Select the Scene smart bin folder and click the disclosure triangle to open the Scene smart bins.
Media Pool 中的每个片段现在会按其 Scene 元数据自动归组。这类元数据通常在拍摄时即可写入文件。Now each clip in the media pool is automatically grouped based on the Scene metadata of the clip. This can often be added to the recorded files during filming.
- 在 macOS 上按 Command-,(逗号),或在 Windows 上按 Ctrl-,(逗号),重新打开
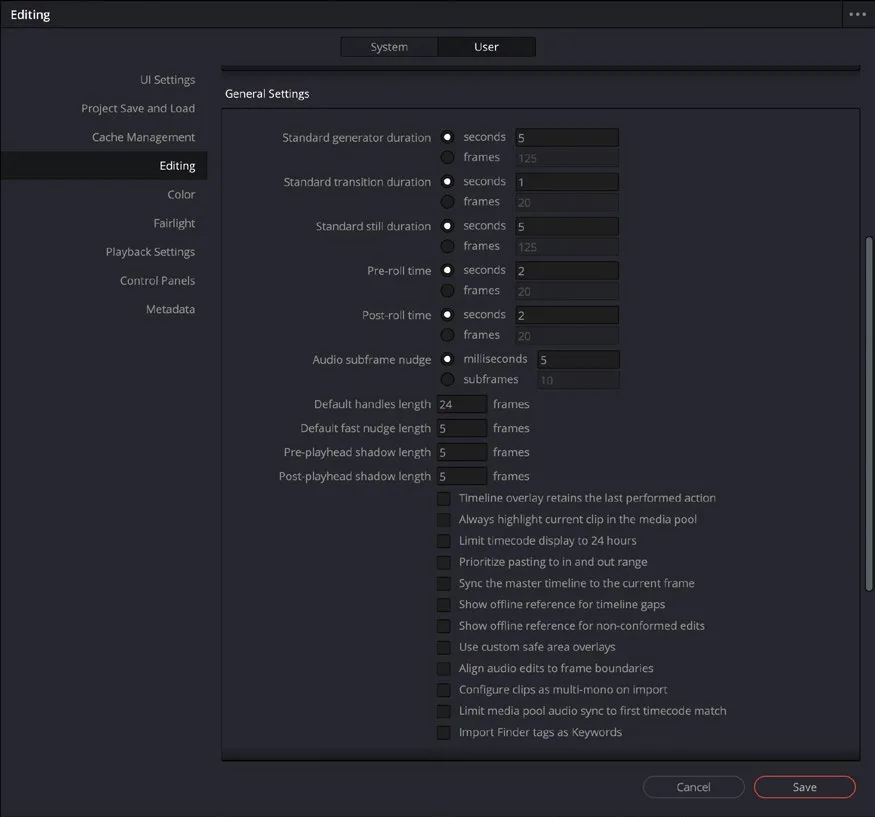
User Preferences窗口。Press Command-, (comma) in macOS or Ctrl-, (comma) in Windows to reopen theUser Preferenceswindow. - 向下滚动查看更多 Editing(剪辑)偏好设置。Scroll down to see more Editing preferences.
General Settings(常规设置)可调整标准转场和静帧时长(秒或帧),以及其他可启用选项,例如让 timeline viewer overlay 保留上一步剪辑操作的结果,而非始终默认回到 Overwrite。The General Settings allow you to adjust the standard transition and still-image durations, in either seconds or frames, along with other specific options you can choose to enable, such as having the timeline viewer overlay retain the last editing action, rather than always defaulting to Overwrite.
TIP · 提示注意:在 macOS 上,还可以启用一项功能——DaVinci Resolve 在导入媒体时自动从 Finder 标签创…
注意:在 macOS 上,还可以启用一项功能——DaVinci Resolve 在导入媒体时自动从 Finder 标签创建关键词。If you’re working on macOS, you also have the option to enable DaVinci Resolve to automatically create keywords from Finder tags when importing media.
浏览完 System 与 User Preferences 后,务必保存偏好,否则所有更改都会丢失。Once you’ve finished exploring the System and User Preferences, you must save your preferences, or else any changes you have made will be lost.
- 点击 Save 关闭
Preferences窗口。Click Save to close the Preferences window.
NOTE · 注意注意:部分偏好选项需要重启 DaVinci Resolve 才会生效,届时会弹出提示对话框…
注意:部分偏好选项需要重启 DaVinci Resolve 才会生效,届时会弹出提示对话框。Changing some options in the preferences will not take effect until you restart DaVinci Resolve. A dialog will appear informing you if that is the case.
在 Preferences窗口右上角的 Options (…) 菜单中,可以将 System Preferences 或 User Preferences 恢复为默认设置。Resetting and Saving Preferences Using the Options (…) menu in the top right corner of the Preferences window, you can choose to reset the System or User Preferences back to their defaults.
对于 User Preferences,你也可以把当前设置另存为预设(preset),再导出为扩展名为 .userprefs 的独立文件。For the User Preferences, you can also save the current set of preferences as a preset, which can then be exported as a self-contained file with the .userprefs extension.
需要时,可将该文件导入到其他 DaVinci Resolve 系统,再用同一个 Options 菜单加载为新预设,方便在不同机器间迁移个人偏好。If required, this file can then be imported to another DaVinci Resolve system, where you can use the same Options menu to load it as a new preset, making it easy to transfer your preferred user preferences between different systems.
本卡术语Terms in this card
媒体夹Bin 媒体池Media Pool 项目管理器Project Manager 智能媒体夹Smart Bins 时间线Timeline 导出Export 预设Preset 覆盖Overwrite 转场Transition 窗口Power Window 调色Grade 静帧Still 备份Backup 关键词Keywords 元数据Metadata 项目设置Project Settings 时间码Timecode