复制调色Copying Grades
9 steps
简介Overview
如果同一素材在时间线上多次使用——比如一段剪辑过的采访会有多个来自同一条采访者或受访者镜头的片段——逐条重新调色既耗时也无必要,因为它们的调色几乎一致。同理,来自相似环境的多个镜头,调色方案也往往非常接近。If a shot has been used on multiple occasions in the same timeline—for example, an edited interview will have numerous sections of one clip of either the interviewer or interviewee— you don’t want to spend time grading each clip from scratch since the grade would be pretty much the same. Likewise, if you have multiple shots from a similar environment, the chances are the grades for the shots will be very similar.
这种情况下,可以直接在片段之间复制粘贴调色。With this being the case, you can easily copy and paste grades between clips.
- 在时间线上选中 clip 03,这正是第 5 课中我们对其添加 Power Window 的片段。Select clip 03 in the timeline. This is the clip we graded in Lesson 5 by adding a power window to it.
- 从 Edit 菜单中选择 Copy,或按 Command-C(macOS)/ Ctrl-C(Windows)复制调色。From the Edit menu, choose Copy or press Command-C (macOS) or Ctrl-C (Windows) to copy the grade.
旁边还有一条 clip 同样显得平淡发灰,与原始素材很接近,这套调色很可能也适合它。We have a clip next to it that also looks quite flat and gray, much like our original shot, so maybe the grade will be suitable for this shot as well.
- 选中 clip 02,选择
Edit > Paste,或按 Command-V(macOS)/ Ctrl-V(Windows)粘贴调色。Select clip 02 and choose Edit > Paste or Command-V (macOS) or Ctrl-V (Windows) to paste the grade.
所有节点都会一并复制到新片段上。粘贴后的调色效果不错,给画面增添了急需的对比度,但 Power Window 的位置还需要微调。All the nodes will be copied onto the new clip. The grade now pasted on looks good on our new shot, giving it some much needed contrast. However, the window is not quite in the correct place.
NOTE · 注意默认情况下,粘贴调色会复制片段上的全部节点。该设置可改为仅复制所选节点:进入 DaVinci Resolve 的 Use…
默认情况下,粘贴调色会复制片段上的全部节点。该设置可改为仅复制所选节点:进入 DaVinci Resolve 的 User Settings 菜单,勾选 "Always perform copy paste on selected nodes"。The default setting for pasting grades is to copy all the nodes from one clip to another. The setting can be adjusted to copy only the selected node in a grade. This can be done from the Davinci Resolve User Settings menu by choosing the option “Always perform copy paste on selected nodes.”
- 选中 node 02,点击中间窗口的
Window按钮,在该节点上显示 Power Window。Select node 02 and then click theWindowbutton in the middle window to show the power window on the node. - 按住 Power Window 右下角的控制点向右拖动,使羚羊的一部分不再处于阴影中。Click the control point that sits in the bottom right corner of the window and drag it right so part of the antelope is no longer in shadow.
- 点击回到
Curves窗口,将 Power Window 从 Viewer 中隐藏。Click back on the curves window to hide the power window from the viewer.
其实还有一种更快捷的方式在镜头之间复制粘贴调色。There is a quicker way of copying and pasting grades between shots.
- 在时间线上选中 clip 01。这一镜头的画面也偏灰,需要重新调色。Select clip 01 in the timeline. Again, this is another shot that looks a little flat.
- 把鼠标指针移到 clip 02 上,按鼠标中键点击,完整调色就会被复制到 clip 01。Place the mouse pointer over clip 02 and click with the middle mouse button. The complete grade will be copied to clip 01.
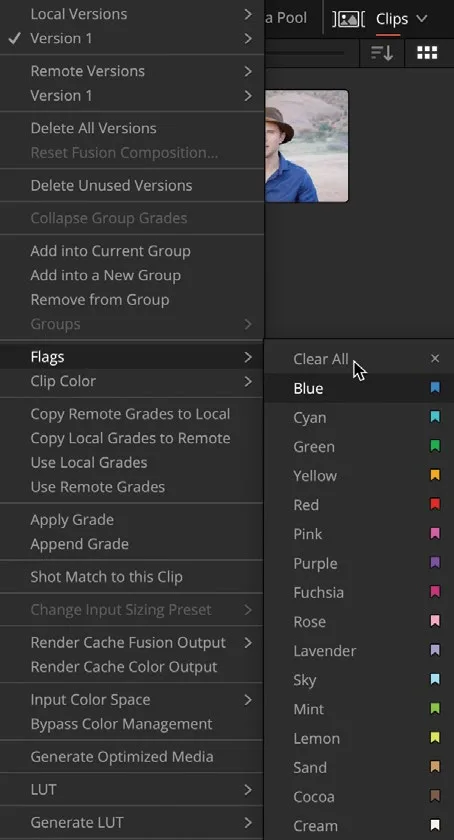
现在时间线上有多个片段已经应用了调色,但依然显示蓝色标记,代表它们还处于未调色(ungraded)状态,需要手动更改这个状态。You now have several clips that have grades applied but are still flagged blue, which identifies them as being ungraded, so this needs to be changed.


- 选中 clip 01,按住 Command 键(macOS)或 Ctrl 键(Windows),再选中 clip 02,片段周围应出现红色边框。Select clip 01, hold down the Command (macOS) or Ctrl (Windows) key and select clip 02. The red border should appear around the clips.
在任意选中的片段上右键,选择 Flags > Clear All。Right-click over any of the selected clips and choose Flags > Clear All.
本卡术语Terms in this card
时间线Timeline 标记Marker 对比度Contrast 曲线Curves 窗口Power Window 调色Grade 静帧Still 节点Node