用 Color Warper 快速调色Making Quick Adjustments with the Color Warper
9 steps
简介Overview
HSL 曲线背后的算法能让调色结果非常平滑自然,但一次只能调整一个色彩参数。上一课里,一条曲线负责调饱和度,另一条曲线再单独调色相。The computer mathematics behind the HSL curves create a very smooth and natural result; however, they only allow the adjustment of one color parameter at a time. In the previous lesson, one curve allowed you to adjust the saturation of a color and then a separate curve allowed the adjustment of the hue.
Color Warper 通过一组可拖动的网格点,允许同时调整两个参数。比如不仅能改变某个颜色的饱和度,还可以同步调整色相——本质上等同于用两套曲线同时操作,但操作过程更直观、更快捷。The Color Warper allows the adjustment of two parameters at the same time using a grid of adjustable points. For example, you can change not only the saturation of a color but the color itself by adjusting the hue at the same time—essentially the process we just did but with two sets of curves. This makes the process of manipulating color a quick and intuitive process when using the Color Warper.
- 在时间线上选中 clip 14。Select clip 14 in the timeline.
这段画面基本只包含橙色和蓝色,正好适合用 Color Warper 快速处理。Here we have a clip that essentially has just orange and blue in it, so we can manipulate these colors quickly and easily with the Color Warper.
- 在中央调色面板的工具栏中,点击 Color Warper 图标。In the toolbar center palettes, click the Color Warper icon.
Color Warper 默认进入 Chroma Warper 模式,要调整色相和饱和度需要先切换模式。The Color Warper will default to the Chroma Warper, but we need to change this to adjust the hue and saturation in the image.
- 在
Color Warper面板右上角点击,切换到 Hue – Saturation。In the Color Warper tool, click in the top right corner of the window and choose Hue – Saturation.
Color Warper 显示在中间窗口,被划分为六个独立色块,每个分界线上都有若干可拖动的控制点,改变它们就能调整画面中对应区域的颜色与饱和度。The Color Warper appears in the middle window and is split into six separate segments. Each section divider will have several points that can be dragged to change the color and saturation in the image.
- 为了让 Warper 更精准,把分段数从 6 改为 8。To make the Warper a little more precise, change the number of segments from 6 to 8.
- 把鼠标移到 Viewer 上,默认会激活 Qualifier 工具,将其移到画面左下角的沙地区域。Position the mouse pointer over the viewer, and it will default to the Qualifier tool. Place it over the sandy area toward the bottom left corner of the frame.
- 在 Viewer 中框选沙地区域,Color Warper 中对应的控制点会被自动选中。Select the sandy area in the viewer, and you will notice that it selects a control point in the Color Warper.
- 保持 Qualifier 停留在沙地区域,按住鼠标向左上方拖动,直到该区域变得更饱和、更偏橙,Warper 的形状与下图一致。With the qualifier still over the sandy area in the viewer, click and drag left and upward until the area looks more saturated and orange, and the Warper looks similar to the image below.
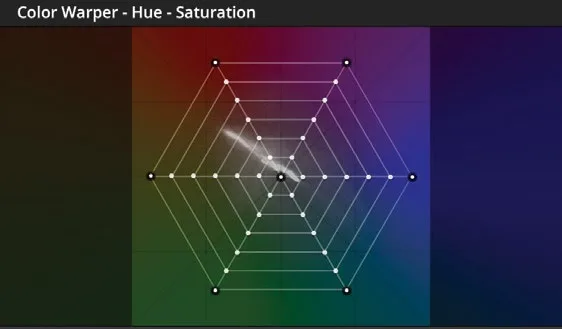
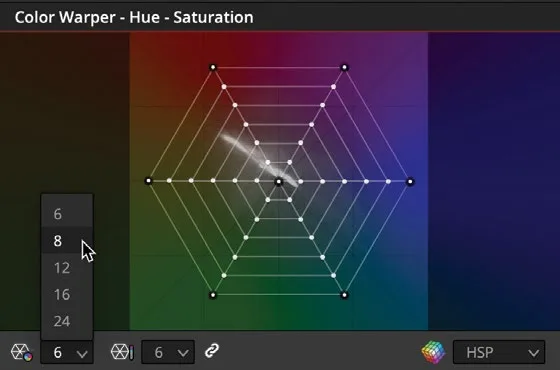

把控制点从 Warper 中心拖得越远,所选区域的饱和度就加得越多;把控制点拖进某个 hue 区域,则会改变选区的颜色。这两种调整可以同时进行。By dragging a control point further away from the center of the Warper, more saturation will be added to a selected area. Dragging the point into a hue in the Warper changes the color of the selection. As you can see, both of these adjustments can be made simultaneously.
现在要对天空做一个更精细的选区。这次不是直接在画面上拖选,而是用 Color Warper 自带的控制点来操作。You now want to make a slightly more precise selection for the sky. Rather than simply dragging along the image, you’ll use the control points in the Color Warper itself.
- 右键点击 node 02,选择 Add Serial,或按 Option-S(macOS)/ Alt-S(Windows)添加第二个节点。Add a second node by right-clicking node 02 and choosing Add Serial, or pressing Option-S (macOS) or Alt-S (Windows) on the keyboard.
- 确认
Color Warper窗口仍然可见。Make sure the Color Warper window is still visible.

在天空的任意位置点击,一个控制点会出现在中心偏右、靠近蓝色轴的位置。Select any part of the sky, and a point will appear just to the right of center toward the blue axis.
把控制点向右拖向蓝色。天空可能会偏一点品红,再稍微往下拖一点,直到天空看起来是蓝色为止。Drag the control point right toward blue. The sky might start to go a little magenta, so drag it down slightly until the sky looks blue.
HSL 曲线和 Color Warper 都能做出很自然的效果,这比用其他方法要省力得多。不过 HSL 曲线只能做一种调整,Color Warper 也只能做两种。Both the HSL curves and Color Warper can create very natural results that are much trickier to get using other methods. However, the controls are limited to one adjustment for HSL curves and two adjustments for the Color Warper.

本卡术语Terms in this card
时间线Timeline 曲线Curves 饱和度Saturation 色度扭曲器Chroma Warper 色彩扭曲器Color Warper HSL 曲线HSL Curves 窗口Power Window 限定器Qualifier 调色Grade 静帧Still 节点Node