粘贴属性平移Pasting Pan Attributes
11 steps
简介Overview
复制与粘贴带关键帧的属性——你可以把这个动画作为模板,应用到其他存在类似问题的片段上。Copying and Pasting Attributes with Keyframes You can use this animation as the basis for other clips with similar issues.
- 在时间线上选中 WHITE SANDS 11 片段,按 Command-C(macOS)或 Ctrl-C(Windows),或选择
Edit > Copy,复制该片段。In the timeline, select the WHITE SANDS 11 clip and press Command-C (macOS) or Ctrl-C (Windows), or choose Edit > Copy, to copy the clip. - 取消选中片段,然后点击
Single Viewer Mode按钮。Deselect the clip, and then click theSingle Viewer Modebutton. - 打开 Index,点击 PAN 2 标记,跳转到片段 PINA BLANCA 48。Open the Index and click the PAN 2 marker to move to the clip PINA BLANCA 48.
- 选中 PINA BLANCA 48 片段,按 Option-V(macOS)或 Alt-V(Windows),或选择
Edit > Paste Attributes。Select the PINA BLANCA 48 clip and press Option-V (macOS) or Alt-V (Windows), or choose Edit > Paste Attributes.
- 因为你只需要把 WHITE SANDS 11 的水平移动应用到本片段,所以在
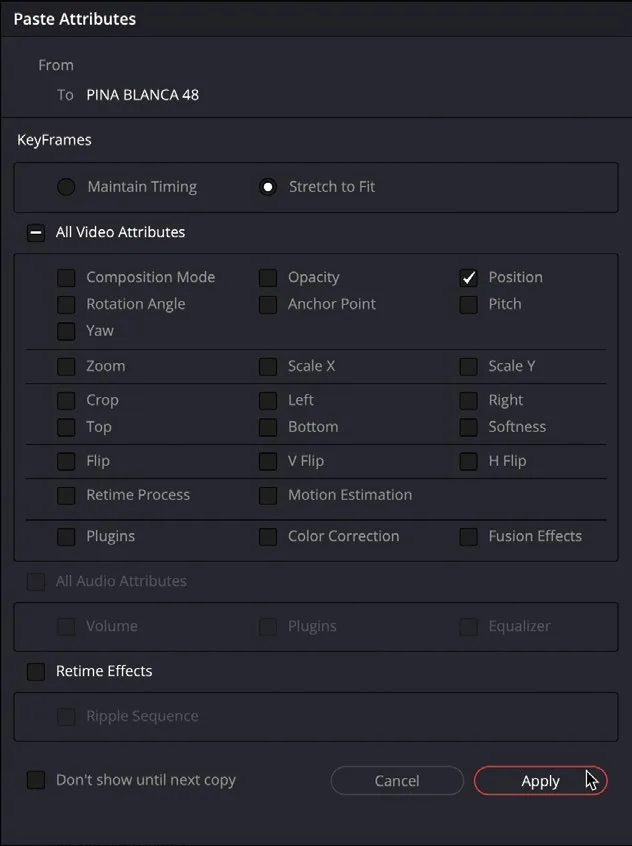
Paste Attributes窗口中取消勾选 Color Correction,并勾选 Stretch to Fit。Since you only need to apply the horizontal movement from the WHITE SANDS 11 clip to this clip, in thePaste Attributeswindow, deselect the Color Correction option and choose Stretch to Fit.
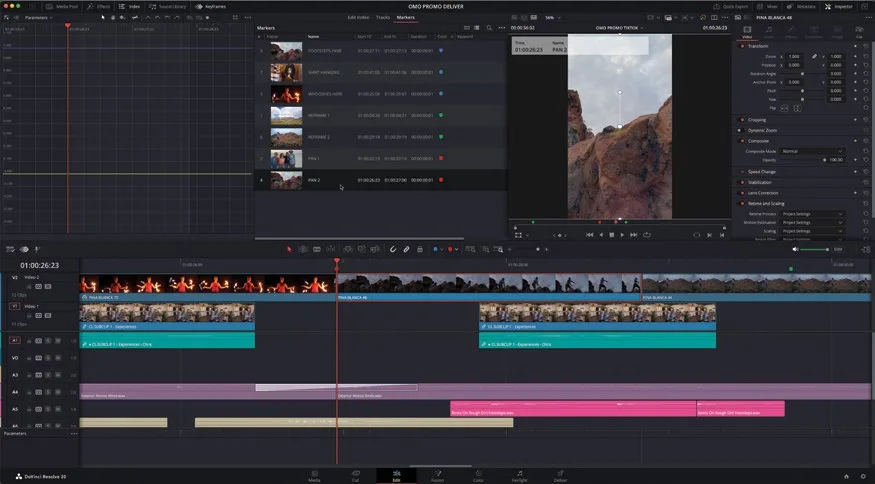
Stretch to Fit 会使关键帧的时序自动按新片段的时长重新适配。Stretch to Fit will ensure that the timing of the keyframes is adjusted relative to the duration of the new clip.
- 点击 Apply。Click Apply.
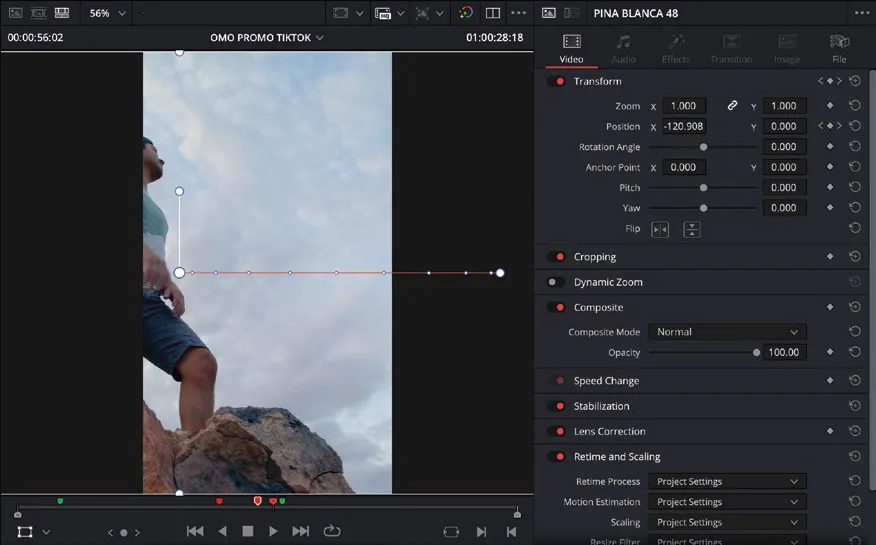
你可能会发现摇镜最后停在了过靠右的位置,这没关系——直接调整第二个关键帧的 X Position 即可修复。You will probably find that the pan finishes too far to the right. That’s OK, since you can simply refine the X Position of the second keyframe.
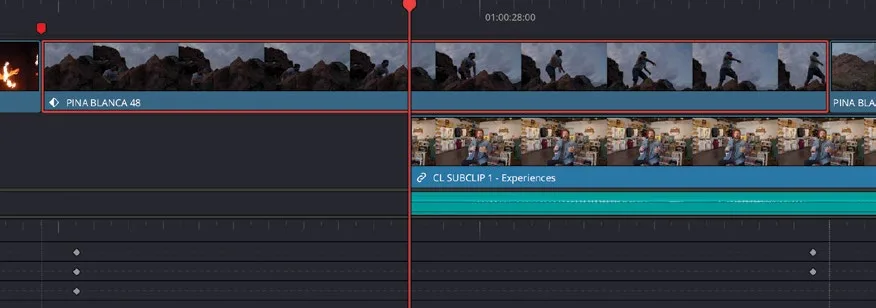
- 在时间线上把播放头移到 PINA BLANCA 48 两个关键帧之间。In the timeline, place the timeline playhead between the two keyframes on PINA BLANCA 48.
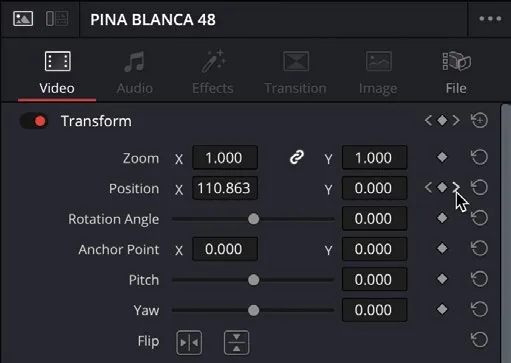
- 在 Inspector 中点击 Next Keyframe 箭头,跳转到播放头右侧的下一个关键帧。In the Inspector, click the Next Keyframe arrow to jump to the keyframe to the right of the playhead.
TIP · 提示提示:也可以按 [(左方括号)跳到当前所选片段的上一个关键帧,按 ](右方括号)跳到下一个关键帧…
提示:也可以按 [(左方括号)跳到当前所选片段的上一个关键帧,按 ](右方括号)跳到下一个关键帧。You can also use [ (left square bracket) to jump to a previous keyframe and ] (right square bracket) to jump to the next keyframe of the currently selected clip.
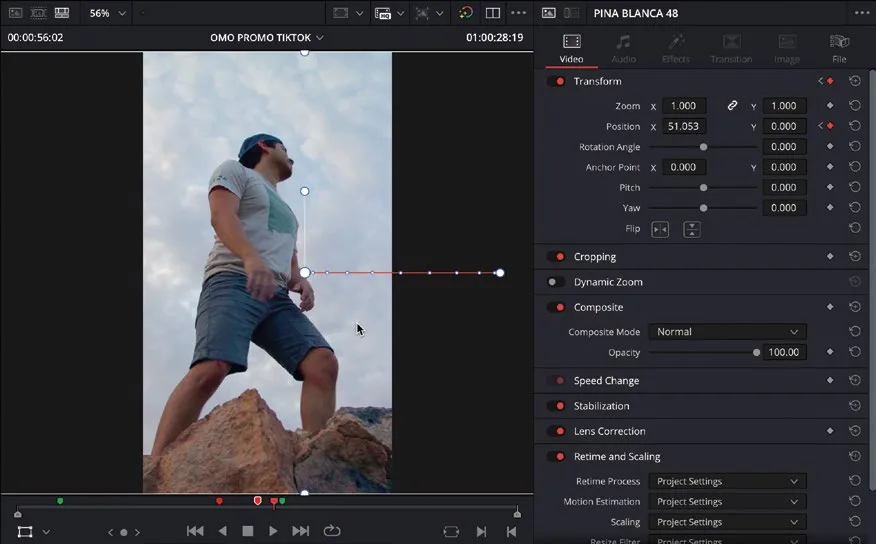
- 使用屏幕上的 Transform 控件,或在 Inspector 中调整 Position X 控件,修改第二个关键帧的数值,使画面最终落在人物身上。Using the onscreen Transform controls or the Position X control in the Inspector, adjust the value of the second keyframe so it ends with the guy in the shot.
- 如有需要,在 Keyframe Tray(关键帧托盘)中调整关键帧的时序,并在 Keyframes Curves(关键帧曲线)中调整 Position X 曲线的贝塞尔手柄,让镜头在人物跳上岩石时能够平滑地跟随他。If necessary, adjust the timing of the keyframes in the Keyframe Tray and the Bézier handles for the Position X curve in the Keyframes Curves to refine the animation so the pan follows the guy as he jumps up on the rock.
TIP · 提示提示:DaVinci Resolve Studio 提供了 Smart Reframe(智能重构图)功能,可以自动完成通…
提示:DaVinci Resolve Studio 提供了 Smart Reframe(智能重构图)功能,可以自动完成通过关键帧重构图的操作。更多信息请参阅《DaVinci Resolve 参考手册》或《DaVinci Resolve 20 剪辑师指南》。DaVinci Resolve Studio has a Smart Reframe function that automates this process of reframing using keyframes. For more information, refer to The DaVinci Resolve Reference Manual or The Editor’s Guide to DaVinci Resolve 20.
- 播放新格式的时间线,根据需要做进一步修改。Play the newly reformatted timeline, making any further changes you deem necessary.
NOTE · 注意提示:如果在继续下一步之前需要追赶到当前进度,可以打开 Media Pool,选中 TIMELINES bin,选择 F…
提示:如果在继续下一步之前需要追赶到当前进度,可以打开 Media Pool,选中 TIMELINES bin,选择 File > Import > Timeline,导航至 R20 Beginners Guide / Lesson 10 / Timelines / OMO PROMO TIKTOK CATCHUP.drt,然后点击 Open。If you need to catch up before moving to the next step, open the media pool, select the TIMELINES bin, choose File > Import > Timeline, navigate to R20 Beginners Guide / Lesson 10 / Timelines / OMO PROMO TIKTOK CATCHUP.drt, and click Open.
本卡术语Terms in this card
媒体夹Bin 媒体池Media Pool 时间线Timeline 检查器Inspector 关键帧Keyframe 标记Marker 播放头Playhead 曲线Curves 窗口Power Window 变换Transform