将声音片段放入时间线Editing the Soundbite to the Timeline
2 steps
简介Overview
这就是将要被编辑进时间线的部分。This is the portion of the clip you’ll edit into the timeline.
- 在 source viewer 中按住鼠标中键,把素材拖到时间线上,确保拖入的是现有的 Video 1 和 Audio 1 轨道,并且对齐到时间线最左端的起点位置。Click in the middle of the source viewer and drag the clip down into the timeline, ensuring that you drag the clip into the existing Video 1 and Audio 1 tracks and to the start of the timeline at the far left.
NOTE · 注意如果不小心拖错了位置,多生成了轨道或者在时间线起点留了空隙,也不用太担心。可以等素材放进时间线后,再把它拖到正确的轨道和…
如果不小心拖错了位置,多生成了轨道或者在时间线起点留了空隙,也不用太担心。可以等素材放进时间线后,再把它拖到正确的轨道和位置上,只是多花点时间,编辑节奏会稍微变慢。另外也可以按 Command-Z (macOS) 或 Ctrl-Z (Windows) 撤销上一步操作,重新把素材拖到空白的时间线里。If you accidentally drag the clip and add additional tracks or leave a gap at the start of the timeline, it’s not a huge problem. You can simply drag the clip to the right tracks and location after you’ve added it to the timeline. It’s just that this takes a bit more time and slows down your editing slightly. Alternatively, press Command-Z (macOS) or Ctrl-Z (Windows) to Undo the last action and try dragging the clip to the empty timeline again.
- 在 timeline viewer 的 transport controls 中点击
Play按钮,或按 Spacebar,在时间线上播放刚编辑好的素材。In the timeline viewer transport controls, click thePlaybutton or press the Spacebar to play the edited clip in the timeline.
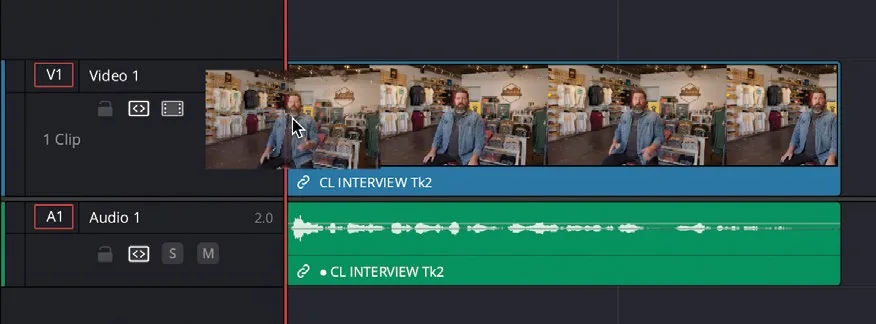
恭喜你!已经成功把第一条素材添加到了时间线上!接下来只要对这个流程不断重复,把 Organ Mountain Outfitter 宣传片所需的所有素材都按同样方式放进去就行了。Congratulations! You’ve successfully added your first clip to the timeline! Now all you need to do is keep repeating this process for all the other clips you’ll need to build up the Organ Mountain Outfitter’s promo.
回放控制是剪辑中的重要环节。DaVinci Resolve 的默认键盘布局支持全球专业剪辑师通用的全部回放快捷键:Spacebar 开始/停止回放,Left/Right Arrow 逐帧前后移动;进阶用户也可以用 J、K、L 键控制不同速度的回放。Controlling Playback An important part of editing is learning how to control the playback of your video. DaVinci Resolve’s default keyboard layout supports all the usual shortcuts for playback that professional editors around the world recognize. You can use the Spacebar to start and stop playback and the Left Arrow and Right Arrow keys to move forward and back one frame at a time. More experienced users will be happy to know that the J, K, and L keys also control playback at different speeds.
J K LJ K L
J、K、L 键的排列顺序与 source viewer 和 timeline viewer 中 Play Reverse、Stop、Play 传输控件的顺序一致。The order of the JKL keys match the layout of the Play Reverse, Stop, and Play transport controls in both the source and timeline viewers.
试试以下操作,练习控制 source 或 timeline viewer 的回放:Try the following to practice controlling the playback of the source or timeline viewer:
— 按住 K 并轻点 L:向前逐帧 jog。 — 按住 K 并轻点 J:向后逐帧 jog。 — 按住 K 并按住 L:以半速向前 scrub。 — 按住 K 并按住 J:以半速向后 scrub。 — 连按两次 L:以 2 倍速向前 shuttle。 — 连按两次 J:以 2 倍速向后 shuttle。— Hold K and tap L to jog forward 1 frame. — Hold K and tap J to jog backward 1 frame. — Hold K and Hold L to scrub forward at half speed. — Hold K and hold J to scrub backward at half speed. — Press L twice to shuttle forward at twice normal speed. — Press J twice to shuttle backward at twice normal speed.
持续轻点 J 或 L 可逐级提升 shuttle 速度,最高可达 64 倍速。You can keep tapping the J or L keys to increase the shuttling speed up to 64x normal speed.