文字创建Text Creation
10 steps
简介Overview
现在来添加文字。Text+ 节点是 Fusion页面中创建和动画化 2D 文字的主要工具,在 Edit页面也同样可用。它提供丰富的文字效果选项,包含六个标签页,分别控制文字样式、布局方式,以及填充、描边、阴影、边框等着色选项。这里只能触及皮毛,Text+ 节点功能极为强大,用法无穷无尽。It’s time to add some text. The Text+ node is the main tool for creating and animating 2D text in the Fusion page and is also available in the edit page. It offers extensive options for text effects, including six tabs of controls for text styling, layout methods, and shading options such as fills, outlines, shadows, and borders. While you’ll only scratch the surface here, the Text+ node is an incredibly powerful tool with endless possibilities.
- 选中 Merge1,然后点击工具栏中的第三个工具图标 Text+。Select Merge1, and then click the Text+ icon, which is the third tool in the toolbar.
- 画面上会出现一个新的 Text+ 节点和一个 Merge2 节点,Text1 节点已连接到 Merge2 节点的绿色 Foreground Input(前景输入),因此文字会显示在背景之上。A new Text+ node and a Merge2 node will appear, connecting your Text1 node to the green Foreground Input of the Merge2 node, which will be on top of the background.
NOTE · 注意如果在添加新工具前先在节点编辑器中选中一个节点,新工具会自动连接到该节点。选中节点后,Inspector 中会显示该节点…
如果在添加新工具前先在节点编辑器中选中一个节点,新工具会自动连接到该节点。选中节点后,Inspector 中会显示该节点的默认参数,并在查看器顶部出现该节点专用的工具栏。If you select a node in the Node Editor before adding a new tool, the new tool will connect to the selected node. Selecting a node also shows its default parameters in the Inspector and adds a toolbar specific to that node at the top of the viewer.
如果 Text1 节点出现在节点树的底部,无需在意,节点位置不影响功能,关键在于连线:Text1 必须连接到 Merge2 的绿色输入端。如果想保持节点整齐,可以点击拖动节点重新排列。If the Text1 node appears at the bottom of the node tree, don’t worry. The only thing that matters is the connections: Text1 should be connected to the green input of Merge2. To maintain order, we can click and drag the nodes to rearrange them.
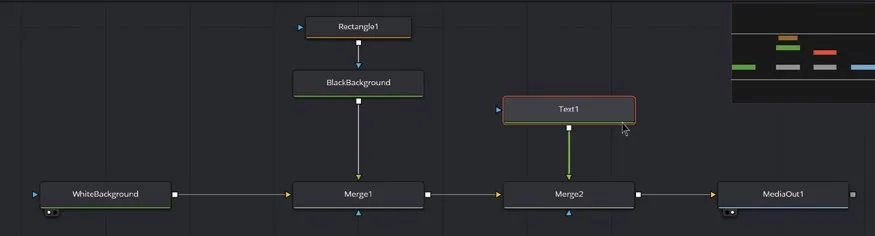
- 按 F2,将 Text1 节点重命名为 TitleText。Press F2 and rename the Text1 node TitleText.
- 选中 TitleText 节点,在 Inspector 的文字框中输入 DAVINCI RESOLVE,并将 Size 设为 0.18。With the TitleText node selected, type DAVINCI RESOLVE into the text box in the Inspector and set the size to 0.18.
TIP · 提示可通过按 Command-P(macOS)或 Ctrl-P(Windows),或在 Inspector 中点击节点的 E…
可通过按 Command-P(macOS)或 Ctrl-P(Windows),或在 Inspector 中点击节点的 Enable按钮,关闭(旁通)任意节点。You can turn off (or pass through) any node by pressing Command-P (macOS) or Ctrl-P (Windows), or by clicking the node’s Enable button in the Inspector.
接下来,在另一个节点中添加第二行文字。为此,需要将现有文字上移以腾出空间。调整文字位置有多种方式:使用 Transform 节点、在 Layout 标签中调整 Center 值、在 Text+ 节点的 Transform 标签中修改 Offset 值,也可以在 Merge2 节点中更改 Center 值。本练习尽量减少工具种类,但实际上完成同一效果的方法很多,各有优劣。Next, you’ll add another line of text in a different node. To do that, you’ll need to move your existing text up to create space for the new line. There are several ways to adjust the text position: by using a Transform node, by adjusting the Center values in the Layout tab, or by modifying the Offset values in the Transform tab of the Text+ node. You can also change the Center value in the Merge2 node. For this exercise, we have minimized the variety of tools used, but you will find that there are many ways to achieve the same result, each with its own pros and cons.
- 由于已选中 TitleText 节点,在工具栏中找到 Transform 节点并点击。As you already have the TitleText node selected, look for the Transform node on the Toolbar and click it.
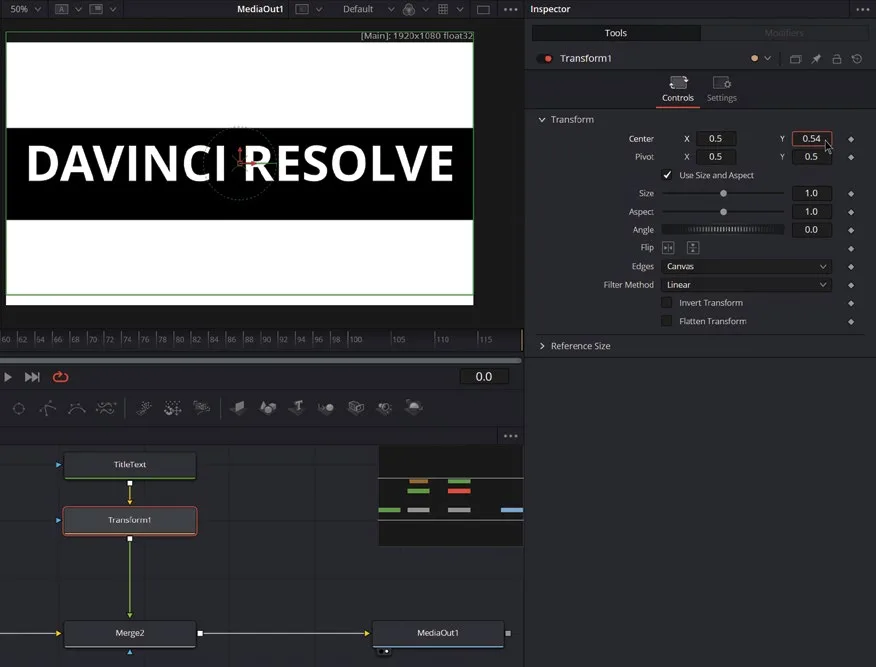
Transform 节点应连接在 TitleText 和 Merge2 之间。这样 Transform 会作用于其输入端连接的所有内容,可以用它将文字上移。You should have the Transform node connected between TitleText and Merge2. This way, the Transform will affect everything that is connected to its input. With this setup, you can move the text upward.
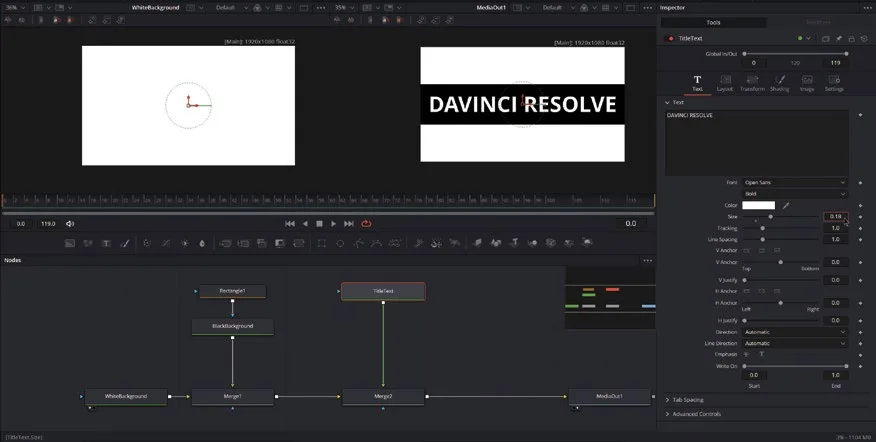
- 选中 Transform,进入 Inspector,将 Center Y 的值改为 0.54。Select the Transform, go to the Inspector, and change the Center Y value to 0.54.
接下来,运用刚学到的节点知识,添加第二行字幕文字。Next, you will add a secondary line of text using the nodes you just learned.
- 选中 Merge2 节点,添加一个新的 Text+ 节点(点击工具栏上第三个图标)。此时会同时生成一个 Merge3 节点和一个 Text1 节点,将 Text1 节点重命名为 SubtitleText。Select the Merge2 node and add a new Text+ node (click the third icon in the toolbar). This will add a Merge3 and a Text1 node. Rename the Text1 node SubtitleText.
TIP · 提示提示:你也可以复制之前做好的 TitleText,再重置部分参数…
提示:你也可以复制之前做好的 TitleText,再重置部分参数。You could also copy and paste the TitleText we created earlier, and reset some of the values.
- 在 SubtitleText 节点的编辑框中输入 MOTION GRAPHICS IN FUSION,将字体改为 Courier New Regular,大小设为 0.085。In the SubtitleText node, type MOTION GRAPHICS IN FUSION in the edit box, change the font to Courier New, Regular, and set the size to 0.085.

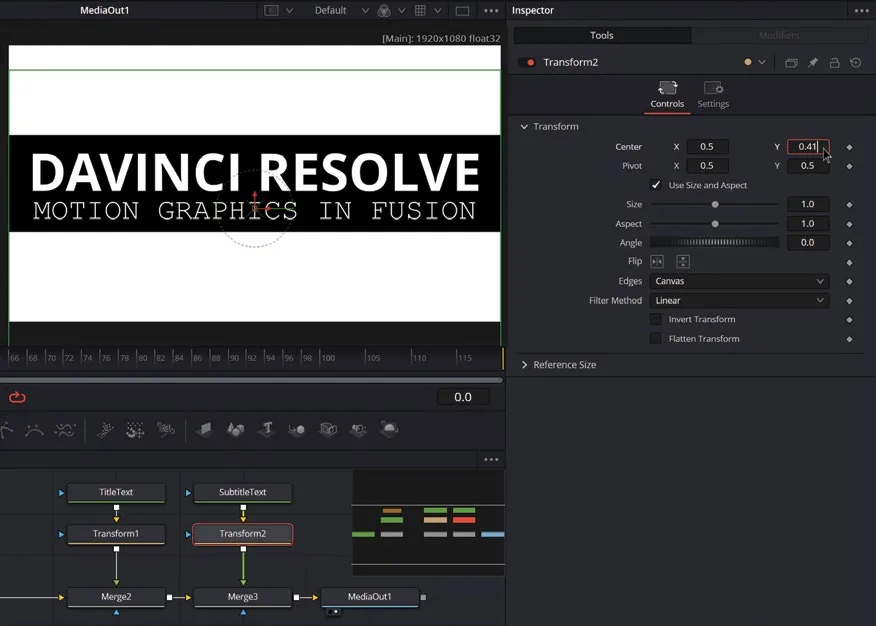
此时字幕会显示在主标题 TitleText 的前面,需要添加一个 Transform 节点来调整位置。The subtitle text is in front of your main TitleText. You’ll add a Transform node to correct that.
- 选中 SubtitleText 节点,点击工具栏上的 Transform 节点图标。Select the SubtitleText node and click the Transform node icon on the toolbar.
- 选中新建的 Transform2 节点,将 Center Y 值改为 0.41。Select the new Transform2 node and change the Center Y value to 0.41.
时间标尺与播放控制 画面设计就绪后,下一步就是做动画。由于要添加关键帧,需要观察合成的动态效果。时间标尺位于 Viewer 区域下方,反映合成的总时长,其显示范围取决于 Edit 或 Cut页面时间线上当前选中的内容。The Time Ruler and Transport Controls With the design in place, it’s time to start animating. You are about to add keyframes, so you’ll need to review your composition in motion. The Time Ruler, located beneath the viewer area, reflects the total duration of the composition. The range displayed on the Time Ruler depends on what’s currently selected in the edit or cut page timeline.
渲染范围(render range)决定了交互式播放、磁盘缓存和预览所使用的帧区间。范围外的帧不会被渲染或播放,但仍可拖动 playhead 查看这些未使用的帧。本练习中创建的 Fusion 合成时长 5 秒、帧率 24 fps,因此总帧数为 120 帧,从第 0 帧到第 119 帧。The render range determines the range of frames used for interactive playback, disk caches, and previews. Frames outside the render range are not rendered or played, although you can still drag the playhead to these frames to see the unused frames. In this exercise, you’ve created a 5-second Fusion Composition at 24 frames per second, so it’s a total of 120 frames from frame 0 to frame 119.
时间标尺下方有六个播放控制按钮,你在其他页面应该已经很熟悉了,分别是:Composition First Frame、Play Reverse、Stop、Play Forward、Composition Last Frame 和 Loop。Underneath the Time Ruler, you’ll find the six transport controls that you’re already familiar with from the other pages: Composition First Frame, Play Reverse, Stop, Play Forward, Composition Last Frame, and Loop.
要使用键盘移动 playhead,可以用 Edit页面相同的快捷键(JKL、Left Arrow、Right Arrow),此外还有以下额外命令:To move the playhead using the keyboard, you can use the same controls as in the edit page ( JKL, Left Arrow, Right Arrow), along with these additional commands:
— Shift-Left Arrow:跳转到片段的 Global Start 帧。 — Shift-Right Arrow:跳转到片段的 Global End 帧。 — Command-Left Arrow(Windows 为 Ctrl-Left Arrow):跳转到 Render Range 入点。 — Command-Right Arrow(Windows 为 Ctrl-Right Arrow):跳转到 Render Range 出点。— Shift-Left Arrow: Jumps to the clip’s Global Start frame — Shift-Right Arrow: Jumps to the clip’s Global End frame. — Command-Left Arrow (Ctrl-Left Arrow on Windows): Jumps to the Render Range In point. — Command-Right Arrow (Ctrl-Right Arrow on Windows): Jumps to the Render Range Out point.
本卡术语Terms in this card
时间线Timeline 帧率Frame Rate 渲染Render 编辑页Edit page 检查器Inspector 关键帧Keyframe 播放头Playhead 偏移Offset 静帧Still 合成Compositing Fusion 合成Fusion 合并Merge 节点Node 变换Transform
相关知识卡Related Cards
时间线Timeline Fusion 页面Fusion Page 节点编辑器Node Editor 变换节点Transform Node