创建新项目Creating a New Project
6 steps
简介Overview
到目前为止,你所用到的项目都是预先创建并配置好的,可以直接上手体验 Edit页面和 Color页面的各种工具。但你迟早需要自己创建项目,因此理解一些关键的项目设置非常重要。The projects you have worked with so far have all been created and set up so that you didn’t have to worry about the settings, allowing you to just dive in and explore the exciting tools that the edit and color pages have to offer. At some point, though, you will need to create your own project, so it’s important that you understand some of the essential project settings you’ll need to consider.
第一步当然是在 Project Manager 中新建一个项目。Of course, the first step is to create a new project in the Project Manager.
- 打开 DaVinci Resolve。Open DaVinci Resolve.
- 确认 Project Manager 指向的是 Local project library,然后点击
New Project按钮。Ensure that the Project Manager is set to your Local project library and click theNew Projectbutton.
TIP · 提示如果 DaVinci Resolve 已经打开,可以通过 File > Project Manager,或按 Shift…
如果 DaVinci Resolve 已经打开,可以通过 File > Project Manager,或按 Shift-1,或点击界面右下角的 Project Manager按钮来打开 Project Manager。也可以直接选择 File > New Project来创建新项目。用这种方式创建的项目仍会添加到 Project Manager 顶层,即使 Project Manager 本身并未打开。If DaVinci Resolve is already open, you can choose File > Project Manager, or press Shift-1, or click the Project Manager button in the lower right corner of the interface to open the Project Manager. You can also choose File > New Project to create a new project directly. Projects created in this way will still be added to the top level of the Project Manager, even though the Project Manager itself isn’t open.
- 在弹出的
Create New Project窗口中,输入项目名称:MY OMO PROJECT。In the Create New Project window that appears, type the project name, MY OMO PROJECT.
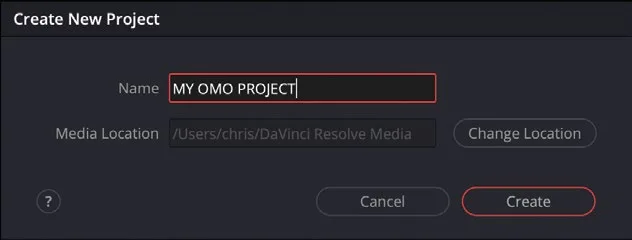
在 DaVinci Resolve 20 中创建新项目时,系统会要求你指定一个 Media Location,用来存放该项目所产生的所有生成媒体(generated media)。Lesson 3 中使用 Voiceover 工具录制的音频文件就是 generated media 的一个例子。Media Location 可以是本地磁盘、外接硬盘或网络存储位置。Whenever you create a new project in DaVinci Resolve 20, you will be asked to specify a Media Location, which is a folder on your system to hold all generated media created for that project. An example of “generated media” is the audio file created when you used the Voiceover tool in Lesson 3. The Media Location can be on a local disk, an external drive, or a network storage location.
本课练习中,Media Location 保持默认即可;之后你也可以随时在 Project Settings 中修改这个路径。For the purposes of this lesson, you will leave the Media Location set to the default; however, you can also change this location any time using the Project Settings, which you will explore in due course.
- 点击 Create。Click Create.
新项目创建完成,DaVinci Resolve 默认打开 Cut页面;如果你在新建项目前已停留在其他页面且未关闭 Resolve,则会保留在原页面。The new project is created, and DaVinci Resolve opens on the cut page unless you were previously working in another page and hadn’t closed Resolve before creating the new project.
- 选择
Workspace > Reset UI Layout,将 Resolve 所有页面的界面恢复为默认布局。Choose Workspace > Reset UI Layout to return all pages in Resolve to their default layouts.
TIP · 提示如果想保存自定义布局,可选择 Workspace > Layout Presets > Save Layout as P…
如果想保存自定义布局,可选择 Workspace > Layout Presets > Save Layout as Preset。注意保存的预设会记录 Resolve 每个页面的布局。之后可通过 Workspace > Layout Presets> [Preset Name] > Load Preset / Update Preset / Export Preset / Delete Preset 来加载、更新、导出或删除已保存的预设。If you want to save a customized layout, you can choose Workspace > Layout Presets > Save Layout as Preset. Note that saved presets save the layout for every page in Resolve. You can then load, update, export, or delete a saved preset by choosing Workspace > Layout Presets > [Preset Name] > Load Preset / Update Preset / Export Preset / Delete Preset.
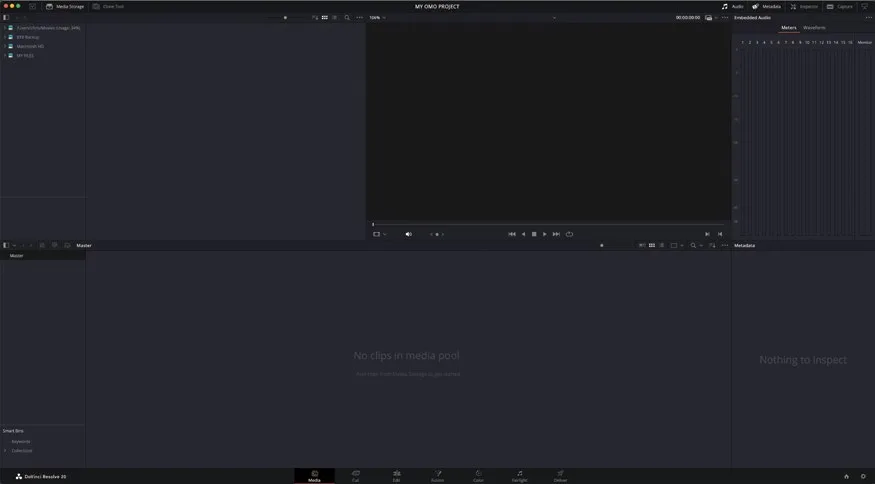
Media页面专门用于集中准备和组织项目素材。这里能最大化利用屏幕空间来查看可用片段,不会被时间线、调色控件或音频混音器干扰。The media page is dedicated to helping you focus on preparing and organizing the media for your project. It is here that you have the most space to explore the clips you have to work with, without the distractions of a timeline, color grading controls, or audio mixers taking up valuable screen real estate.
项目组织并非只在初始设置时做一次,本课介绍的许多功能同样适用于 Edit页面,可以在剪辑过程中同步执行。However, as project organization is not something that just happens once when you first set up a project, many of the functions discussed in this lesson can also be applied directly in the edit page so you can implement them alongside your editing.
- 点击
Media按钮,或按 Shift+2 切换到Media页面。Click the Media button or press Shift-2 to switch to the media page.
Media页面主要用于查看和组织源素材,主要是视频、音频和图形。不过在拖入素材之前,需要先了解项目设置及其重要性。The media page is dedicated to reviewing and organizing your source media—principally, video, audio, and graphics. However, before you start dragging files into your project, you’ll learn more about the settings of your projects and why it’s important to make sure those settings are correct.
TIP · 提示提示:同样可使用快捷键切换其他页面——Shift+4 切换到 Edit 页面,Shift+5 切换到 Fusion,Sh…
提示:同样可使用快捷键切换其他页面——Shift+4 切换到 Edit页面,Shift+5 切换到 Fusion,Shift+6 切换到 Color页面,Shift+7 切换到 Fairlight,Shift+8 切换到 Deliver页面。You can also use similar keyboard shortcuts to switch between the other pages: Shift-4 for the edit page, Shift-5 for Fusion, Shift-6 for the color page, Shift-7 for Fairlight, and Shift-8 for the deliver page.
本卡术语Terms in this card
项目库Project Library 项目管理器Project Manager 时间线Timeline 交付页Deliver page 导出Export 预设Preset 编辑页Edit page 调音台Mixer 配音Voiceover 调色页Color page 窗口Power Window 调色Grade 静帧Still 键盘快捷键Keyboard Shortcuts 项目设置Project Settings Fairlight 音频Fairlight Fusion 合成Fusion