在调色页面中应用 Resolve FXApplying Resolve FX in the Color Page
9 steps
简介Overview
和 Cut、Edit、Fusion页面一样,调色页面内置了多种高质量 Resolve FX,例如模糊、Glow、胶片颗粒和镜头光晕等。这些特效可以作用于整张画面,也可以配合调色页面的窗口(Power Window)将效果局限在画面的某个区域。本节先从对整张画面施加效果开始,沿用上一章的时间线。Just like the cut, edit, and Fusion pages, the color page includes many high-quality Resolve FX, such as blurs, glows, film grain, and lens flares. They can be applied to the entire image, or you can combine them with windows on the color page to isolate the effect to one area of the frame. You’ll start by applying an effect to the whole image. You will continue using the timeline you used in the previous chapter.
- 在时间线中选中片段 07。Select clip 07 in the timeline.
- 在 Node Editor 中,对节点 02 右键单击,选择
Add Node > Add Serial。In the Node Editor, right-click over node 02 and choose Add Node > Add Serial. - 点击界面右上角的
Effects按钮,打开调色页面中可用的 Resolve FX 列表。In the top right corner of the interface, click theEffectsbutton to show the Resolve FX you can utilize in the color page.
这个镜头需要更强的阳光照射感,所以要添加一个能传达这种光线的光效。This shot could use more of the feel of the sun shining, so you need a lighting effect that conveys this.
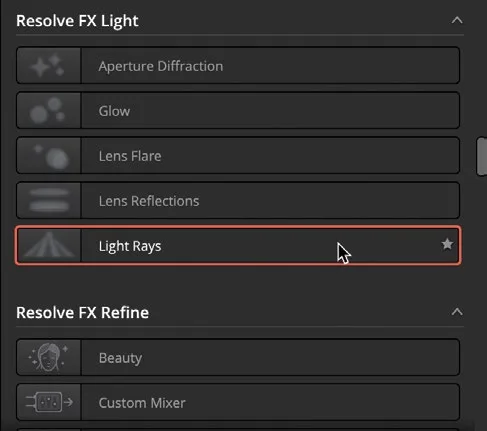
- 在特效面板中向下滚动,找到 Resolve FX Light 组,其中的 Light Rays 效果即可使用。Scroll down the effects palette until you reach the Resolve FX Light group. Under this section, you will find the Light Rays effect.
TIP · 提示部分 Resolve FX 仅在 DaVinci Resolve Studio 中提供。不过在免费版中也可以应用这些效果…
部分 Resolve FX 仅在 DaVinci Resolve Studio 中提供。不过在免费版中也可以应用这些效果来测试功能,画面上会带有水印。Some Resolve FX are available only in DaVinci Resolve Studio. However, to test their functionality, you can apply them in the free version with a watermark.
- 将 Light Rays 效果拖拽到节点 03 上。Drag and drop the Light Rays effect onto node 03.
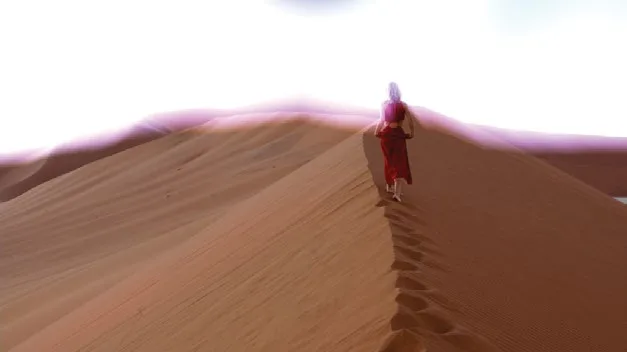
已应用 Light Rays 效果后的画面。Clip with Light Rays effect applied.
TIP · 提示如果因为 Effects 面板遮挡而看不到节点 03,可以在节点窗口中按住鼠标中键拖动,重新调整节点视图…
如果因为 Effects面板遮挡而看不到节点 03,可以在节点窗口中按住鼠标中键拖动,重新调整节点视图。If you cannot see node 03 because of the Effects tab, click and drag with the middle mouse button anywhere in the node window to reframe the node tree.
现在效果已经添加到节点上并应用到画面。此时 Effects 菜单会自动切换到 Settings 标签,方便你在该节点上调节效果参数。You will now see the effect added to the node and applied to the shot. The Effects menu switches to the Settings tab to allow you to control the effect on the node.
这个效果过亮,明显不是我们想要的效果。The effect is very bright and definitely not what we want.
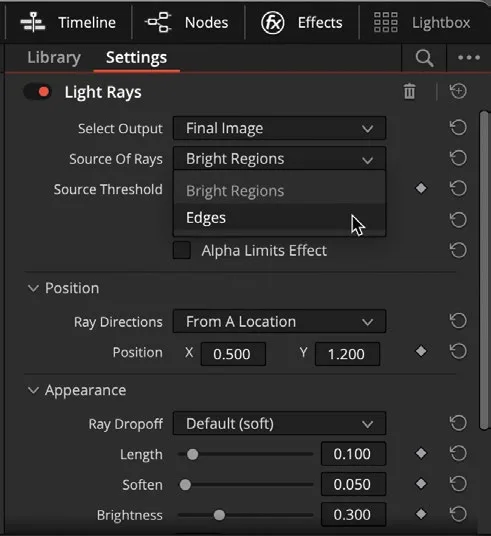
- 在 Source Of Rays 菜单中选择 Edges。In the Source Of Rays menu, choose Edges.
- 把 Source Threshold 向下拖到大约 0.073,让光线重新变得更加鲜明。Drag the Source Threshold down to around 0.073 so the light rays start to appear more vibrant again.
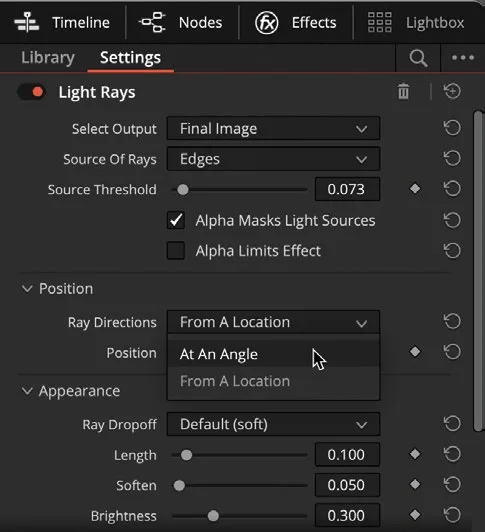
- 在 Position 菜单下,点击 Ray Directions,把选项改为 At An Angle。Under the Position menu, click Ray Directions and change the selection to At An Angle.
- 在 Appearance 菜单下,拖动 Length 到大约 0.165,或者直到你觉得画面里的光线长度合适为止。Under the Appearance menu, click and drag the Length to around 0.165 or until you feel the light rays are long enough in your image.
把光线稍微柔化一些,并把颜色改成橙色。Soften them slightly and change the color to orange.
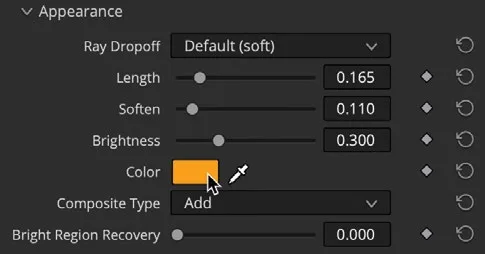
现在你应该得到如下图所示的效果:人物左侧的光线看起来不错,但右侧的光线仍然过强。You should now have an image that looks like the one below, in which the light rays to the left of our subject look good but to the right they still seem a bit too much.
你可以像之前用 qualifier(限定器)那样,把光线效果和 power window(功率窗口)配合使用,从而限制它的作用范围。You can limit the effect by using them in conjunction with power windows as you did with the qualifier.
点击中间窗口栏的 Windows按钮,选择 gradient(渐变)power window。Click the Windows button in the middle window and select the gradient power window.
TIP · 提示每个节点只能应用一个 Resolve FX。若要移除节点上的 Resolve FX,右键点击该节点,选择 Remove…
每个节点只能应用一个 Resolve FX。若要移除节点上的 Resolve FX,右键点击该节点,选择 Remove OFX Plug-In。You can apply one Resolve FX per node. To remove a Resolve FX from a node, right-click the node and choose Remove OFX Plug-In.

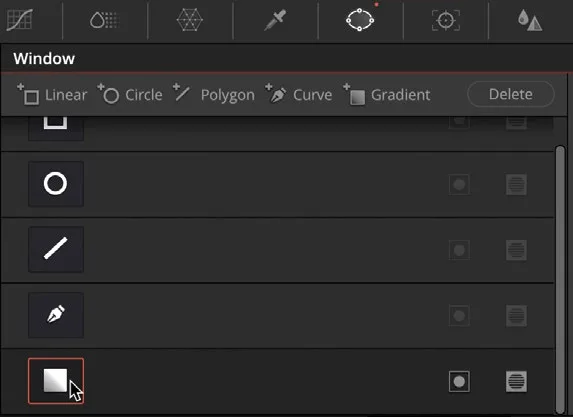
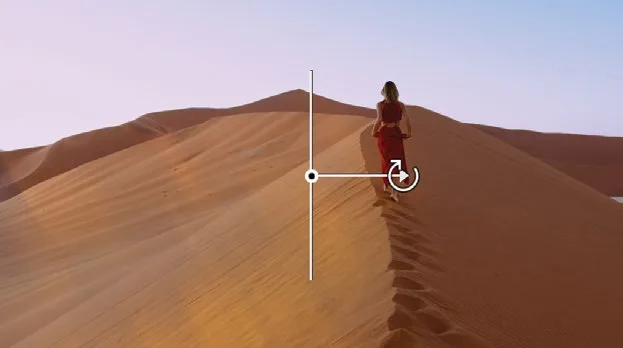
在 viewer 中,抓住渐变窗口底部的箭头,旋转窗口让箭头指向右侧,即可限制效果的覆盖范围。In the viewer, grab the arrowhead at the bottom of the gradient control and rotate the window around so the arrow points to the right, limiting the effect.
现在效果只作用于被窗口圈选的部分,看起来就像是画面左侧有阳光从窗外射进来。Now the effect is limited to just the windowed area and appears to be sunlight shining in for the light source on the left of the frame.
掌握 qualifier、window、Resolve FX 以及 tracker palette(追踪面板)这些工具的用法,能让你在 secondary color grading(二级调色)中对画面最终效果有相当大的掌控力。但只有把这些工具组合起来使用,才能真正释放它们的潜力。Understanding how to use tools such as the qualifiers, windows, effects, and the tracker palette enables you to perform secondary color grading with substantial control over your image’s final look. However, it is only when you combine these tools that their true potential is unlocked.
本卡术语Terms in this card
时间线Timeline 覆盖Overwrite 调色页Color page 窗口Power Window 限定器Qualifier 二级调色Secondary Correction 跟踪器Tracker 调色Grade Resolve FXResolve FX 静帧Still 模糊Blur Fusion 合成Fusion 节点Node
相关知识卡Related Cards
时间线Timeline 窗口Power Windows 限定器Qualifier 二级调色Secondary Color Correction 跟踪器Tracker Fusion 页面Fusion Page 节点编辑器Node Editor