TASK 1Task 1
标准化电平Normalize Levels
6 steps
- 确认时间线处于 Selection 模式,然后选中 Audio 1 轨道上的所有片段。Make sure the timeline is in Selection mode and select all the clips on the Audio 1 track.
NOTE · 注意如果时间线开启了 Linked Selection,音频片段会与其链接的视频片段一起被选中,这是正常的;标准化是纯音频处…
如果时间线开启了 Linked Selection,音频片段会与其链接的视频片段一起被选中,这是正常的;标准化是纯音频处理,不会影响视频片段。If Linked Selection is enabled for the timeline, both the audio clips and their linked video clips will be selected. This is fine; normalization is an audio- only process and does not affect video clips.
- 在 Audio 1 片段保持选中的状态下,右键单击任一选中片段,选择 Clip Operations > Normalize Audio Levels,打开
Normalize Audio Levels窗口。With the clips on Audio 1 selected, right-click any of the selected clips and choose Clip Operations > Normalize Audio Levels to open theNormalize Audio Levelswindow.
Normalization Mode 下拉菜单用于选择确定片段音量标准化方式的方法。The Normalization Mode dropdown menu allows you to choose the method used to determine how each clip’s volume level will be normalized.
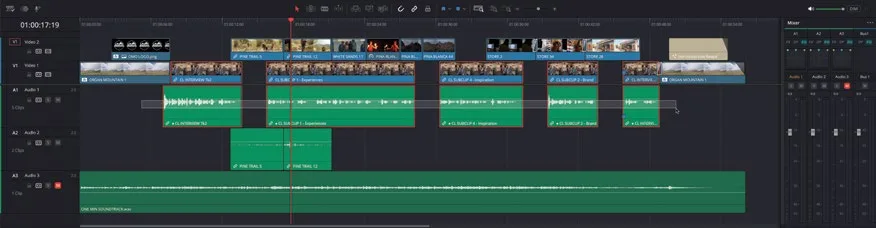
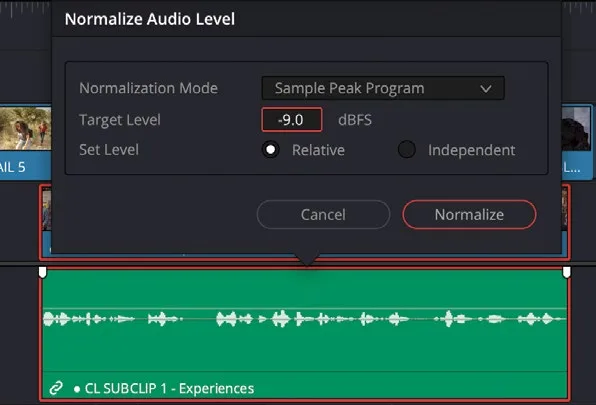
可选算法包括多种针对不同国际标准的响度标准化方案,可用于在不考虑各片段瞬态电平的前提下,让多个片段之间的主观整体响度趋于一致;也可以执行峰值标准化,支持 Sample Peak 和 True Peak 两种方式。无论选哪种,结果基本一致:先分析每个片段的音频电平,再调整到所设定的峰值和/或响度值。Options include a variety of loudness normalization algorithms specific to various international standards, which are useful for balancing the perceived overall loudness of several clips to one another, regardless of transient levels throughout each clip. You can also perform peak normalization, with options for both Sample Peak and True Peak. Whichever method you choose, the result is largely the same: each clip’s audio level is analyzed and then adjusted to the various peak and/or loudness levels specified.
NOTE · 注意关于不同响度标准的交付方法,将在第 10 课“交付与媒体管理”中详细介绍…
关于不同响度标准的交付方法,将在第 10 课“交付与媒体管理”中详细介绍。You will learn more about delivering your audio for various loudness standards in Lesson 10, “Delivery and Media Management.”
- 将 Normalization Mode 保持为 Sample Peak Level,Target Level 设为 -9 dBFS。Leave the Normalization Mode set to Sample Peak Level and the Target Level to -9 dBFS.
将目标值设为 -9 dBFS 后,标准化过程会把选中片段的峰值(最高)电平调整到该值,这是设置对白电平的良好起点。With the target set to -9 dBFS, this is where the normalization process will set the peak (highest) levels of the selected clips and is a good starting point for setting dialogue levels.
- 将 Set Level 选项改为 Independent。Change the Set Level option to Independent.
Set Level 设为 Relative 时,所有选中片段会被视为一个整体,以其中最高的峰值和/或响度作为基准进行统一调整,所有片段音量增减量相同。Set Level 设为 Independent 时,则按每个片段各自的峰值和/或响度独立调整,因此各片段的音量增减量不同,但能让各片段的峰值和/或响度电平更趋一致。Relative 适合对录音电平一致的片段(例如受控环境录制的对白)进行标准化,When Set Level is set to Relative, all selected clips are treated as if they’re one clip so that the highest peak and/or loudness level of all the selected clips is used to define the adjustment, and the volume of all selected clips is adjusted by the same amount. When Set Level is set to Independent, the peak and/or loudness levels of each clip are used to define the adjustment to that specific clip. This is likely to result in different volume adjustments to each clip that make the peak and/or loudness levels of each audio clip better match one another. Relative is useful if you’re normalizing a series of clips that have a consistent recorded level, such as a controlled dialogue recording,
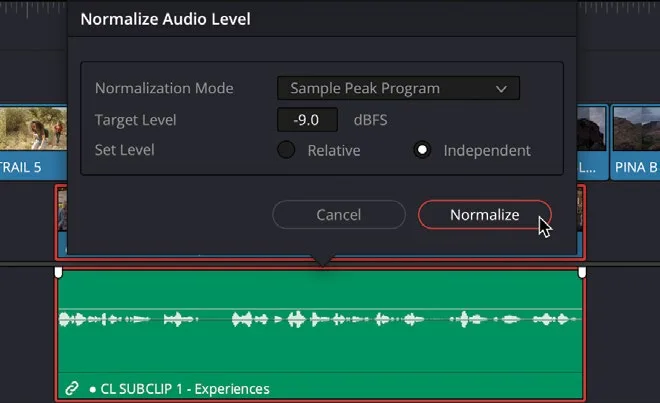
而 Independent 更适合电平各不相同的片段(例如录音条件不易控制的采访或外景音频),便于将它们平衡到一致水平。whereas Independent is much more useful if you’re trying to balance a series of clips that have different recorded levels (subtle or not), such as interviews or other location audio, which might have been recorded under less-controlled conditions.
- 点击 Normalize(归一化)。Click Normalize.
所选片段的音量会被各自调整,使每个片段的峰值在 mixer(混音器)的音频电平表上达到 -9 dBFS 的目标值。The audio levels for the selected clips are each adjusted so that the peak level for each clip reaches the target level of -9 dBFS on the audio meters in the mixer.
- 验证方法:再次播放时间线,观察 Audio 1 上各片段的峰值电平。To verify, play through the timeline again, looking for the peak levels of the clips on Audio 1.
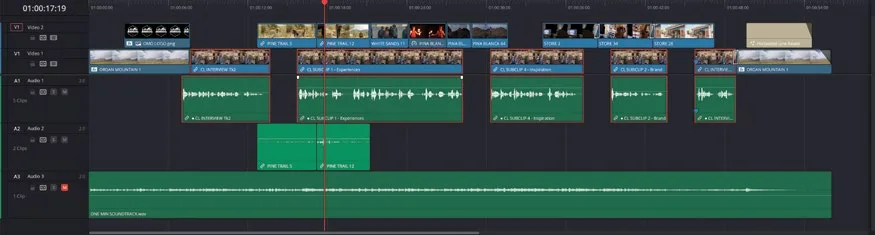
你会看到每个片段的峰值都稳定在 -9 dBFS。但你会发现(也听到)这并不代表各片段的音量完全一致,因为原始录音的音量本身就不统一。比如第一段和第五段采访虽然都以 -9 dBFS 开头,但由于录音本身的特性,其余部分的音量比其它片段低约 6 dB。You should now see that each clip peaks at the consistent level of -9 dBFS. However, as you’ll no doubt see (and hear), that does not mean the levels are entirely consistent with each other, because it depends on the consistency with which the original audio levels were recorded! For example, while the first and fifth interview clips each start with a peak of -9 dBFS, the rest of the audio levels for these clips is around 6 dB lower than each of the other clips due to the nature of the recorded audio.
为音频片段添加关键帧 归一化并不能真正为每个片段设定正确的电平。更准确地说,它只是一个起点,便于后续微调。设好初始峰值后,接下来要做的是把片段中其余部分的音量也提到同一水平,让每段对白以一致的电平播放,观众才能更专注地听清内容。Adding Keyframes to Audio Clips Normalizing audio levels doesn’t really set the correct level for each of your clips. Instead, think of it as a useful starting point from which you can make further adjustments. Having set the initial peak level, all you need to do now is bring the rest of the audio in the clips up to the same level so each dialogue clip plays at a consistent level, making it easier for the audience to concentrate on what’s being said.
实现这一目标有多种方法,其中最常用的一种是使用音频关键帧。There are several ways you can achieve this, but one of the most common methods is using audio keyframes.
本卡术语Terms in this card
时间线Timeline 响度Loudness 媒体管理Media Management 关键帧Keyframe 调音台Mixer 标准化音量Normalize 窗口Power Window 音频关键帧Audio Keyframes