媒体管理Media Management
9 steps
简介Overview
除了导出时间线和项目文件,另一项重要的“整理”工作是管理源媒体文件——也就是项目制作过程中导入的所有视频、音频和图形文件。项目结束时,这些文件往往数量众多、分散在系统各处。导出 .drt 或 .drp 文件不会处理这些媒体,它们需要单独、仔细地管理。Media Management Beyond exporting timelines and project files, another important “housekeeping” task you’ll need to undertake is managing your source media files. These are all the individual video, audio, and graphics files that you have imported while you have been working on your project. Often, by the end of a project, these files are numerous and can be spread across your system. Exporting a .drt or .drp file will not do anything with these files. They will need to be managed separately and carefully.
管理媒体文件有两种基本方式:consolidation(合并)和 trimming(裁剪)。You can take two basic approaches to managing your media files: consolidation and trimming.
当文件分散在系统各处时,Consolidation 很有用,它会把所有文件的副本集中到一个位置,便于归档(见下文)。Consolidation is useful when you have many files spread across your system, as it will bring copies of all these files together in a single location for easier archiving (see below).
而 Trimming 只复制项目实际用到的媒体片段,不包含未使用的部分,生成的媒体存储体积通常更小。Trimming, on the other hand, copies just the portion of the media files you are using throughout your project. This can be useful since it does not include media that’s not being used. As a result, the new media is often much smaller in storage size.
需要注意的是,这两种操作都会创建媒体文件的副本,原素材文件不会受到任何影响。It’s important to note that both of these processes create copies of your media files. At no point are your original clips affected by either of these operations.
要执行 Consolidate 或 Trim,需要使用内置的 Media Management面板。To consolidate or trim the media files used in your project, you’ll need to use the built-in Media Management panel.
- 选择
File > Media Management,打开Media Management面板。Choose File > Media Management to open theMedia Managementpanel. - 在
Media Management面板中,确保选择 Entire Project 和 Copy。In the Media Management panel, ensure that Entire Project and Copy are selected.
Media Management(媒体管理)面板可以管理整个项目、单个时间线或片段的媒体,并支持复制或转码(transcode)媒体文件。The Media Management panel allows you to manage your media across the whole project, specific timelines, or clips, and allows you to copy or transcode your media files.
按当前设置,项目内所有媒体都会被复制到指定位置。Copy(复制)功能会在目标位置生成一套重复的媒体文件,同时保留原始文件,这样你可以在确认复制无误后再删除原件。面板底部的指示器会显示当前使用媒体的容量,以及按当前设置将要复制的媒体容量。由于媒体管理只作用于项目实际用到的文件,而本项目中存在完全未被使用的素材,因此 New Size(新容量)会略小于 Current Size(当前容量)。With the current settings, all the media within the project will be copied to your chosen location. The Copy function will create a duplicate set of media files in the destination location but leave the original files in place. This allows you to ensure that duplicates are copied safely and without errors before deleting the originals. Indicators at the bottom of the Media Management panel indicate the size of the currently used media and the size of the media that will be copied using the current settings. Currently, the media management will only affect the files used for your project. Since this project contains files that are completely unused, the copied media would be slightly smaller in total file size than the current media, as detailed by the New Size and Current Size values.
NOTE · 注意下方步骤仅涉及复制源媒体文件,不涉及转码。转码是将源媒体转换为其他格式的操作,常用于本指南范围之外的工作流程,更多信息请…
下方步骤仅涉及复制源媒体文件,不涉及转码。转码是将源媒体转换为其他格式的操作,常用于本指南范围之外的工作流程,更多信息请参阅《DaVinci Resolve Reference Manual》。The steps below only address copying the source media files, not transcoding. Transcoding is a way of converting the source media files into other formats and is used in workflows beyond the scope of this guide. See The DaVinci Resolve Reference Manual for more information.
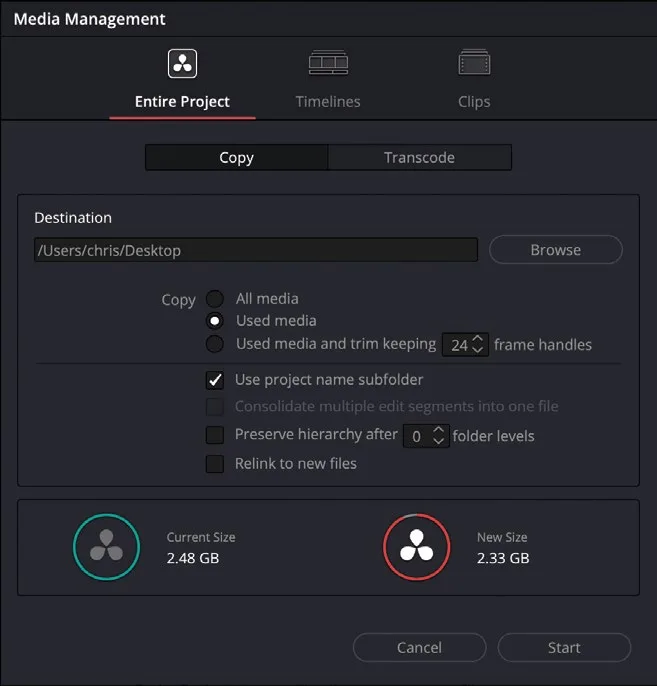
- 在 Destination(目标)字段中点击 Browse(浏览),定位到 R20 Beginners Guide / OUTPUT / MEDIA MANAGEMENT,点击 Open(打开)。In the Destination field, click Browse, navigate to R20 Beginners Guide / OUTPUT / MEDIA MANAGEMENT, and click Open.
- 点击 Timelines(时间线)标签。Click the Timelines tab.
该区域用于在项目内选择单个时间线。This part of the Media Management panel allows you to select individual timelines within your project.
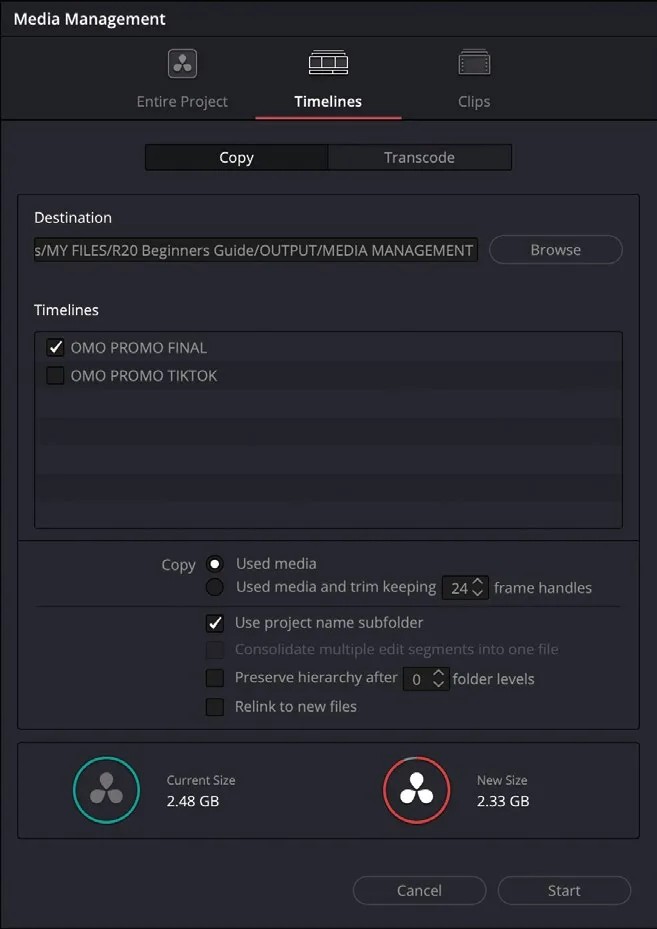
- 将 OMO PROMO TIKTOK 时间线添加到当前选中的 OMO PROMO FINAL 时间线中,这两条就是要进行媒体管理的时间线。Add the OMO PROMO TIKTOK timeline to the currently selected OMO PROMO FINAL timeline. These are the timelines for which you will manage the media.
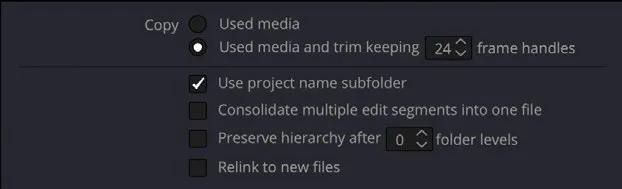
- 选择 "Used media and trim keeping 24 frame handles"(已用媒体 + 修剪,保留 24 帧 handle)。Choose “Used media and trim keeping 24 frame handles.”
注意,做出这一选择后,New Size 指示器的数值会发生变化。Note that when you make this last selection, the New Size indicator changes.
这表明只复制所选时间线中实际使用的素材,并加上两端少量帧(handle),可以大幅减少需要复制的素材量。This reflects that, by choosing just the media you’re using in the selected timelines plus the few frames on either side (the handles), you’re drastically reducing the amount of footage needed to be copied.
NOTE · 注意添加 24 帧 handle 会在每个被复制媒体文件的起点和终点各增加 1 秒长度,为将来对修剪后的项目做小范围调整留出…
添加 24 帧 handle 会在每个被复制媒体文件的起点和终点各增加 1 秒长度,为将来对修剪后的项目做小范围调整留出余地。Adding 24 frame handles adds 1 second to the start and end of each media file being copied. This will allow you “wiggle room” to make minor changes to the trimmed project in the future.
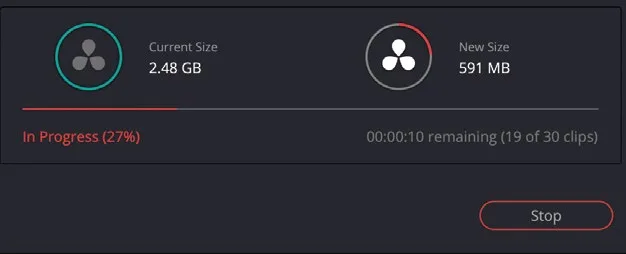
- 点击 Start 开始媒体管理流程。Click Start to begin the media management process.
完成后,Media Management面板自动关闭。Once completed, the Media Management panel closes.
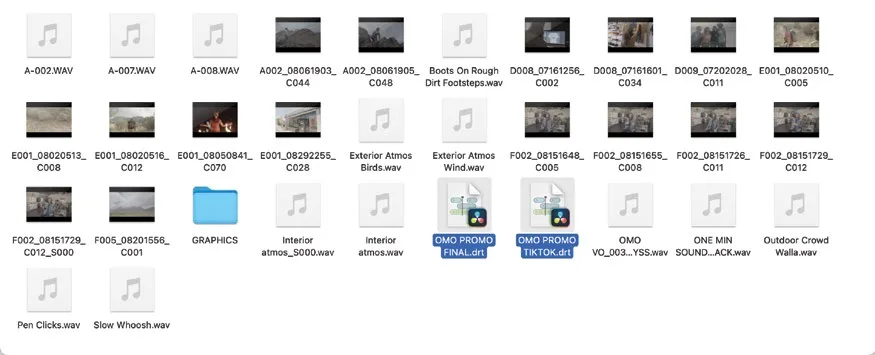
- 打开新的 Finder(macOS)或 File Explorer(Windows)窗口,定位到 R20 Beginners Guide / OUTPUT / MEDIA MANAGEMENT / OMO PROMO DELIVER,查看该文件夹的内容。Open a new Finder (macOS) or File Explorer (Windows) window and navigate to R20 Beginners Guide / OUTPUT / MEDIA MANAGEMENT / OMO PROMO DELIVER to view the contents of the folder.
这个新文件夹包含从原始素材复制过来的全部 trimmed 媒体文件,仅限于具体时间线用到的片段,原始素材未受影响。文件夹中有两个 .drt 文件。This new folder contains all the trimmed media files that have been copied from the original media. Of course, this is just the footage that was used in the specific timelines. The original media hasn’t been touched. However, you will find two .drt files among these files.
- 回到 DaVinci Resolve,选择
File > Project Manager,或按 Shift-1,打开 Project Manager。Return to DaVinci Resolve and choose File > Project Manager, or press Shift-1, to open the Project Manager.
点击 New Project按钮,将新项目命名为 OMO PROMO MM,然后点击 Create。Click the New Project button, name the new project OMO PROMO MM, and click Create.
在 Edit page 中,选择 File > Import > Timeline。In the edit page, choose File > Import > Timeline.
定位到 R20 Beginners Guide / OUTPUT / MEDIA MANAGEMENT / OMO PROMO DELIVER,选中 OMO PROMO FINAL.drt 和 OMO PROMO TIKTOK.drt,点击 Import。Navigate to R20 Beginners Guide / OUTPUT / MEDIA MANAGEMENT / OMO PROMO DELIVER, select the OMO PROMO FINAL.drt and OMO PROMO TIKTOK.drt files, and click Import.
如果弹出提示要求更改项目帧率,点击 Change。Click Change if asked to change the project frame rate.
OMO PROMO FINAL 和 OMO PROMO TIKTOK 两条时间线随即导入新项目,包含全部对应的视频、音频和 Graphics 片段、Title、Marker 等时间线元素。The OMO PROMO FINAL and OMO PROMO TIKTOK timelines are imported into your new project, including all the appropriate video, audio, and graphics clips, titles, markers, and other timeline elements.
本卡术语Terms in this card
项目文件.drp 项目管理器Project Manager 时间线Timeline 归档Archive 导出Export 帧率Frame Rate 媒体管理Media Management 编辑页Edit page 标记Marker 修剪Trim 窗口Power Window 合并Merge